Cherry bowl explosion:
A lady I work with had a tree that died and wanted to know if I’d like some of the wood. When she said it was a cherry tree, at least 24″ thick, I was all in. Since she gave me the wood, I decided to make her a bowl. Seemed like a fair trade. I had finished the outside and was well into hollowing out the middle when the tool started to make a weird chatter sound. I shut the lathe off as fast as I could. Good thing, because as it was spinning down, the entire bowl split in half!

Turns out, there was a rotten spot right at the base and as the wood was removed, it became less and less stable until it couldn’t take the strain and split.
My initial thought was to throw it in the burn pile, but then My daughter said, “Hey, dad, just Frank it”. Frank is Frank Howarth, a guy on YouTube who makes amazing things! Her and I had watched this video of Frank encountered a similar problem. I figured I had nothing to lose, so I’d try his method for dealing with cracked bowls.
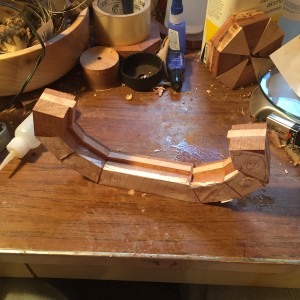
Step #1: cut out the cracked part: This turned out to be harder than you might think. The whole key is that the lines that get cut into the bowl have to be absolutely parallel. If not, it won’t be round when it’s all glued back together. With some creative sanding, I think I got pretty close. Status = Done

Step #2: make a new piece to take the place of the sliver that was removed: So just as it was important to cut parallel lines, turns out it is equally important to make the new piece of wood exactly the same width as the chunk removed. My first attempt was about a half inch too fat and pushed the bowl so obviously out of round all I could do is chuckle. After a quick trip to the bandsaw and a sander, the final piece fit pretty well. Status = Done.
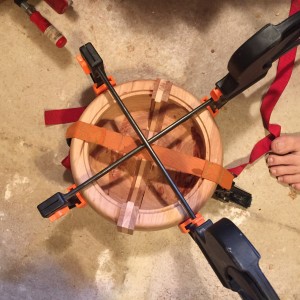
Step #3: glue it back together and hope it all lines up. OK, so this is nearly impossible to do! linear clamps don’t exactly lend themselves to circular objects, so the clamps kept slipping off. When the bowl broke, it also split off the tenon for the chuck that left little nubs on the bottom of the bowl that kept allowing the insert to slip down. To get it to work, I had to take the bowl halves back to the sander and remove the remains of the old tenon so there would be a flat spot for the bowl to sit on. Then I remembered I have strap clamps!!! The guy who invented this little beauties deserves ever dollar he’s ever made! Running the strap around the bowl cinched it in to the point where most of the glue joints looked pretty good. I added a couple of linear clamps across the top, just for a little more force. Hopefully, this will work. Status = Done.
Step #4: Finish turning the bowl and hope it all stays together! Life kinda got in the way, so my plan of waiting overnight had to be change to waiting a week or so. Since the tenon on the bottom had been sanded off, there really wan’t anything to hold on to from the bottom. Also, the strip that I made was taller than the rim of the bowl, so mounting it from the top wasn’t an option, either. After yet another trip to the bandsaw and sander, I ended up with a top that was flat enough to work with. Mounted the bowl from the top with jumbo jaws, put an shallow round circle in the bottom to expand a chuck into, and turned it back around so it would mount to the lathe. Surprisingly, the final turning wasn’t that hard. As long as I didn’t try to take off all the wood at once, I was good. The final step in turning was to turn it back around on the lathe and make the circle I used to for the chuck, into a shallow, gradual indentation in the bottom. Looks MUCH better, at least to me. What I ended up with looks pretty good, at least from across the room. There are some worm holes on one side, which didn’t come through in this picture, and there were two additional cracks that came out as I finished the turning, running parallel to the stripe, but they don’t seem to go all the way through the bowl. I left the worm holes, filled the cracks with CA glue, then after sanding, added a healthy dose of lacquer based sanding sealer to the whole thing to add a little extra support. I left a place on the top where I can create a lid for this one, which should help to hide the cracks and the “punky” wood that didn’t sand so well on the inside of the bowl. The lid may have to be a different project… Status = Done!

Step #5: Add finish and buff. Status = done

