Category Archives: Uncategorized

Jon’s “cracked ash” bowl

I work with a guy named Jon and have always suspected he’s one of the few people in corporate America who are genuinely nice, not just someone who pretends to be nice.  He’s always upbeat, cheerful, helpful, collaborative, inclusive, well… you get the picture.  It wasn’t until he told me the real reason why he came into work with a cleanly shaved head that my suspicions were confirmed.  He’s actually a good guy!

When I brought in a new turning to swap out my candy dish, he was quick to compliment my newest efforts, but slipped in a “my wife would really like a bowl like that” compliment, just for good measure.  Another Manager overheard his comment and quickly scolded him that the deal was to get a bowl, you HAVE to bring in some wood.  Jon said, “ok, I’ll work on that”.

A month or so later, I met him in the bowels of the parking deck so he could give me some chunks of ash that he had rescued from a firewood pile.  The whole deal must have looked like a drug deal to the guards who monitor the cameras.  When he opened his trunk, he flashed me a look that said he hoped the offering was “good enough” to get a bowl.  After a quick look at the wood, I immediately thought no.  Nope!  Hells no!  I’d have to turn something from wood I already had, then lie to him and hope he’d believe what I returned to him was from the same piece of wood.  One had cracked, split and checked so much and so deeply, it couldn’t be used for anything but firewood.  The other looked like it might have some potential, if the initial chainsaw work could be done with precision.

I was wrong about the second one.  No amount of chainsaw dexterity could have compensated for the deep, deep cracks on the inside of the wood.  As I was about to chainsaw it into little, tiny chunks and go find an ash blank I had already roughed out, I remembered that hopeful look on his face and the faint light shining on his still shaven head.  I shut off the saw and said quietly “ok, I can so something with this”.

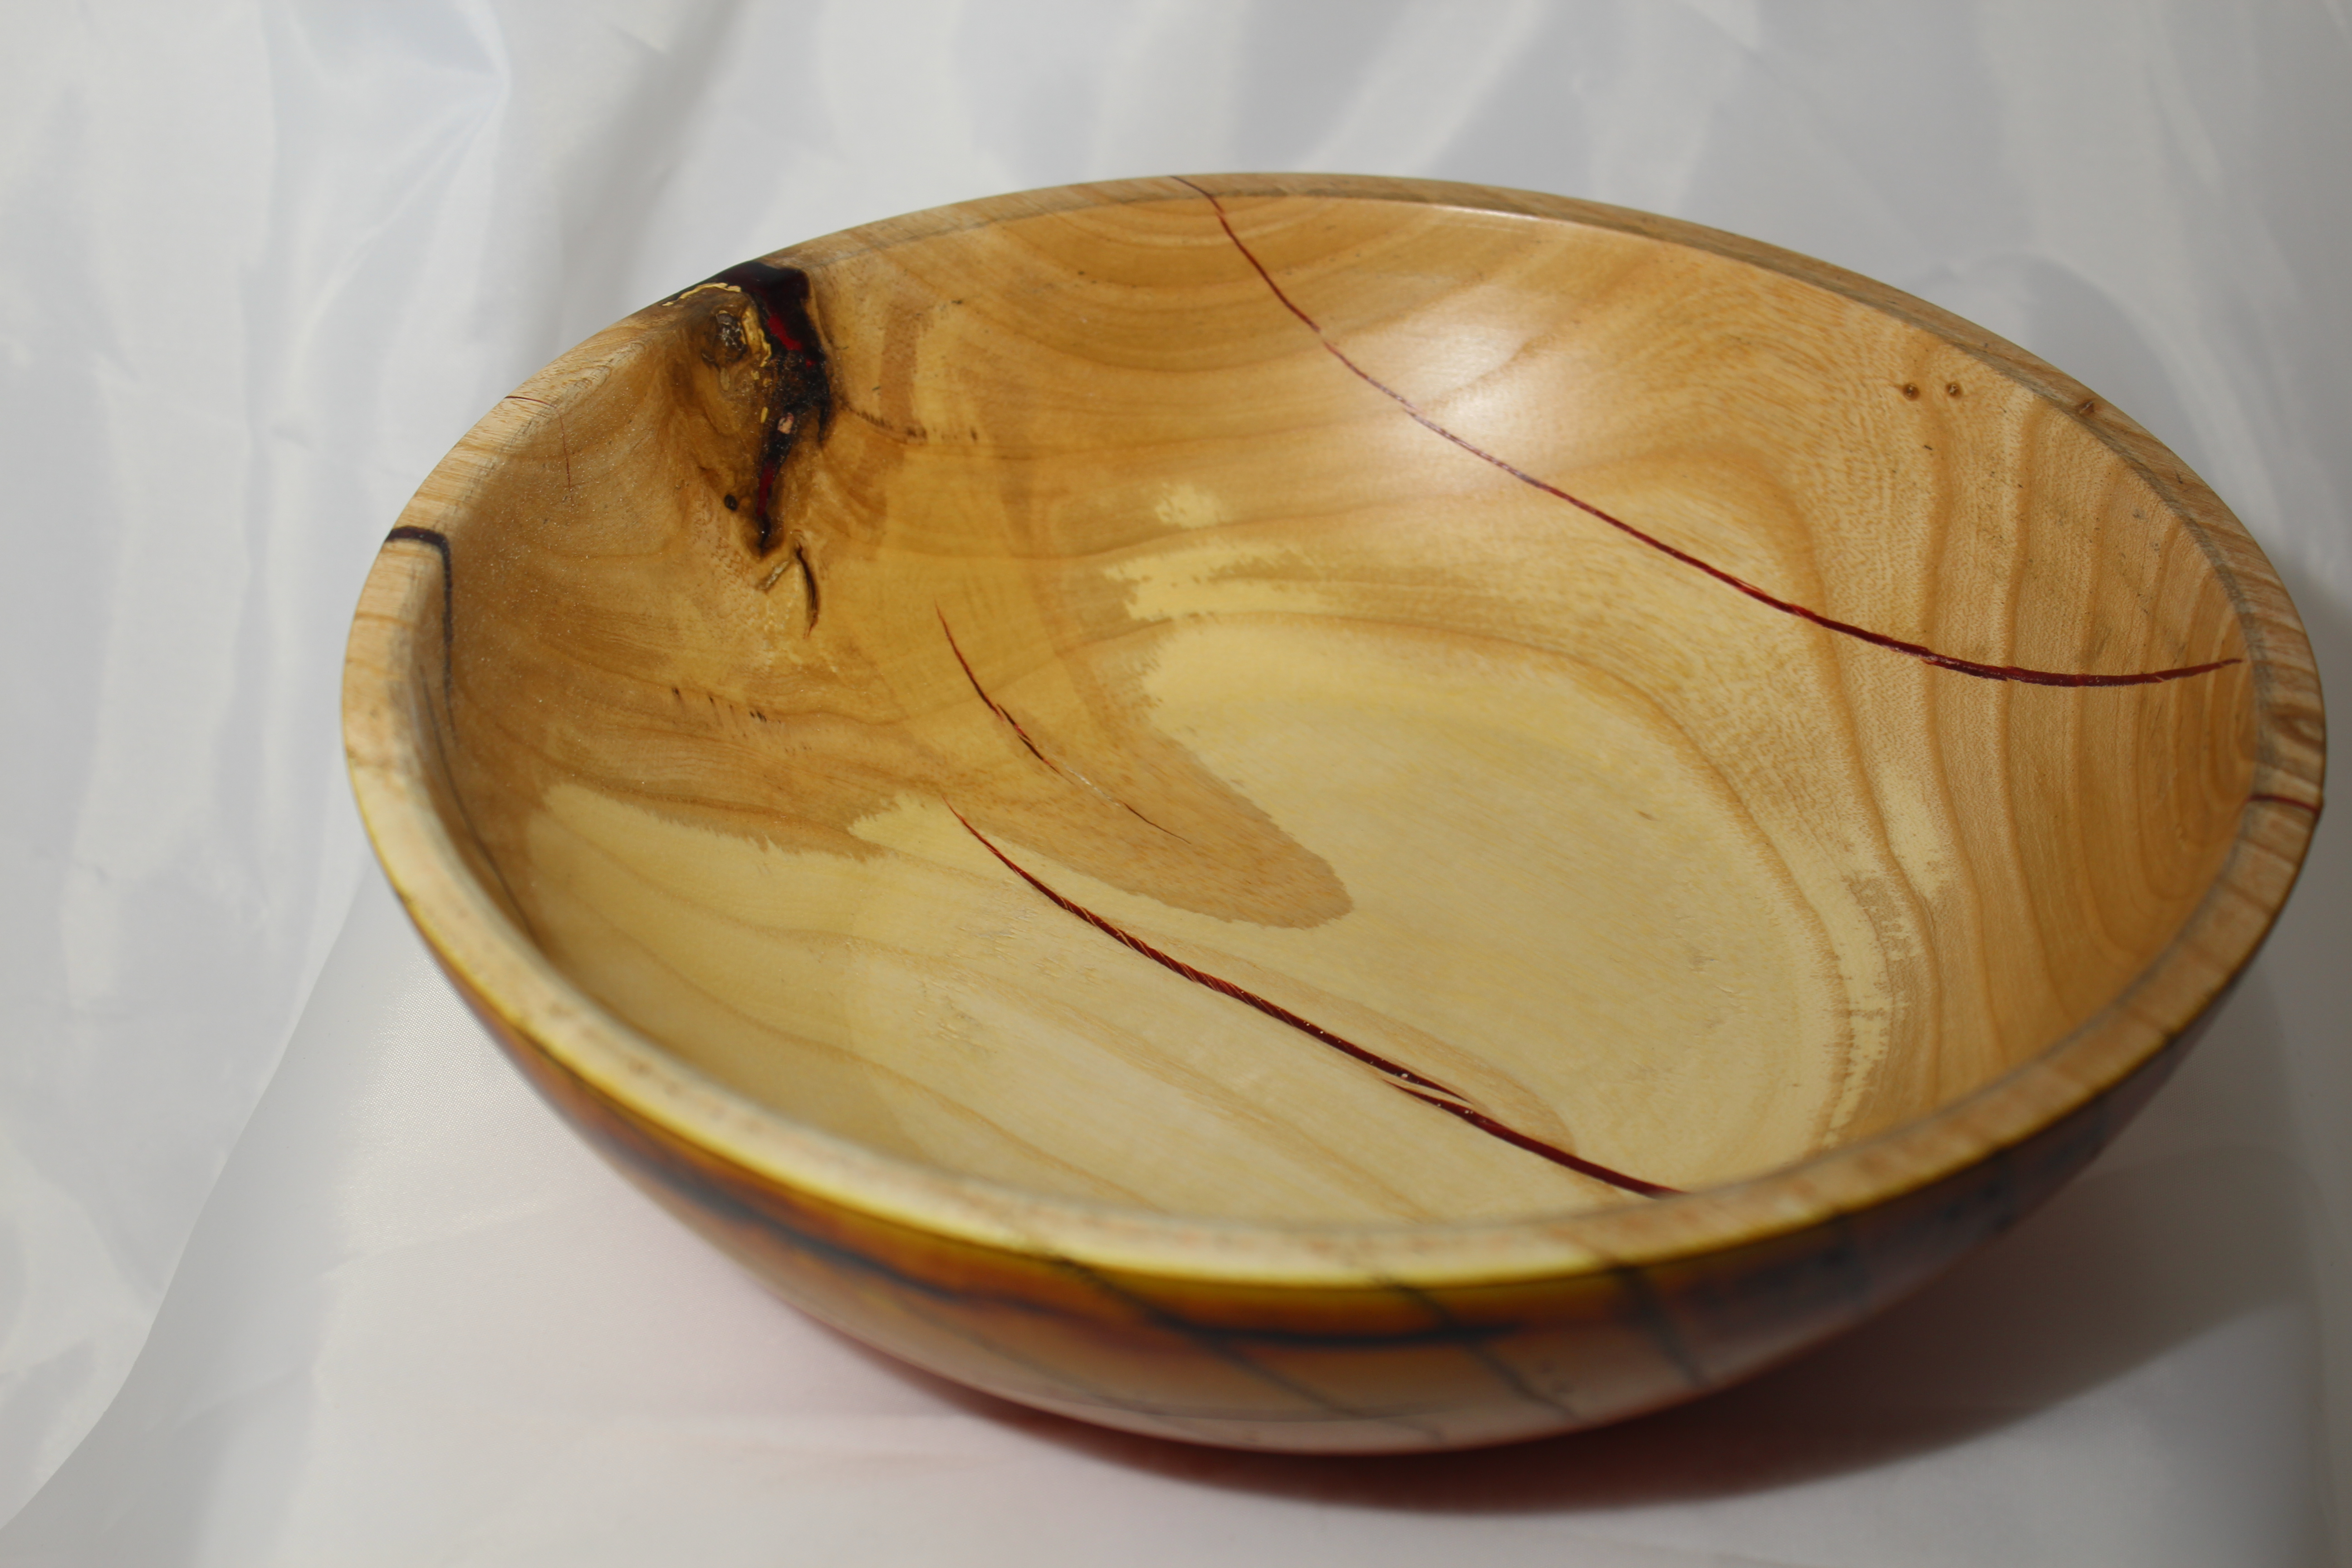
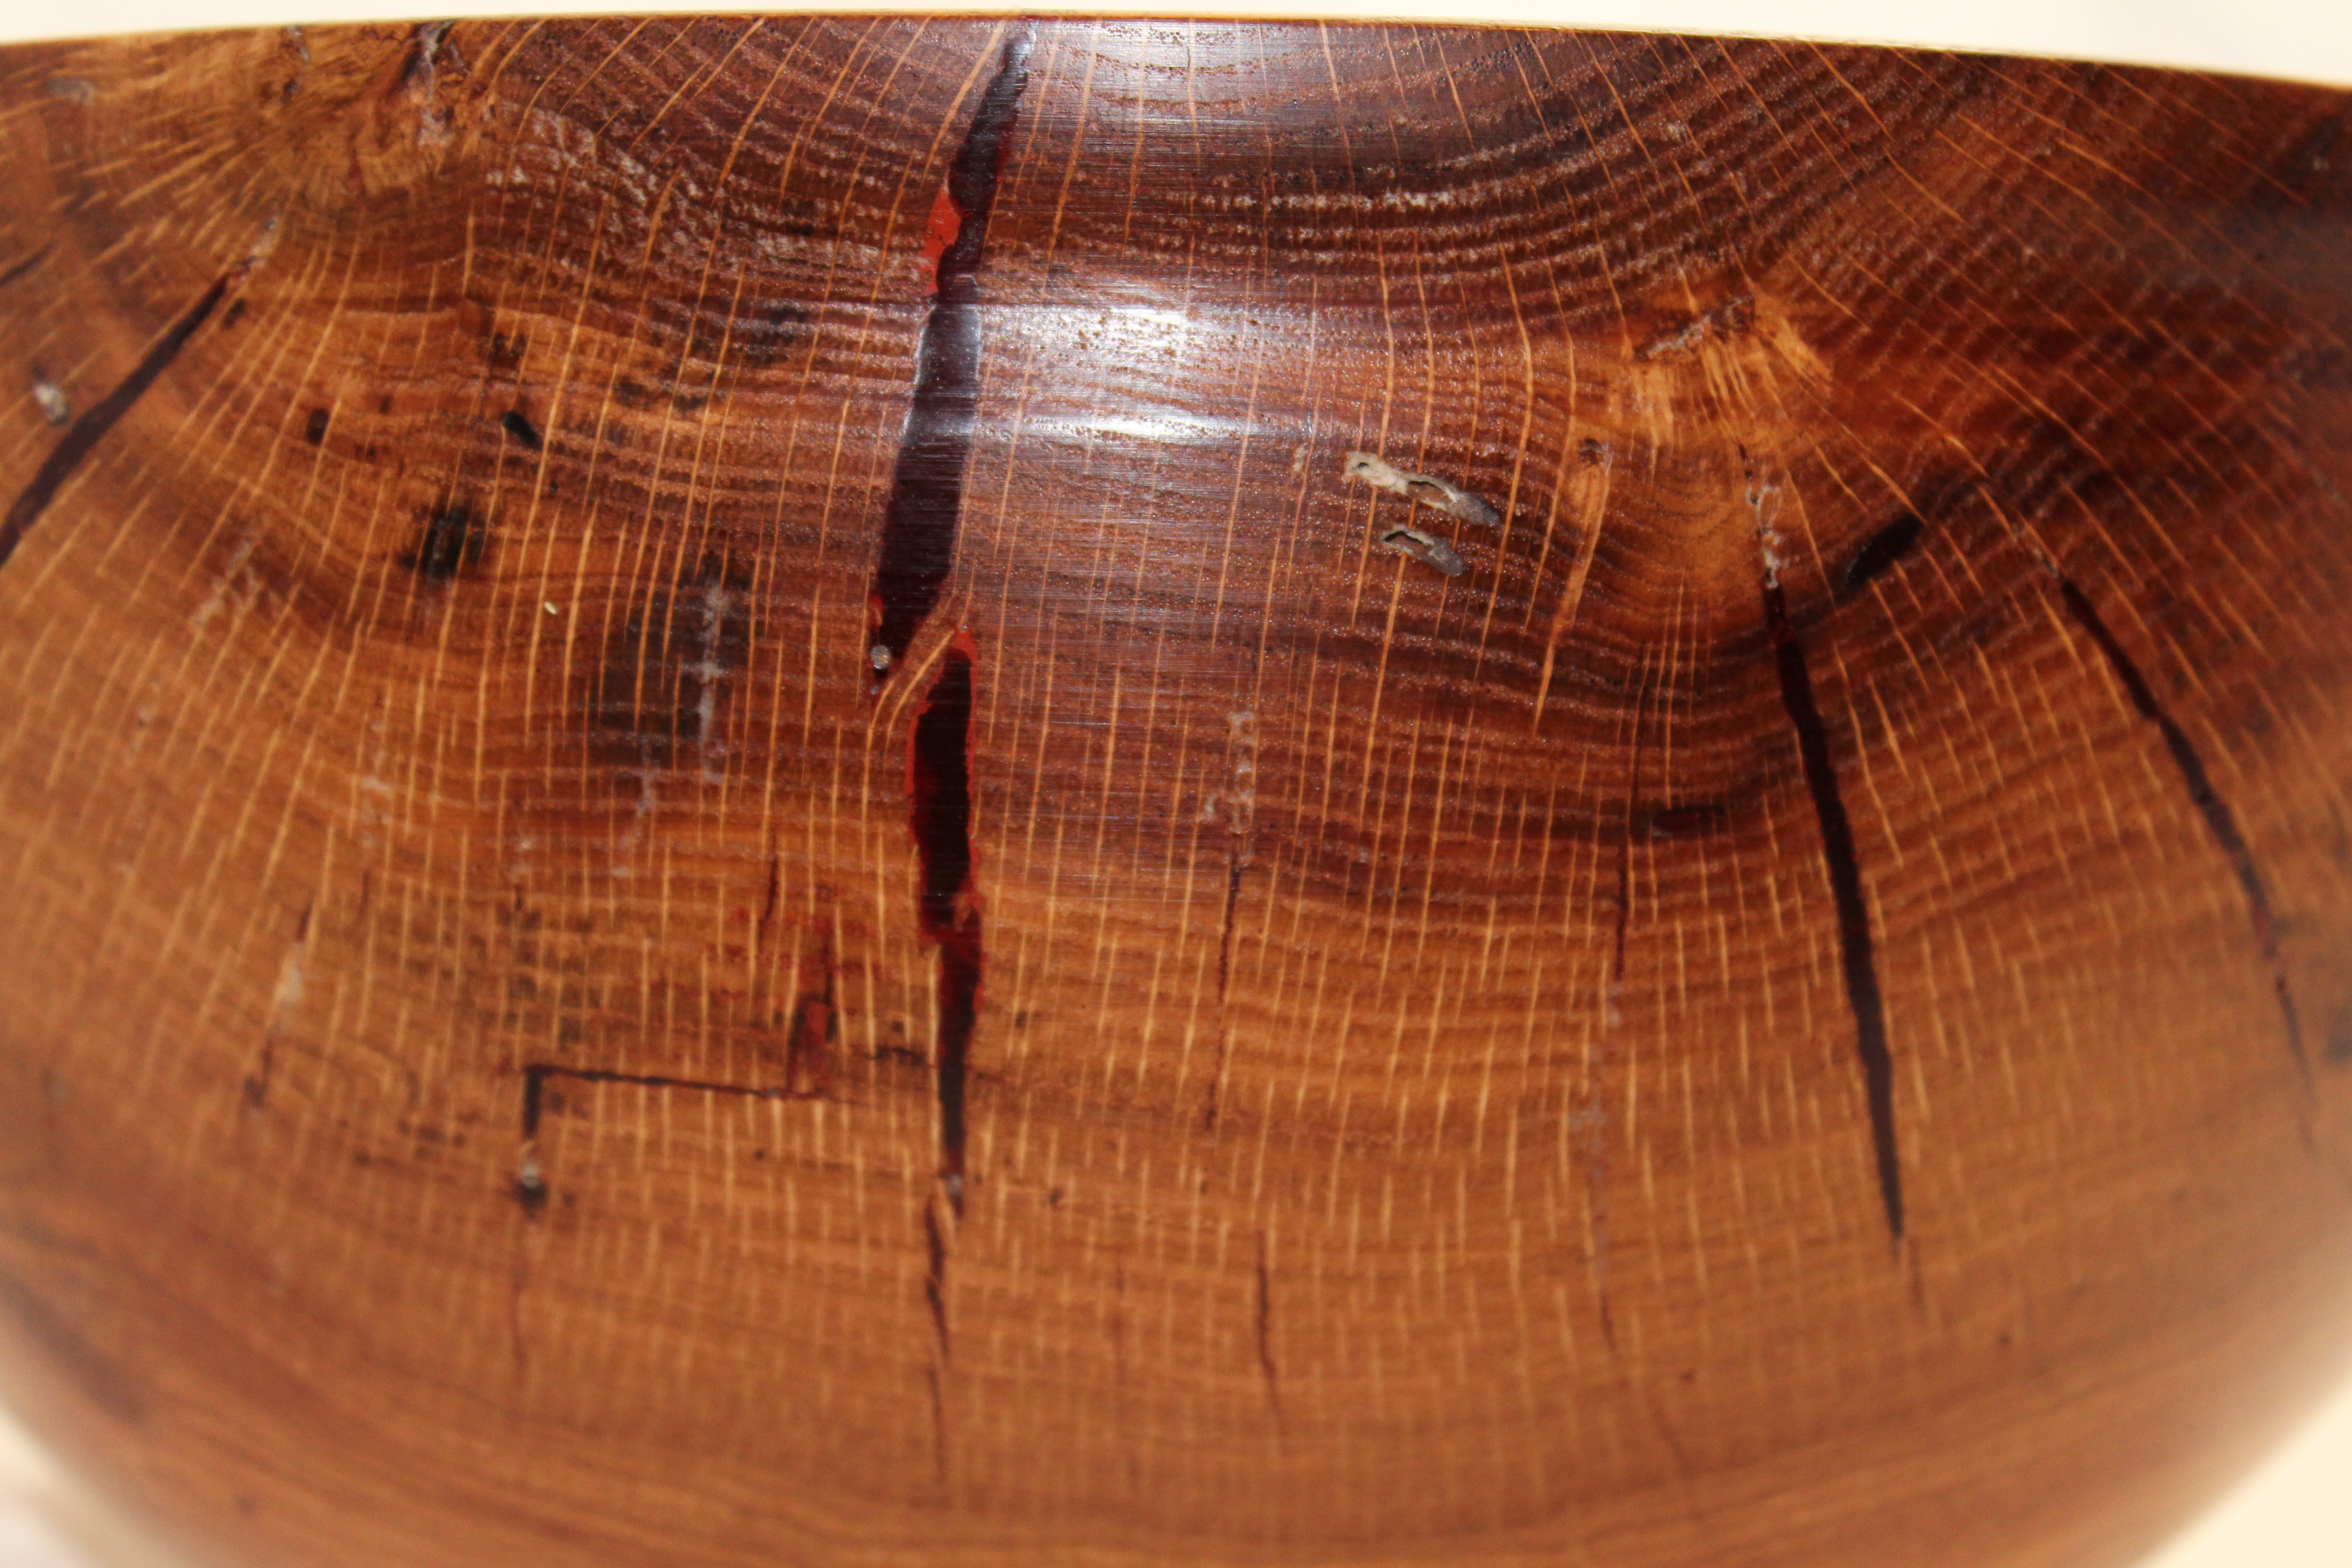
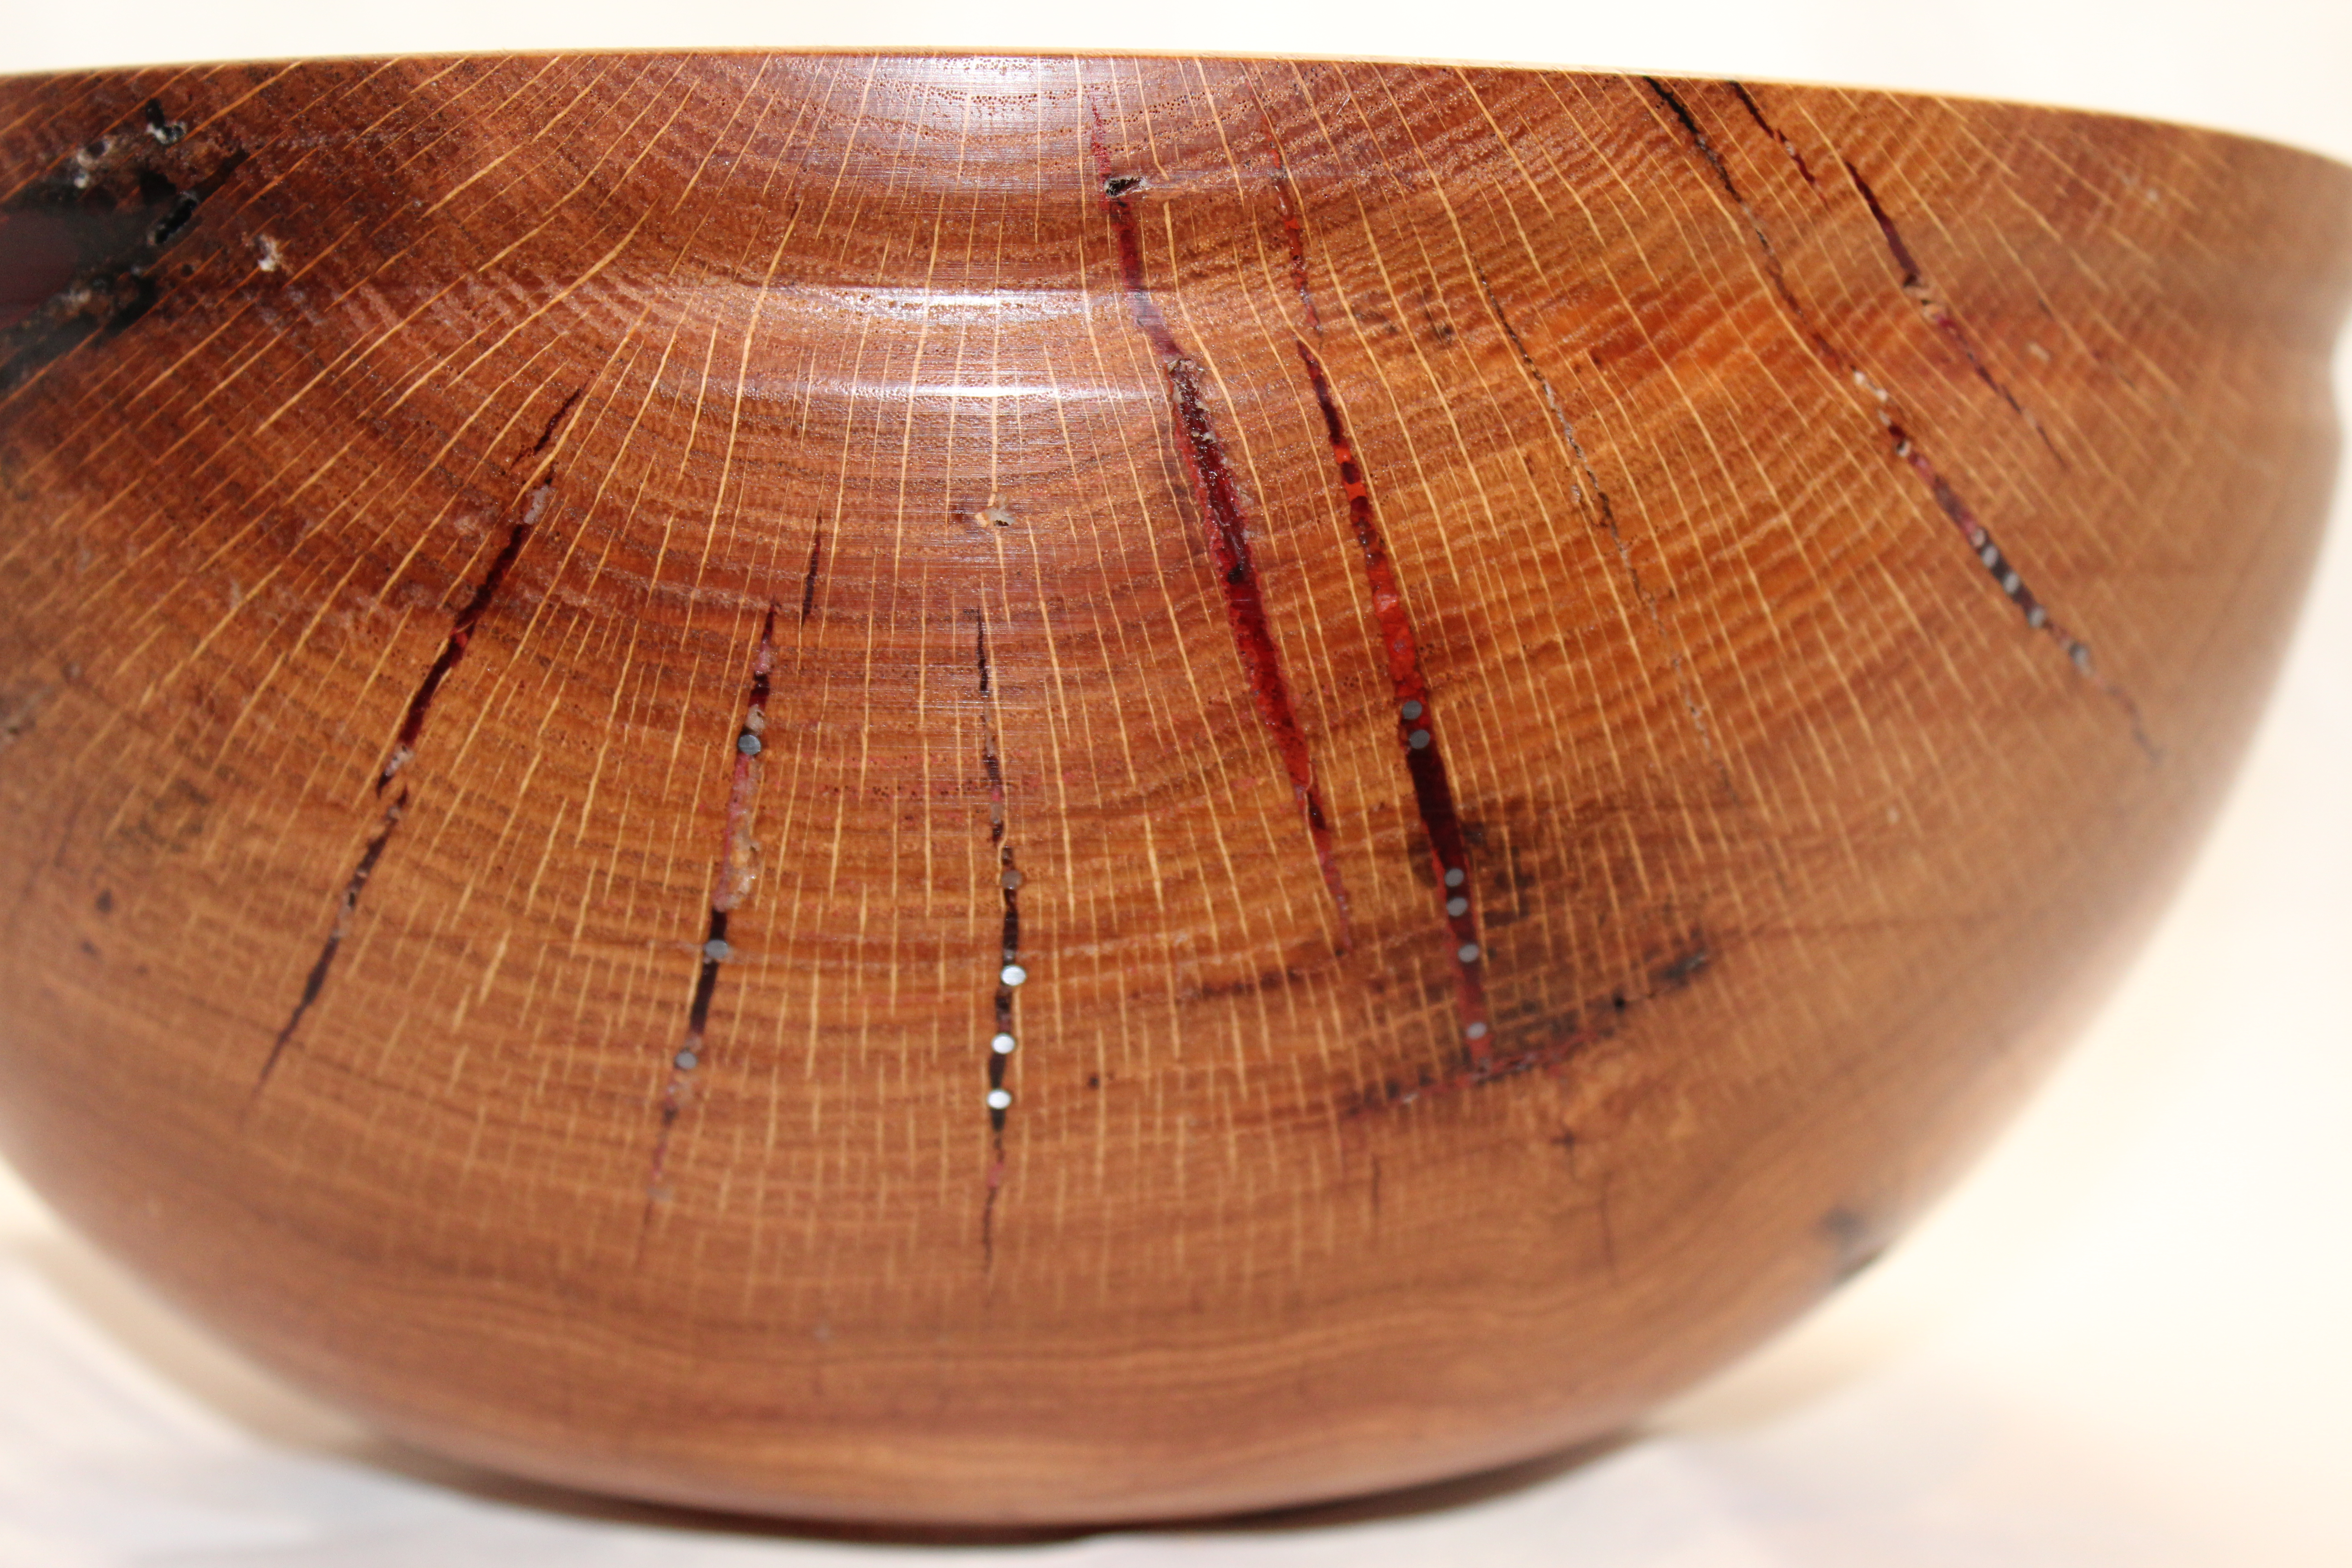
The outside shape of the bowl was turned, but I stopped when I thought I was starting to risk the integrity of the wood failing.  The cracks were filled with clear epoxy casting resin, dyed red, just to add some color to an otherwise bland wood.  To pour a liquid onto a round surface isn’t possible, so I had to build a series of “construction dams” out of clay to keep the resin from running out either side of the crack.  Each crack that was filled took a minimum of 24 hours to create the dam, pour the resin, then wait for it to cure.  Some cracks took multiple pours to complete.  Since only one crack could be filled at a time (the crack had to be horizontal to the surface) it took weeks just to get the cracks filled.

Once I was sure the resin was going to hold everything together, I continued turning.  After the final turn was done, I was left with a plain looking bowl that had these see through red streaks through it.  That was good, but ol’ baldy needed better.  After some airbrushing with colored dye I added some black spray paint, but it looked terrible.  When I went to remove the black paint, something happened and it wiped off some of the paint, but “melted” some as well.  Didn’t expect that kind of “happy accident”.  Overall, I’m definitely satisfied with the addition of the colors.  Below is the final project.  I’m very happy with the look of the bowl, but happier with the smile Jon gave when it was given to him.  Hope his wife likes it!

From the top, the resin filled cracks can be seen and if light shines through the resin, it glows.  Without the resin, this bowl would have split into at least 4 pieces on the lathe, taking out fingers, ceilings or lights.  
The way the black paint kinda came off and kinda “melted” back onto the bowl makes it look like there’s a lightening bolt going around the rim. Sure wish I knew how that happened so I could do it again on another project!


February wigstand

I haven’t spent much time in the shop this month.  A combination of an impending career change, an ex-wife who just won’t go away, and some other “life decisions” has pretty much sapped any creative energy I’ve had.  When I did manage to get in the shop, I discovered that my lathe was broken and had to wait for parts to be shipped in.  Yeah, they only came from Utah, but it still took 6 days for the mailman to deliver them.

For this wig stand, I had completed the turning before the lathe broke.  Between waiting for layers of paint to dry, then waiting for the layers of finish to dry, it took over a week.  Not a whole lot of “different” to this one from past stands, except for the addition of the pegs to allow the user to hang a necklace, if they want.  Hope they like it…

With the iridescent paint and four coats of wipe on Poly finish, it’s hard to get a picture that shows the color without having flash marks.

Barbara’s bowl

Over the last five years or so, I’ve brought a bowl into work to put on my desk to hold candy.  When I get tired of looking at it, or if I make another bowl that looks better, I’ll bring a the new one in and swap it out for the old one.  I’ve had a secretary for the last three years or so named Barbara, and each time I’ve swapped out a bowl, I’ve had to walk past Barbara’s desk.  Each time she comments on the bowl, offers encouragement or praise, and tells me how good the latest project is.  (She could be lying the biggest lies ever lied, but I have to be honest, it always makes me smile.)  After the first few, she started dropping subtle hints that she’d like to have a bowl.  Nothing pushy, just kinda tossing out the idea in the same way people say they’d like to help children or that they hope it doesn’t rain.

When I brought in a bowl for a co-worker, made from a white oak tree they had given me from their back yard, her eyes lit up and the subtle hints became more pronounced.  When I brought in a bowl for a different co-worker, who had given me some cherry from their back yard, Barbara was beaming with praise.  She was looking at the two bowls  like a kid in the lunch room, drooling over the huge stack of extra cookies your mother put in your lunchbox, thinking there were surely enough to share.  Over time, as my skills increased and I became more experimental in how I finished the projects, all subtlety was dropped and the direct assault started.  “That would look good on my dining room table”.  “I’d take that one if you’re not going to do anything with it”.  “Are you ever going to make me a bowl”?  You get the gist.  I made her a paperclip holder made from resin and rubber bands, which she keeps on her desk and uses daily, but that only seemed to strengthen her resolve to get a bowl large enough to sit on her table to hold glass balls, Christmas ornaments, the eyes of her enemies, or whatever else she wants to put in it.  I figured someday I’d make her something, but to be honest, there are a gazillion other projects littering my thoughts that always seem to come first.

With all the changes at work, Barbara is electing to take a voluntary severance package and will be retiring in a couple of months.  Based on the countdown she keeps prominently displayed on a whiteboard next to her desk, time is running out.  As of this writing, there are only 9 more Mondays until she’s gone.  Guess it’s now or never.  Below is the final project that I think I’m going to give to her.  It’s made from a piece of pine that was given to me from our former Director.  Since I’ve already made a pine bowl with the cosmic coloring on the outside, I decided to do something to make the pine look less “pine like” on the inside.  I hit it with a blowtorch, just to bring out the grain pattern.  Hopefully, she’ll like this well enough to smile up until her last day working and appreciate it after it takes up residency on her dining room table.  Hopefully, it won’t spark a request for a matching set or worse, a pair of candlestick holders to set on each side of it.

Thank you, Barb, I appreciate your support over the years, the kind words, and your encouragement for my little hobby.  I hope your retirement is long, healthy, and happy!


The “cosmic cloud” effect work really well on pine, but only after four coats of black paint as a base.
From this angle, the torching of the pine really stands out. I think I like it MUCH better than plain looking pine wood.


basket weave illusion #2

This was actually the first attempt at making a basket weave illusion piece and there was MUCH learning!  I had to create an indexing system to mark all the spokes, which wasn’t that difficult – BUT – I also had to make a pencil holder that held the tip of the pencil exactly on center with the lathe.  Lesson #1 was that I wasn’t exact enough, so the spoke lines aren’t at the right angle to the center.  It doesn’t show up on the outer rings, but in the center of the bowl it gets a little funky.  Lesson #2 was the inconsistent color of  wood that I used.  For this one, I used a scrap piece of mulberry, thinking the natural yellow color of the wood might look good in the final design.  That was true, except only the heartwood has the yellow color, the sapwood is nearly white.  That difference is visible in the end result.  Mulberry also isn’t that good at holding a beaded edge, so many of these look like they’ve been chewed by beavers!   Lesson #3 was a reminder that you have to have the right tool for the job.  I have a set of beading tools, but they’re pretty basic and (I suspect) were designed for spindle turning in mind, not making bowls.  The end result were beads that were very inconsistent in size, depending on which part of the bowl’s slope I was working on.  After the initial turning was done, I sat it aside and waited for the next fire.

My second attempt (posted in Dec. 2017) took all of the turning lessons into account.  After it was completed, I ordered some india ink markers to see if the coloring process would be better using markers over a brush.  When they came, I decided to go back to the first, sub-par, turning and use it to test the colors.  Below is the result.  Using the markers is a LOT more precise than using a brush!

Both of these trial efforts have taught me a great deal.  When I make the next one, I’ll be using a hard maple that will take the beads, will be using a much more granular guide for my indexing system so I have more dots to work with when constructing a pattern, and I’ll definitely be using the india ink markers to do the coloring.

This one will be likely be sacrificed to the fire gods:

Up close, it’s hard to see the pattern. It has to be viewed looking at an angle.

Time to waste bowl

I found a piece of wood that might have been ornamental pear, that I had rough turned this spring.  It has warped so severely I honestly didn’t think it could be even be turned.  Since I had some time to kill, I decided to spin it up and see what I could do with it.

Below is the final result.  The outside of the bowl had a lot of really ugly blotches in the wood, so I decided paint was the best way to compensate.  This is small, maybe 4 1/2″ across.

From the top, this looks like a normal, brown and round bowl.
From the side, the paint helps hid the imperfections in the wood.


Blue jean bowl

A couple of years back, I made a bangle bracelet out of blue jeans and epoxy that one of my daughters “claimed”.  Since then, I’ve been thinking about doing another project like that, only bigger.  A friend of mine gave me an old pair of blue jeans that I could cut up, which I hung on to.  I also had a pair of work jeans that finally got too ragged to wear, so I decided it was time to try again.

Below is the finished product.  It’s about 6″ wide and maybe 4 1/2″ deep.  I started out using epoxy and 6″ squares to make the lower half of the bowl, then switched to making 2″ wide strips in a chriscross pattern.  My thought was that I’d be left with a 2″ square, hollow, center in the bowl, which would save on materials.  As I laid the strips in a square patter, however, the corners of the bowl ended up being twice as thick as the center of the strips, so I had to readjust.  I finished up making 4″ strips, that way the ends wouldn’t overlap.

If anyone is dumb enough to try this, there’s a couple of things to keep in mind.  First, I’ll warn you that the jeans have to be absolutely soaked in the resin, or it’ll leave a weak spot in the blank that will bend as the lathe spins.  For this bowl, I had to end up adding resin to the side of the bowl after the rough turn was done, letting it soak into the jeans, before doing the final turning and sanding.  Second, even though the blue jean material is soaked in resin, it still produces a LOT of dust while sanding.  My shop looked like someone murdered Levi Strauss and there were little bits of blue jean dust floating in the air.  Remember to wear some kind of ventilation and an air cleaner/dust collector is a must!

Pretty pleased with the end result.  The two pairs of jeans I cut up for this were different shades of blue, which comes out in the finished product.  I also decided to add a finish to this, but that ended up darkening the whole bowl and obscured the blue jean look a bit.

Made with cut up blue jeans and epoxy resin.
Dissapointed by the way the finish darkened the material, so you can’t see the patterns of the jeans.

basket weave #1

There’s a guy named Harvey Meyer who makes the most amazing turnings that end up looking like native American baskets.  His work is worth thousands, is in a whole slew of galleries, and is at the absolute highest level of craftsmanship.  Google his work and you’ll be amazed.  He’s also extremely open to showing everyone exactly how he does what he does.  There is a two part YouTube video of him giving a step by step demonstration that was recorded by the woodturning club that was lucky enough to have him.  He made it look simple!  Easy.  Embarrassingly remedial in terms of the skills needed, leaving me to think “is that all it takes?”.  I decided to try to make one.

I had to make an indexing system for my lathe, which took several hours of YouTube watching to figure out.  then, I had to buy a special beading tool and a special woodburning tip and since the woodburner I have isn’t compatible with the tip I needed, I ended up also having to buy a new woodburning pen to accept the tip, but it works with my current machine.  $75 worth of supplies later and the multi-color sets of India ink my kids gave me for Christmas, I was ready to go.  He only uses holly (which doesn’t grow around here) or some kind of pear that he finds in slabs big enough to make 12″ plus sized platters and hollow forms.  The closest I could find was an ornamental pear tree, that would yield a bowl about 7″ wide.  Close enough, right?

Then the learning started.  I learned that using the beading tool to make a series of perfectly sized and spaced beads is NOT as easy and quick as he makes it look.  I learned that ornamental pear is NOT close enough, since it won’t take the small beads well, especially if there is any non-linear grain in the wood.  I learned that using the edge of sandpaper to burn lines in a bowl is not nearly as easy as he made it look, without sanding half of your bead away in the process.  I learned that when he said, “us this particular brand of india ink marker to color in the beads” there was a reason.  I used a very small paint brush.  His looks like art, mine looks like a third grader’s art project in comparison.

All things considered, the finished project actually turned out pretty good!  When I make the next one, there is a whole list of things that I would do differently.  Different colors, different wood, MUCH faster speed when making the beads, different pattern, different mechanism for getting the color on the beads, and some subtle changes to my indexing system.  Overall, I’m going to call this bowl a success, even with the flaws.

Really like the pattern I created for this one. Makes it look all swirly…
I carried the pattern all the way through to the bottom.

Literally playing with fire

The turning club has a new president, so the “president’s challenge” for 2018 have all been updated.  The first one up?  Make something with fire.

Fire!  Hells ya!!!

This is the first of several projects that I have in mind, but most of them will involve either using the fire pit in the back yard or somehow disconnecting the fire alarm system in the house.  It started with a shallow piece of walnut that was mostly sapwood (the white part of the tree, not the dark brown part) but the blank had warped so badly, the overall size shrunk down to about 8″ across and maybe 3″ tall.  The black on the rim was created by using a blowtorch to singe the wood just enough to turn it colors, but not enough to change the texture.

Not too bad for a first effort!

the black on this one comes from using a blowtorch on the wood. Makes a thin line between “embellishment” and “arson”.
I love working with walnut, especially pieces like this that are right between the sapwood and heartwood. Notice how the brown wood and the blonde wood are almost fighting for territory.

Red oak bowl – SAVE!

Well over a year ago, I started working with a large piece of red oak that smelled really bad when it was turned green and had a whole series of splits and cracks that should have made it firewood.  My first attempt at “I can fix it” involved trying to mix red chalk (like the kind that gets put into construction chalk lines) with CA glue.  Once I was done filling all the cracks, I was convinced it was going to be a masterpiece!  As soon as I started turning it, I realized that is was a complete disaster.  Something about the chalk didn’t mix with the CA glue, so as soon as the top surface was turned away, all of the chalk underneath fell out, still in a powder.  For the second time, I figured this was firewood.

Cleaning out the shop, I found this failure again and took another look.  Instead of trying to use chalk and CA glue, I decided to dig all of the old filler out and replace it with epoxy casting resin, dies with Alumilite red dye.  I should have stopped there, but somehow, I got the bright idea to add to the filler, by using something else, encased in the resin.  But, what to use?  I saw some brazing rods and in my head, I thought “these are made from brass, and brass is a soft metal, so this should look pretty cool” and started jamming pieces of the brazing rods into the gaps while the resin was still liquid.  HUGE mistake!  Brazing rods aren’t actually made of brass, they’re made of some kind of steel.  The tools I use are also steel, so the end result was the steel in the bowl chewed the living hell out of my tools!  I switched to carbide steel tipped tools, which was a little better, but I have to admit much of the “fine work” was done with 60 grit sandpaper.

Here’s the final result.  Overall, it really looks good!  The finish is Danish Oil (to darken the color of the red oak), followed by Yorkshire grit (an abrasive wax), then a final coat of Renaissance Wax.  All things considered, this was definitely worth the wait!


Overall, I like the look, size, shape, and color of this bowl.
Here’s a close-up of how the red epoxy looks next to the red oak. Very cool!
This side you can see all those nasty little steel pieces sticking out. I like the look, just not the damage to the tools.


Alexa’s wigstand

So my oldest daughter saw the wigstand that my second daughter made.  (The one that was white, with the intricate henna inspired black patterns on top of the white paint, saved to the May 2017 blog.)  As sisters will do – especially these  sisters – she said she wanted to make one, too!  Now I’m not saying my kids have been in some kind of eternal contest since the day they were born, but I’m not going to deny it, either.  When she was here for Thanksgiving, I gave her one I had made out of cherry wood and said she could do anything she wanted to decorate it, except spray paint.  Cherry is just too pretty to be spray painted a solid color!  It took her about an hour, and here’s what she came up with.  The brown parts are a walnut stain she painted on by hand, and the red and green parts are acrylic paint that’s been thinned.

This turned out VERY pretty! 

Start with cherry, paint in some walnut stain, some red flowers with a little greenery and this is what you get. Beauty!!!

Daughter #3 took a maple stand home (which does not have the no spray paint restriction on it) and said she’d “see what she could do with it”.  Daughter #2 also claimed one of the cherry ones and has marked out an even more intricate henna design, only on this one she’s going to use the wood burner instead of a sharpie.  Daughters 4 and 5 are (im)patiently waiting for me to make more stands so they can get in on the action.

At this rate, the cancer center is going to be very pleasantly surprised!