Category Archives: blog

root folder for blog posts

“Fire engine red” inlay

So I tried messing around with epoxy putty.  If you’ve hung out with plumbers, you might have seen this stuff.  “Plumber’s putty” is available at the local hardware in the plumbing section.  Not very original name and it only comes in a drab gray color, but I supposed it serves the intended purpose.  When they two parts of putty are kneaded together, you can shape it like clay, but when it dries it is like a hard plastic.  Pretty cool stuff!  I’ve seen videos where people use epoxy putty to inlay designs in bowls and it looked really easy.  That should have been a warning!  The stuff is almost gooey when you work with it and really doesn’t WANT to be put in little channels on a bowl.  I found a company out of England that sells a version called “Milliput” that comes in yellow (when I say yellow, think a really ugly shade of grayish-yellow.  Like sinus infection in a toddler, yellow), white, black, or terracotta.  I ordered some of each, just to see what it would do.  Since I have the patience and attention span of a gnat, I got tired of waiting on the slow boat from London and went to Hobby Lobby looking for something similar that I could use right now.  Guess what?   They carry Milliput, but only the ugly yellow and the white.  I bought the white, thinking I could dye it some other color.  Then I looked to the right and there was a whole display of liquid dyes that were supposedly made to be used to color epoxy.  I’m pretty sure I heard angels sing for just a little bit.

I bought a bottle of “fire engine red” and went home to create red stripes around the rim of a cherry bowl.  What I quickly realized when I started coloring the putty, was someone at the dye factory has apparently never seen a fire engine in their entire life, is color blind, or is still laughing about the practical joke he played on everyone who bought this stuff.  After adding almost an entire bottle of the coloring to the white putty, I figured the color I had was the color I was always going to have.  This is what I was left with:

image
Side view of the “fire engine red” that was added to the cherry bowl
image
Different image of the “fire engine red” bowl.

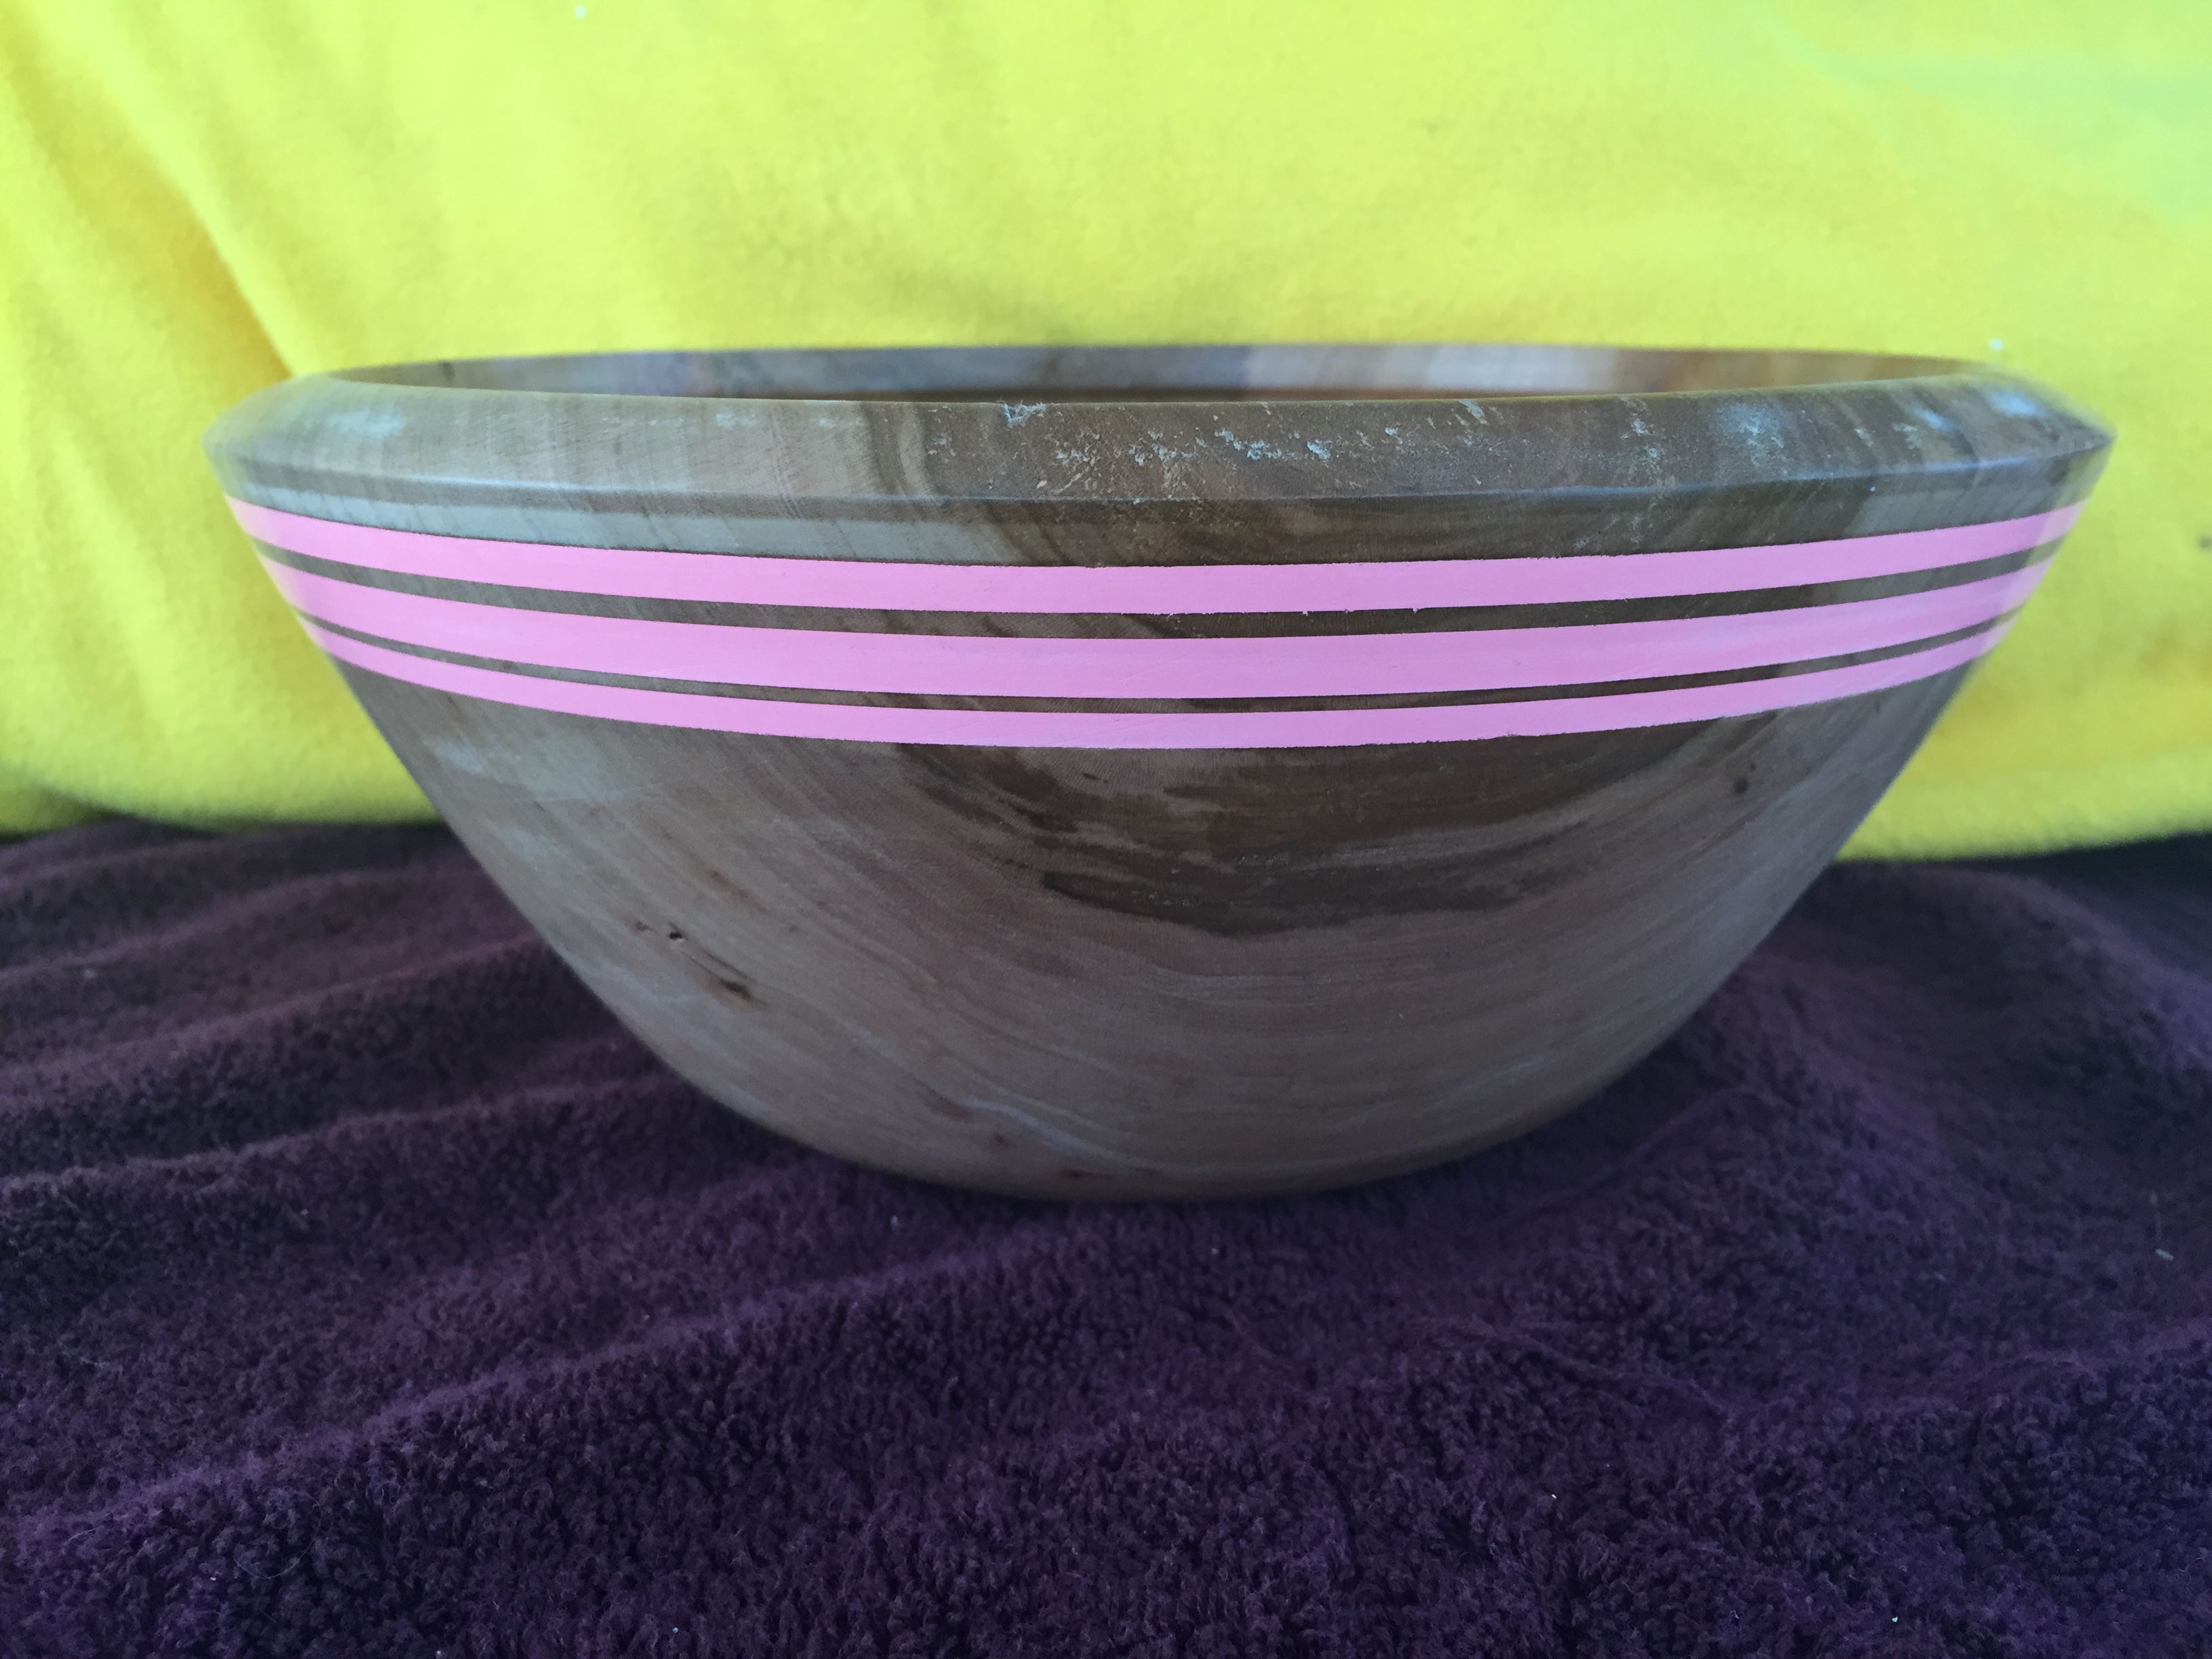
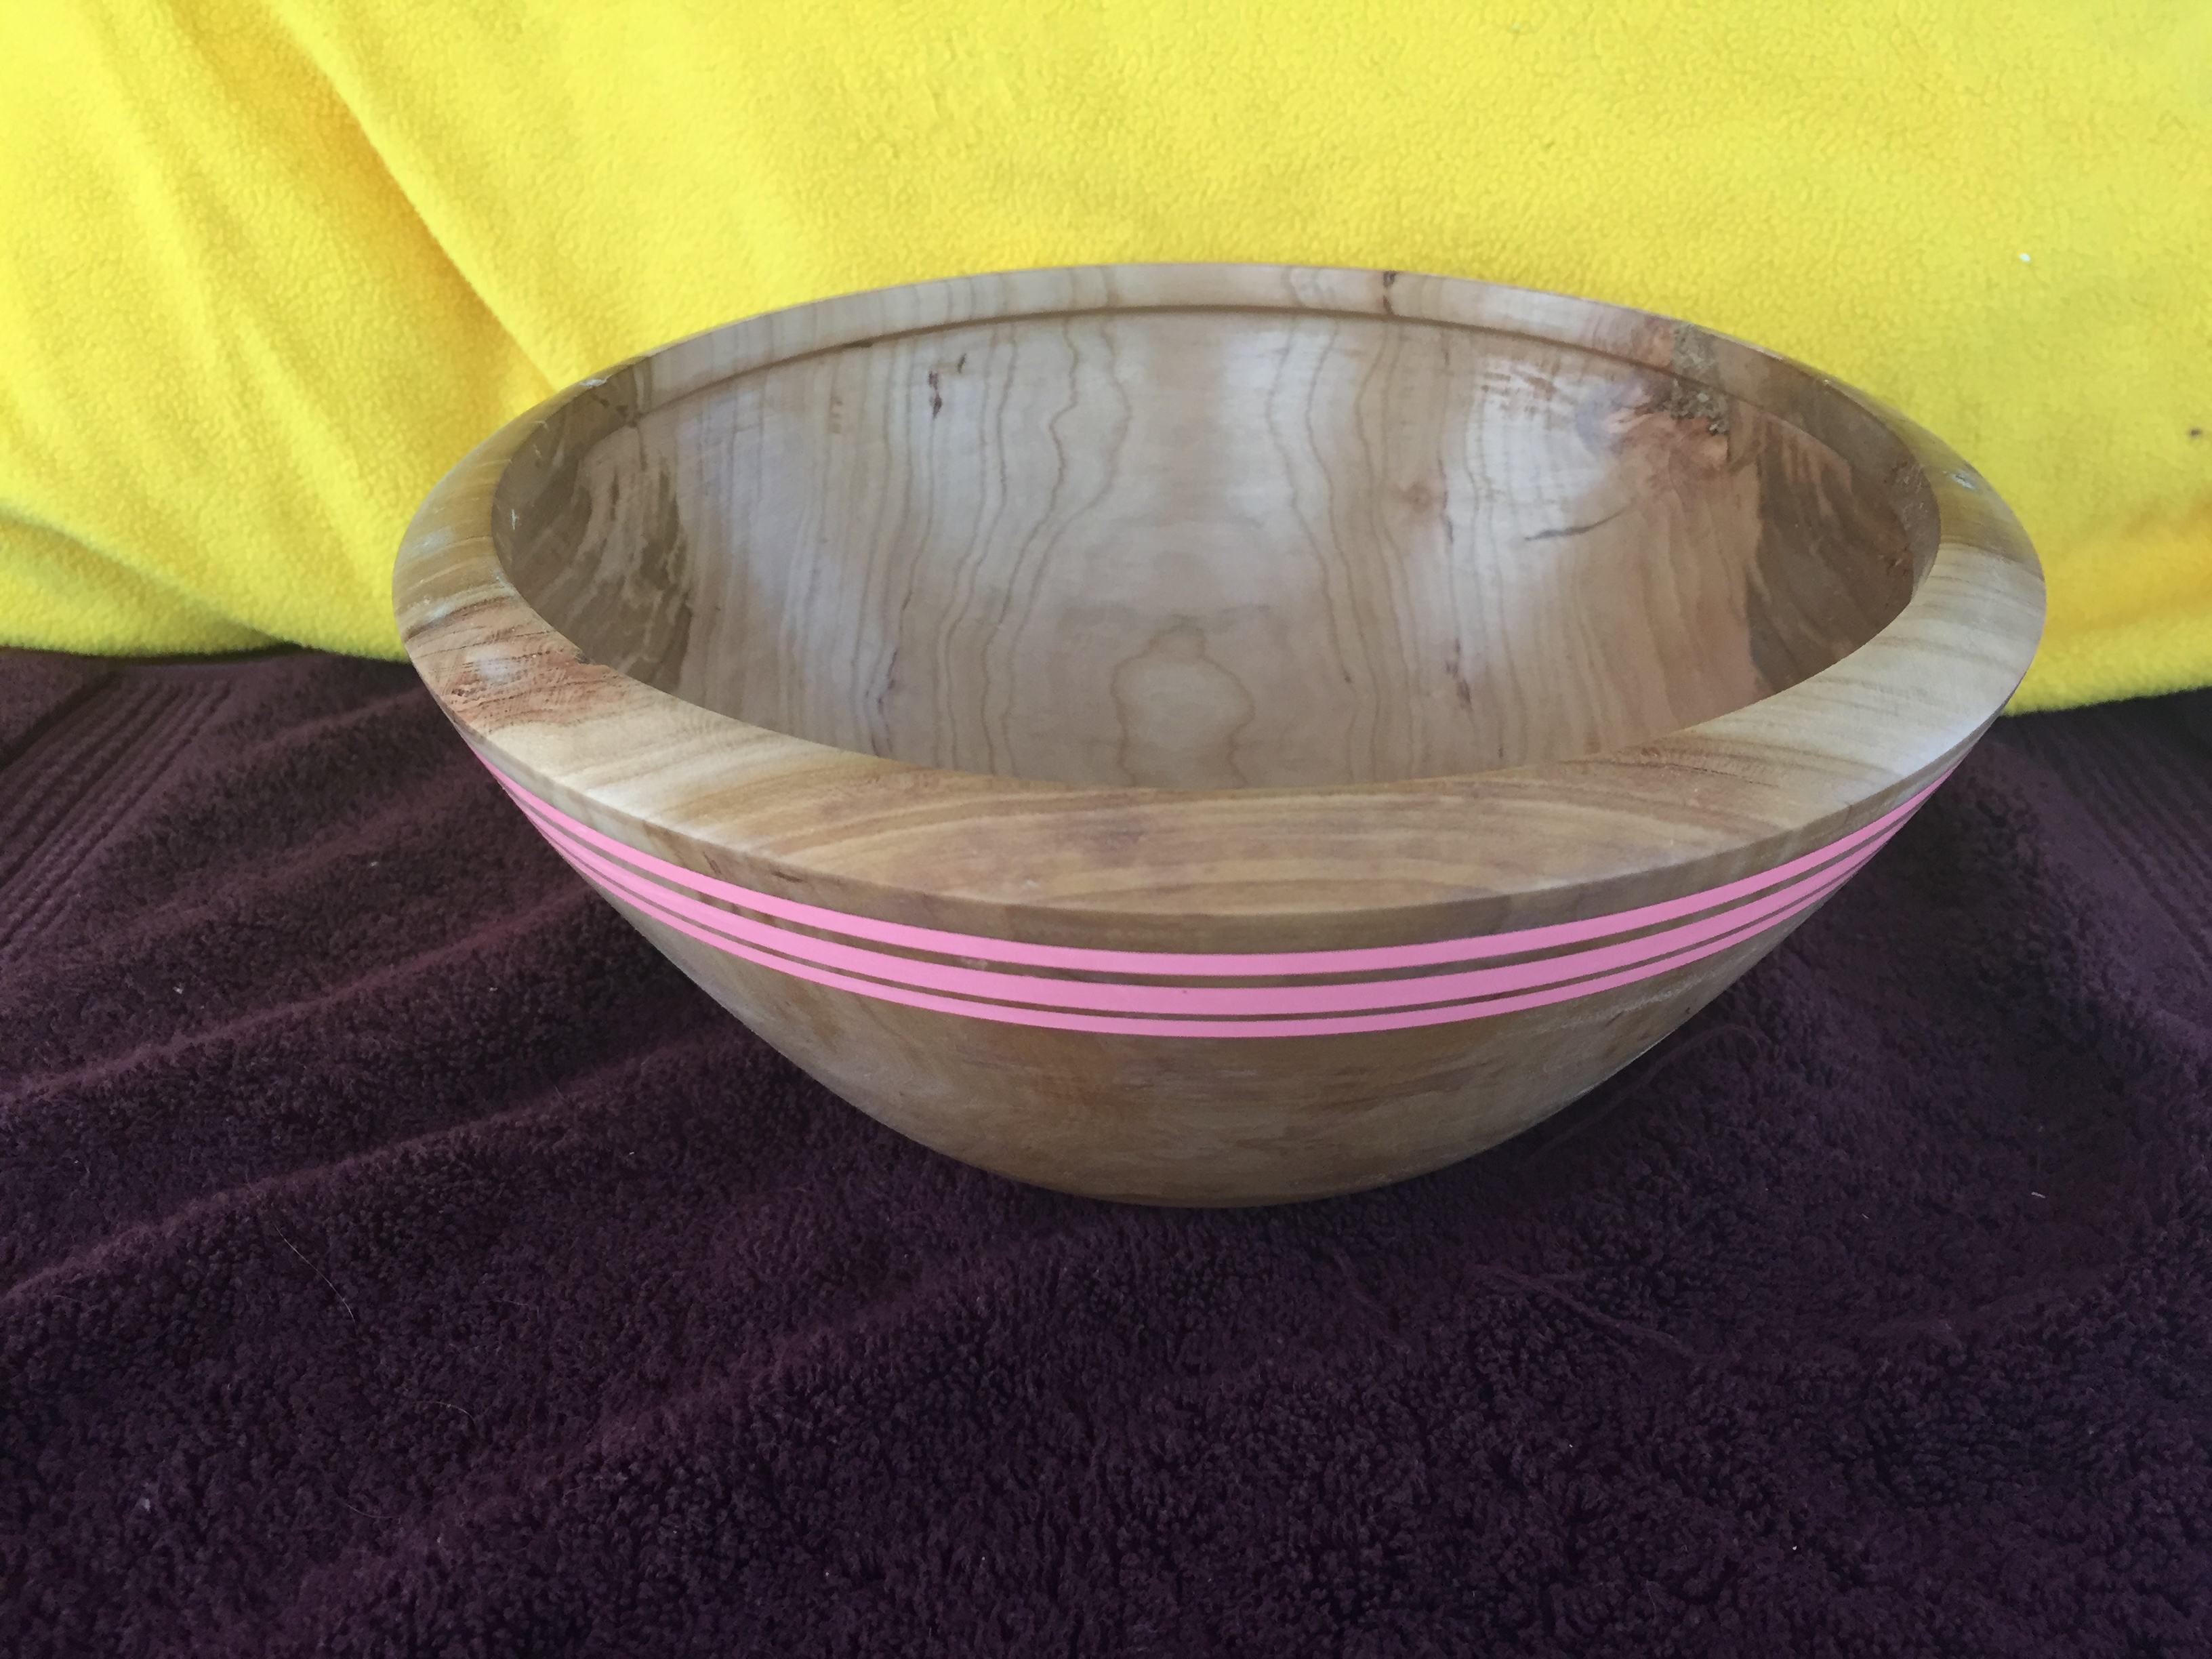
What the hell am I supposed to do with this???  Note to the color blind guy in the factory: that’s pink, not red!  Fire engines are NOT this color, because aside from a few parades in the San Francisco area, every kid expects to see an actual red fire engine.  Dalmation’s “pop” when sitting on a big RED fire engine, they just look annoyed and a little embarrassed sitting on something this color.  How about you call what you put in the bottle “Pepto Bismol”, “Baby Bop’s belly”, or “Barbie’s dream house” so the buyer would know what they were getting?  Fire engine red by ass!

Maybe I’ll just hold on to it for awhile and then try to donate it to some kind of breast cancer awareness raffle, where I can act like I did this on purpose…

Cut bowls for baskets

July 31st -lazy Sunday.   Since today was the last day of July and last night was another overnight implementation at work, I figured I should finish up some projects that have been cluttering up my shop.   The first focus was to make a couple of bowls for a collaboration with a woman I work with. She is a basket weaver, and a damn good  one at that.   She actually went to school for the craft.  (No jokes about majoring in basket weaving!)  I made two perfectly good bowls out of white oak, then cut them them in half  with the band saw. Then, where the cut was made, I made a groove. If all goes according to plan, she will be able to weave the two bowls back together, using the groove I made to anchor the weaving.  The end result should be a long oblong dish like thing that would make a really good bread basket. I thought I could cut the groove using a router table or a palm router, but I couldn’t figure out anyway to get it consistent and there’s not a lot of space to work with, so any slip up would be catastrophic!  I ended up cutting the grooves freehand. Let’s hope it works! Here’s a couple pictures just to see “the before”.

image
This is what the bowls would have looked like if I had just left well enough alone. Not too bad! White Oak has such distinctive grain, they really do look nice.
image
This is what they look like after they were cut and had the groove added.

Stay tuned!  When the weaver lady finishes, I’ll post pictures of what the final product looks like.


Walnut platter

July 8th – Ready to serve it up!  The turning club’s next challenge is to make a platter.  Not a whole lot of difference between making a bowl and a platter (or plate), the technique is the same.  All that really changes, is the size.  Getting the flat spots and the curvy parts to be consistent across something 14″ wide  is a tricky at best.

At least 5 years ago, someone gave me three walnut boards that had been glued together.  It was a cut off from some project he had done, and since I didn’t know what I was doing back then, I threw it up on a shelf with some other wood and forgot about it.  When I went looking for “platter wood” to use for the challenge, I realized  it was big enough that I could start with a blank that was 15″ wide and about two inches thick. Here’s my entry into the competition.  Not bad for a first effort on something this wide and this shallow!  Many thanks to Bob for the use of his big lathe, I couldn’t have done this on my little Jet.  I’m getting closer and closer to the day when I can rebuild a shop that actually has the right tools and enough space to use them!

This is finished with a product called "Danish Oil", which is a combination oil and stain which soaks into the walnut and makes the darkness of the walnut color come out. After a coat or two of lacquer, some buffing, and a buffed on coat of carnuba wax, the oil trappen in the wood should prevent it from ever cracking. Yeah, I was barefoot in the shop. Sue me...
This is finished with a product called “Danish Oil”, which is a combination oil and stain which soaks into the walnut and makes the darkness of the walnut color come out. After a coat or two of lacquer, some buffing, and a buffed on coat of carnuba wax, the oil trappen in the wood should prevent it from ever cracking. Yeah, I was barefoot in the shop. Sue me…


New vacuum chamber

Since the homemade vacuum chamber I tried to make last month was such a bust, I broke down and bought one online.  Luckily, our Chinese friends that make Harbor Freight look expensive have many ebay stores!  I picked up a system that has a 5 gallon stainless steel pot, a small vacuum pump, and all the hardware for about a hundred bucks.  WORKS LIKE A DREAM!!!  The best stuff to use to stabilize half rotten wood is something called “Cactus Juice”, but you pretty much have to sell a kidney to be able to afford it.  Since I want to stabilize bowls, not tiny little pen blanks, I might also have to give up a lung to afford enough juice to cover the entire bowl while it’s in the vacuum chamber.  After many hours surfing the net, I discovered that any polyurethane based finish can be used, it just takes longer for the liquid to soak into the wood and longer for it to dry.  After some creative use of rocks, towels and Wal-Mart bags to cut down on the amount of poly necessary to submerge the bowl blank, I managed to get one gallon of poly to cover the whole blank.  When it was done, I put the wet blanks into the kiln and ran it at about 120 degrees overnight to help the poly cure.  In hindsight, I should have left it soak in the poly for a day or so after the bubbles stopped coming out with the vacuum pump turned on, then cooked it for more like a week.  I’ll also try thinning the liquid down a little bit so that it absorbs into the wood better.  Here’s a picture of the inaugural test run:

Not bad for how little this system cost!
All those bubbles are the air being pulled out of the wood, allowing the poly to soak deeper into the wood.

The bowls that I used were the “mystery wood” blanks that I talked about last month.  Here are two of the four bowls that were retrieved from Chris’ rotten tree and were put through the vacuum stabilizer.  This is the final product of the rough out that was in last month’s post.

After being stabilized, the wood grain and color is fantastic!

Here are two pictures of the second bowl.  This one was from the same tree, but further away from the woodpecker attack, so the wood isn’t nearly as bad and didn’t require as much time in the tank to stabilize.  Top view:

Chris' bowl #2 - top view
really wish I knew what kind of tree this was. It really is pretty!

Side view:

Chris's bowl #2 - side view
I really like the way the heartwood is just starting to break down, causing the color difference.

There are two additional blanks that have been stabilized, waiting to turn, so stay tuned…


Three projects to kill time

June 18 – Killing time…  For my job, every once in awhile we have work to complete that starts late Saturday night and if all goes well, ends Sunday morning.  If things don’t go well, which is usually the case, we may not finish until Sunday afternoon.  The hours are long, but for my part, I’m not required to be physically onsite, just available via phone and able to log into the hourly status meetings.  With all that time to “hurry up and wait”, I’ve started the habit of working on some project in the shop while the hours tick away.  Although this is Father’s Day weekend, we’re doing another major release tonight.  There are several projects on tap for the waiting.

The first is the construction of a the wood stabilizing vacuum chamber.  I was able to find a big metal pot like what is used for canning for cheap, then got the air fittings and a piece of plexiglass for the top.  When I drilled the hole for the air hose, I cracked the plexiglass really bad, so I had to cut another piece and silicone it over the hole.  That’s drying now, so if it finishes soon, I should be able to start hooking up the air fittings.  When it’s done, I’ll post a picture.

The second project is for next month’s wood turning club meeting.  The challenge for the meeting is to turn a platter.  Since I haven’t done that before, I figured I’d better make some smaller practice pieces.  The first one is made from cherry, but I think it’s pretty plain and just a tad ugly.  So ugly, I may not even put finish on it, opting for the burn pile instead.  Here’s a picture:

really nothing to this piece that would make anyone want to look at it. the color is weak, the grain pattern is boring, and the shape is as basic as it gets. Overall grade = D+. All that saves it from an F are the bug holes, and I didn't even do that, nature did!
really nothing to this piece that would make anyone want to look at it. the color is weak, the grain pattern is boring, and the shape is as basic as it gets. Overall grade = D+. All that saves it from an “F” are the bug holes, and I didn’t even do that, nature did!

The second one I really like!  It’s about 8″ wide, made from hard maple, and it’s just less that an inch tall.  More of a plate than a platter, but still really well done.  I will definitely put the finish on this one tonight and let it start to cure so I can have it buffed out by the time the next meeting comes around.  I’ve also started on a HUGE (14″ wide) walnut platter at Bob’s house, which will likely be the entry for the club challenge.  Here’s a picture of the maple plate:

Top view of the maple plate. Love the way the grain runs in pretty good symmetry. If you could feel this, it has just the right weigh to it.
Side view of the plate will show that it's not tall, and the width of the rim is very much in proportion to the width and depth of the center.
Side view of the plate will show that it’s not tall, and the width of the rim is very much in proportion to the width and depth of the center.

June 19th – EPIC fail x 2.  So I spent some time in the wee hours of the morning working on making a vacuum chamber to stabilize wood.  Since I like making bowls, I needed something big enough to hold something at least 12″ wide and 12-15″ tall.  Yesterday, my first attempt ended in failure as the vacuum created was too strong for the plexiglass and caused it to crack.  I found an old piece of 3/8″ Lexan that had been cast off in the garage that was big enough to fit on top of the canning pot, so I drilled a hole in it, transferred all the hardware to it, remade the silicone seal on the top, and waited for everything to dry.  This morning, I got tired of waiting and fired it up to see if it worked.  The good news is that once I got the lid to form a seal, it started pulling a vacuum and you could watch the bubbles come out of the wood I had submerged in a bowl of water.  EXCELLENT!  This is exactly what was supposed to happen.  About 15 seconds into my jubilant smiling, right about the time I was going to declare victory and start the dance, there was a loud, metallic bang.  Turns out, the Lexan is more than strong enough to hold the vacuum, but the canning pot itself certainly isn’t.  The sides crumpled, the water flew, and I’m not back to square 1.  I think I’m at the point where I’ll have to actually buy something on the internet that’s specifically made for this kind of operation.  Worst part is that I can just hear Mr. Oyer, my high school science teacher, laughing at me right now for not paying closer attention in class…

This is what happens when a strong vacuum meet relatively weakly formed metal.

Chris’ bowls, part 1

June 4th – Wood hoarding is real!  A friend of mine lost a tree earlier this year when the late season ice storm split it in half.  It was some kind of ornamental fruit tree (wild guess there) that had become weak because of obvious bug damage followed by relentless woodpecker attacks.  The first chunk fell all the way to the ground, while the second chunk was just kinda sticking out at an odd angle.  Recent rain storms were enough to coax the second chunk to split from the main trunk, but it was stubbornly still hanging on by a little bit of bark.

His ex-wife (notice how I didn’t add any extra adjectives?  That’s called restraint!) decided to call the city building inspector and report a “public safety hazard”, no doubt hoping that he’d have to hire a tree service to remove it.  The joke ended up being on her, because in about an hour, the tree was dismantled and stacked on the curb so the city could take it away.  Total cost to him?  a 12 pack of Summer Shandy’s, which he helped me empty.  While we were at it, we also took down a small ash tree the beetles had started to kill.

I kept some of the wood from the mystery tree and decided to make bowls for him and his children since this was the tree that was next to their play fort.  All four are roughed out, ready to dry.  The good news is the grain pattern in the wood is spectacular!  Here’s a picture:

Chris' bowl
some kind of ornamental tree that gave up some really pretty grain patterns. “punky” doesn’t come close to describing the end grain, though, and the whole piece is riddled with holes from the bugs and the woodpeckers.

The bad news is the wood in the center of the tree is pretty much rotten.  After it dries, I’m going to have to figure out some way to stabilize the wood, or else it will just either break apart or be so brittle that it can’t be turned or sanded.  There were live grubs of some kind in the wood that the woodpeckers hadn’t removed (yet), but they were no match for high-speed steel gouges.  Stay tuned!  I’m building a wood stabilization vacuum chamber, so if all goes well, I should be able to stabilize the blanks and have all the bowls turned in a couple of weeks.


Courtney’s save!

A year or so ago I turned a really crappy bowl out of an equally nasty piece of willow. It was so ugly and so poorly turned, I decided to use it to practice dying wood. Since the wood and the turning was bad, the dye job turned out absolutely horrendous! It was literally sitting on the top of the wood pile to go to the fire.

My daughter Courtney asked if she could do some pyrography (wood burning) on it.  I figured why not?  I’m gonna burn it anyway, and if I’m lucky, she’ll set it on fire with the wood burner and save me some time.  What she was able to make out of my mistake actually turned out looking pretty cool!

My daughter created something really nice out of my failure. Maybe I’ll let her pick the home I go into, afterall…

More bowls…

Over the course  of a week, here are the other bowls I finished…


Another bowl from Lisa's white oak tree. Love the coloration in oak trees when they shoot those lines out that go opposite of the growth rings. It looks like cracks in the wood, but it's not.
Another bowl from Lisa’s white oak tree. Love the coloration in oak trees when they shoot those lines out that go opposite of the growth rings. It looks like cracks in the wood, but it’s not.
I came across the blank for this bowl in my shop, having forgotten ever roughing it out. Judging by the shape and where I found it in the shop, it must have been from at least 4 years ago. What emerged is an ash bowl, about 8 inches across. Pretty boring bowl, but put it next to the garage door and it would make an acceptable key holder.
Ok, so willow is either really pretty, or it's a nightmare. Doesn't seem to be any middle ground! This piece had all those little bark inclusions throughout it, which actually look pretty cool up close. Kinda like a bird's eye maple, only really, really soft. Too much sanding with 80 grit and I think you could go right through the side.
Ok, so willow is either really pretty, or it’s a nightmare. Doesn’t seem to be any middle ground! This piece had all those little bark inclusions throughout it, which actually look pretty cool up close. Kinda like a bird’s eye maple, only really, really soft. Too much sanding with 80 grit and I think you could go right through the side.
I don't remember what kind of wood this little bowl is made out of . Pity, cause if I could remember what kind of wood it was, I'd remember to never use it again! It's small, about two inched high at the highest point, and maybe 7 inches across. Of those 7 inches, there's a crack running right through the bottom that's at least 6 1/2 inches long. This one will get burnt.
I don’t remember what kind of wood this little bowl is made out of . Pity, cause if I could remember what kind of wood it was, I’d remember to never use it again! It’s small, about two inched high at the highest point, and maybe 7 inches across. Of those 7 inches, there’s a crack running right through the bottom that’s at least 6 1/2 inches long. This one will get burnt.
The curve the outside of this bowl has is called an ogee. This little willow bowl is only 3 inches high and actually turned out really nice. The color differentiation between the heartwood and the sapwood is something I haven't seen in this wood before.
The curve the outside of this bowl has is called an ogee. This little willow bowl is only 3 inches high and actually turned out really nice. The color differentiation between the heartwood and the sapwood is something I haven’t seen in this wood before.
I love the grain that cherry has. For this particular piece of wood, it had started to break down, which is where the dark coloration comes from on the end-grain part of the bowl.
This is another piece of cherry from a co-worker’s tree. It ended up being taller than I had expected, because the crack that you can see in this picture sealed up nicely and didn’t have to be removed.
Not sure what kind of wood this is, perhaps birch. The spalting (the black lines that run through the bowl) looks pretty good on this one!

Twin walnut bowls

My boss’s parents had  a walnut tree that got struck by lightening.  He asked if I wanted any of the wood.  After I wiped a little drool off my chin, I said yes and made the customary deal:  “you give me wood and I’ll give you a bowl”.  Since this is my boss we’re talking about, I ended up making him two bowls, one from each side of the same log.  He can pick one of the two to keep, then give the other one to his parents.  Guess he could also keep them both and tell his parents I welshed on a deal.  I’d never know…  Anyway, here are the two that came out.  Both are about 10 inches around, or so.

Walnut trees have a blonde color around the outer part of the tree (aka sap wood) and the deep brown color in the middle (aka heart wood). For this piece, there seemed to be some confusion going on about what color the different parts should be. very unexpected!
top view of the first bowl.
This kind of coloration for walnut seems pretty uncommon, at least to me. Usually, the transition between the light part of the tree and the dark part is much more immediate.
This bowl is shallow, only about three inches tall.


Mulberry Failure – SUCCESS!

Last month, I talked about a mulberry bowl that cracked so bad I didn’t think it could be salvaged.  Luckily, I was wrong!  This one actually turned out pretty good!

In the April, 2016, blog, I talked about a bowl that I had started out of Mulberry and talked about how bad it cracked while it was drying. This is what the final project turned out to be. I filled all of the cracks with black CA glue, which not only keeps the bowl from continued cracking, but also looks pretty good. The white lines are from where the wood had cracked, but not deep enough to where the black CA glue could get into the crack. These are sealed with regular, clear, CA glue.
Here's another view of the Mulberry bowl. The deep golden/yellow color of the wood will fade to a brownish/yellow over time. I really like working with this wood, at least the non-cracked parts of the wood...
Here’s another view of the Mulberry bowl. The deep golden/yellow color of the wood will fade to a brownish/yellow over time. I really like working with this wood, at least the non-cracked parts of the wood…