This weekend was cold, rainy, and just an overall gloomy day. I went to the shop and decided to straighten things up a bit, put some stuff away, and just tidy up a bit. If I was being truthful, I had just started listening to a new podcast and just needed something to do while I was listening. In the process of rearranging, I found two cherry bowls that had been roughed out, waiting to be turned into their final shapes and finished. I put the smaller one on the lathe, turned up the speaker, and finished the piece in about a half hour. The finished bowl I was holding was nice, but there really wasn’t anything special about it. The shape was typical, the grain was very straight, and the color of the cherry wasn’t anything that would catch your eye.
About 6″ across and maybe 3″ deep. Nice, functional, cherry bowl, but there’s really nothing special about it. Pretty plain, really.
When the turning part finished, the episode on the podcast finished, when meant two things. First, an hour had passed since I walked into the shop and second, I either needed to go back to shuffling and cleaning or I needed to find something new to work on. Putting away all the stuff left out from prior projects would have been the smart choice, but I moved to the workbench, pushed aside all the stuff I had meant to put away before starting a new project, and started a new project.
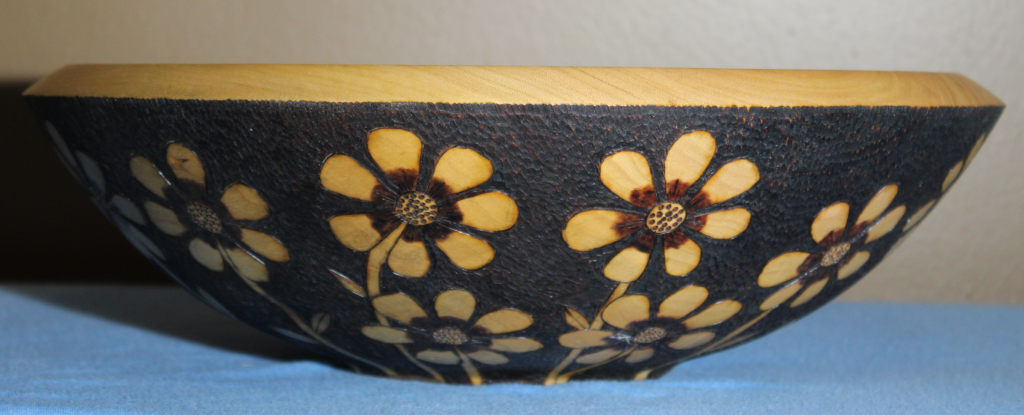
I decided to play around with the wood burners a little, with a vague image in my head of a piece that I’d seen online as a rough example. It seemed like a pretty simple 3 step process in my head: burn in some flowers, texture the background, claim success. As I started thinking about the logistics, I realized there was more to this than I’d thought. One hour long podcast episode later, I had the design laid out that ensured the flowers were all of the same size and was about half done with burning them in. Another episode ended and I was just beginning the shading process. After the the next episode, I was well into the shading process.
Really like the look of this one, the contrast of the natural wood to the darkness of the burning and the texture feel really cool!
After a break for food and to let the feeling return to my fingers, I resumed the podcast and the shading. Another two hours and two episodes and I was done with the burning.
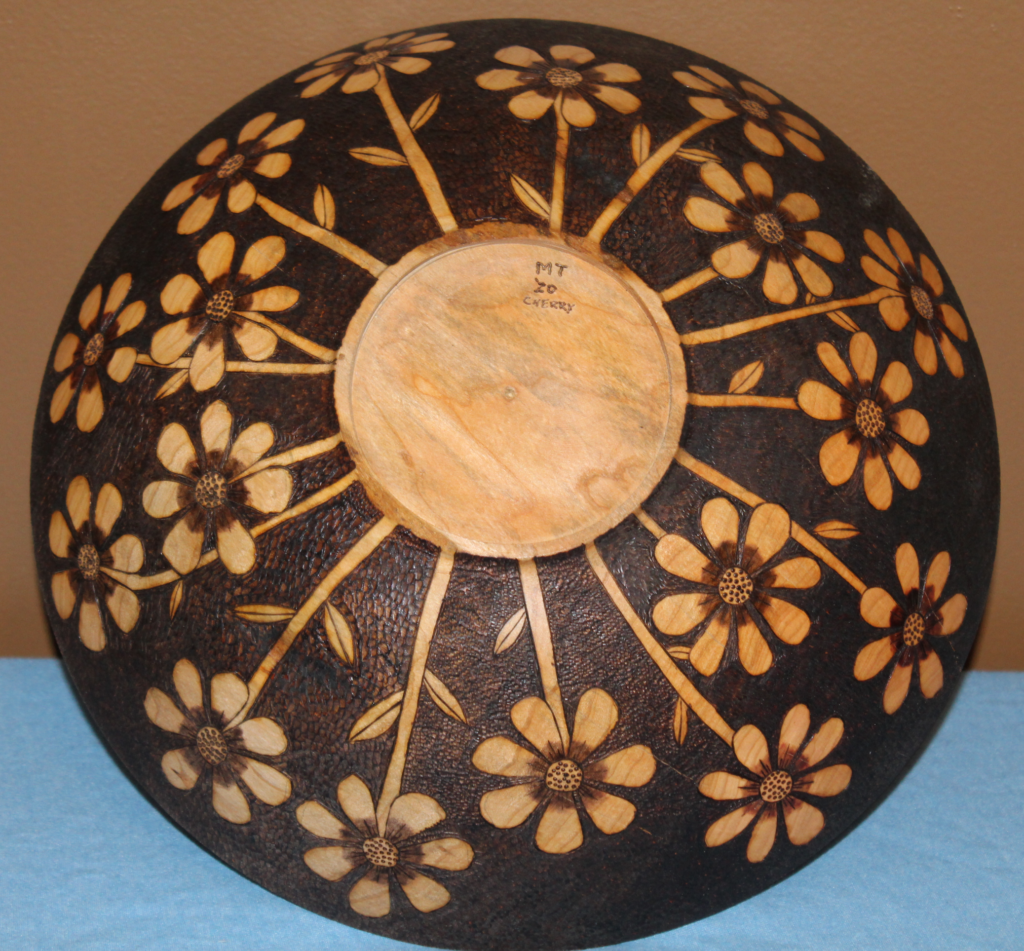
All done with the burning, just need some finish added. Given the small size of the bowl, the only problem is you can’t really see the burning when it’s sitting upright
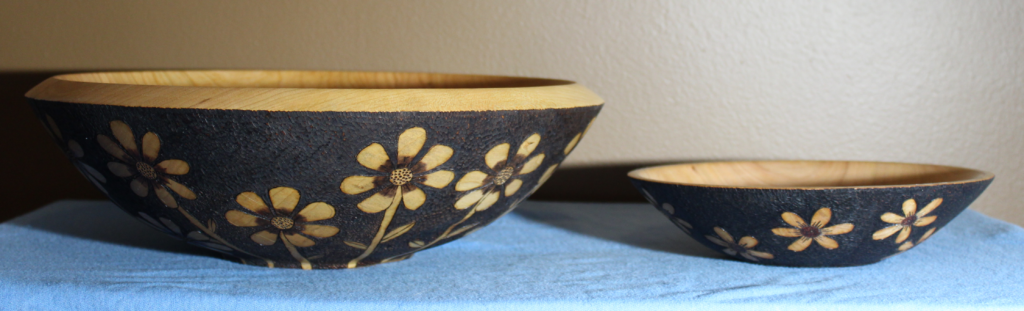
Not too shabby for a practice piece! After seeing that my process worked, and seeing a much larger cherry blank that was ready to finish turn, I jumped into the next project. another 30 minutes of turning, followed by at least 10 hours of burning and it was finished!
REALLY like this one! It will be staying at home, safe from the pilfering of the kids!
Here’s a shot of the two together, just to give an impression of the size difference.
I’m thinking a vase might be the next application of this… Or maybe a lidded box… Or maybe a large, thin, platter…
As I was working on the shop, unboxing box after box, after box, I found a box that was labeled “uncompleted projects, blanks, and misc.”. When I opened it, I wondered why I had ever packed most of it up in the first place. Many of the uncompleted projects were from at least 10 years ago and were projects that I had started before I had the skills to actually do them. Looking at them now, none were worth the time to attempt a salvage, so they were all burned.
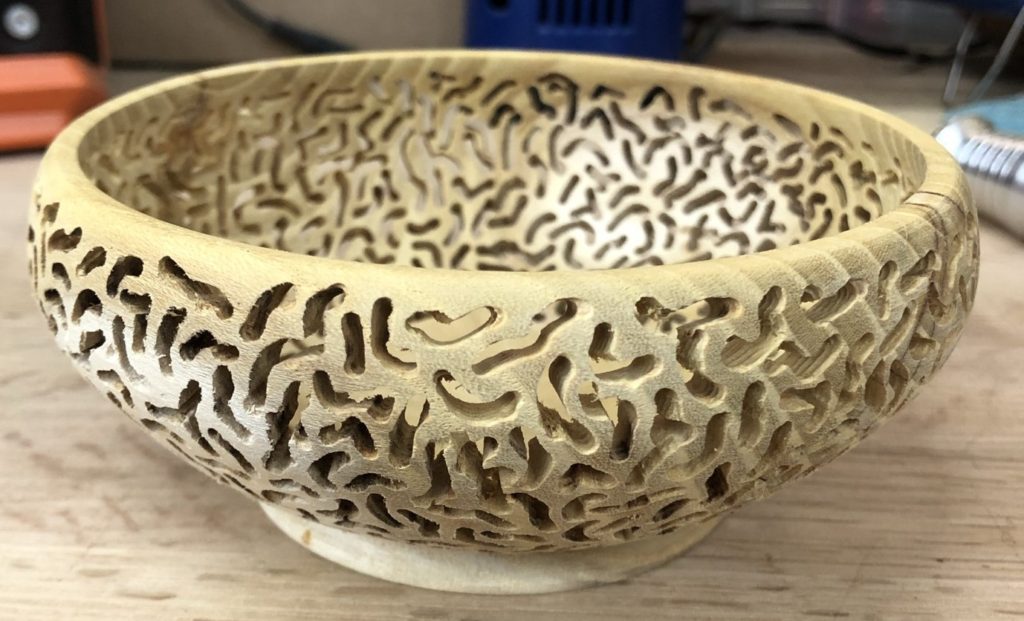
The blanks, were a collection of mulberry rounds that came from my daughter’s house. Not sure how they got in the box, my guess is I had combined two boxes during the early part of the shuffle. The blanks had started to crack, so I wasn’t sure they would be of any use. I filled the cracks with CA glue and figured I put one on the lathe and see what I could do with it. I ended up turning a small bowl with a larger foot. Then things got out of hand. Again!
It looked too plain, so I put it back on the lathe and thinned it down so it could be pierced. After about 3-4 hours and some ibuprofen, I ended with this:
This was better, but the more I looked at it, the more I decided it needed a lid, so I took another one of the mulberry blanks that was even more cracked and made a lid. Having a plain lid on top of such an intricately pierced bowl looked really stupid, so I decided I needed to do some piercing. Because of the way the lid was turned, and since I was already having issues with losing feeling in my hand from all piercing, I decided NOT to pierce the whole lid. Here’s what it looked like after I had dipped both the bowl and the lid in boiled lindseed oil for a finish.
I knew the way the lid fit, I’d need some kind of handle. My options were a white ceramic knob, which would be easiest, or a finial of some kind. I found a ceramic knob, but it just looked wrong! After scrounging through the can full of scraps to burn, I found another piece of mulberry that would work for a finial. The final project actually turned out pretty good!
Not bad for some blanks that were literally stacked up next to the burn pile!
During the divorce, there was a brief period of time when two of my kids and I needed a temporary place to live, quickly. One of my daughters and her husband said “you can move in with us” almost instantly. I don’t think they offered that up out of some sense of obligation, like something they were forced to do, I think they were acting out of pure compassion, understanding, and even love. Even with that understanding, it was still both humbling and humiliating to have to rely on my daughter for something as basic as housing. It ended up being a very nice period of time, a chance to watch my grand babies grow, and to have those late night conversations you don’t realize were important until they’re gone.
To repay this kindness, I tried to do what I could to help with the house they had just recently purchased, by taking care of some projects that new homeowners might not notice or prioritize, check off some of the items on my daughter’s “honey do” list, and arranged for at least one significant issue to be fixed while they were working. One of the other things I did was some tree trimming, including the complete removal of a tree that was growing way too close to their house, had started to wither, and was going to be causing other problems with the foundation, very quickly. I think it was some kind of ornamental crab apple, but it had been poorly maintained over time (I don’t think it had ever been trimmed), had been planted way too close to the foundation, and was about half dead as a much larger tree had stolen most of the sunlight. I piled enough stacks of wood on the curb that the city brush collection truck filled up and we had to wait for a second truck to get the rest of it! I did, however, set one large chunk of the tree aside, the section that had been growing just above the ground, with the intention of making them something down the road, when I had a shop up and running again.
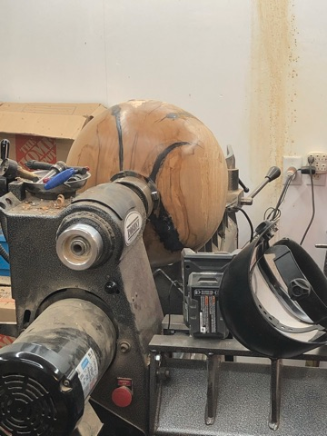
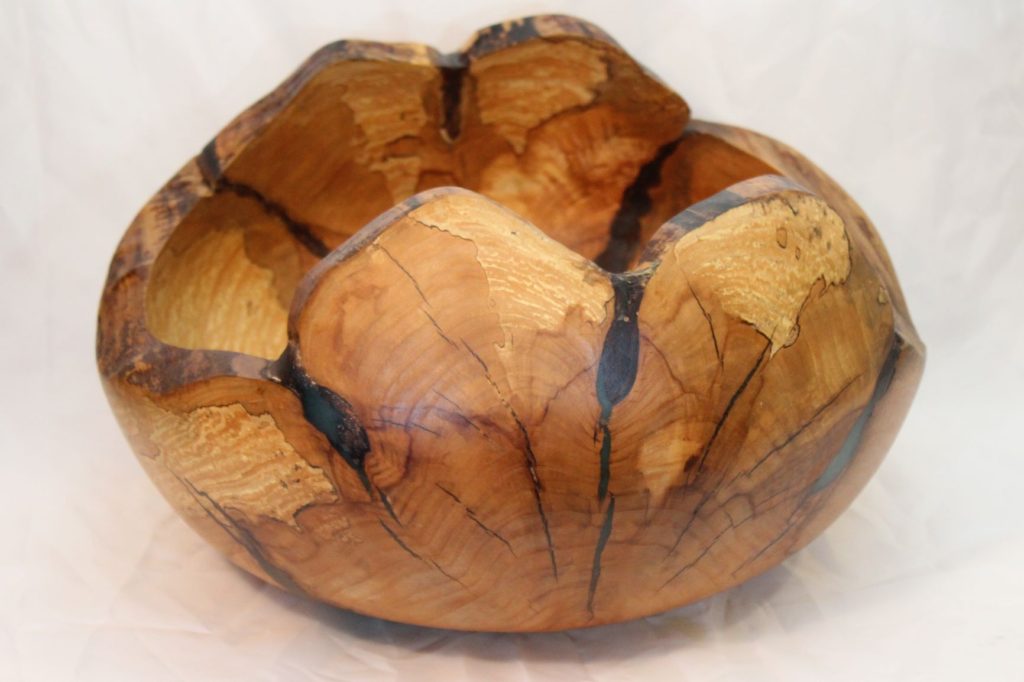
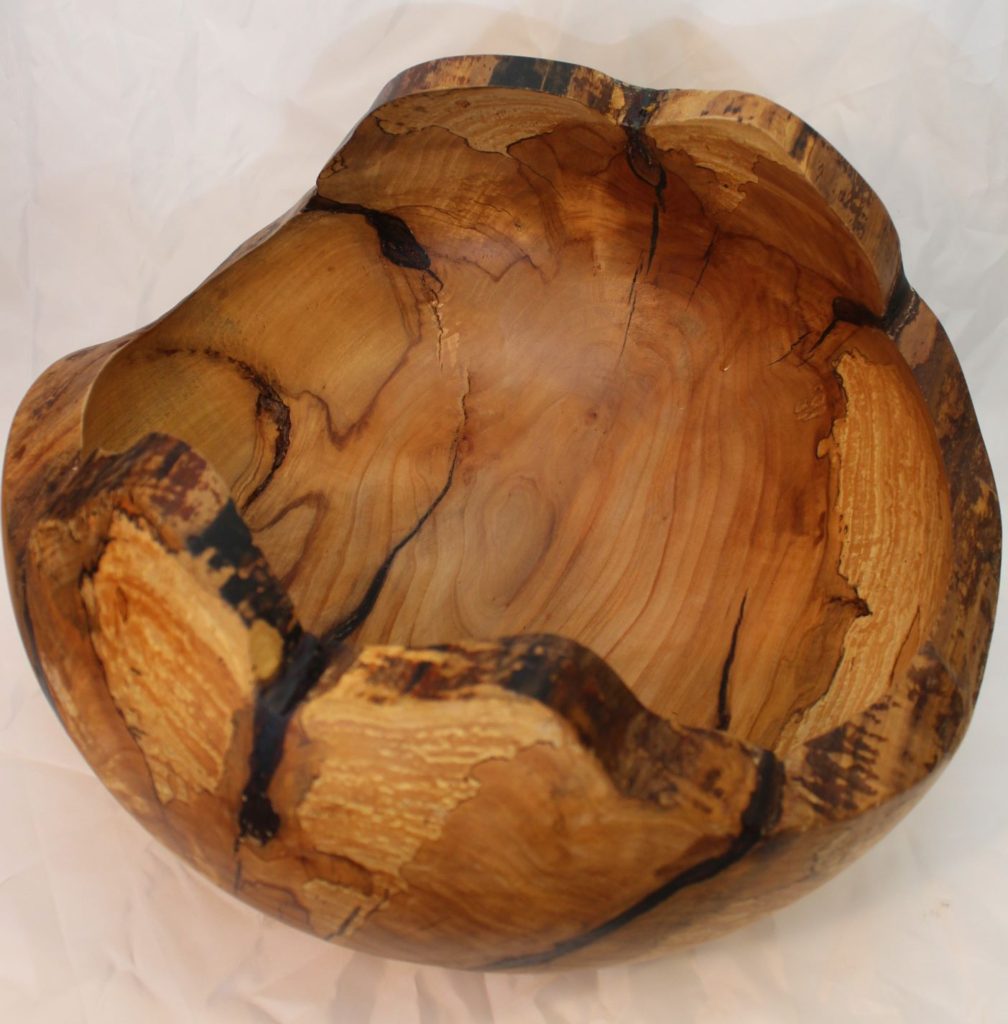
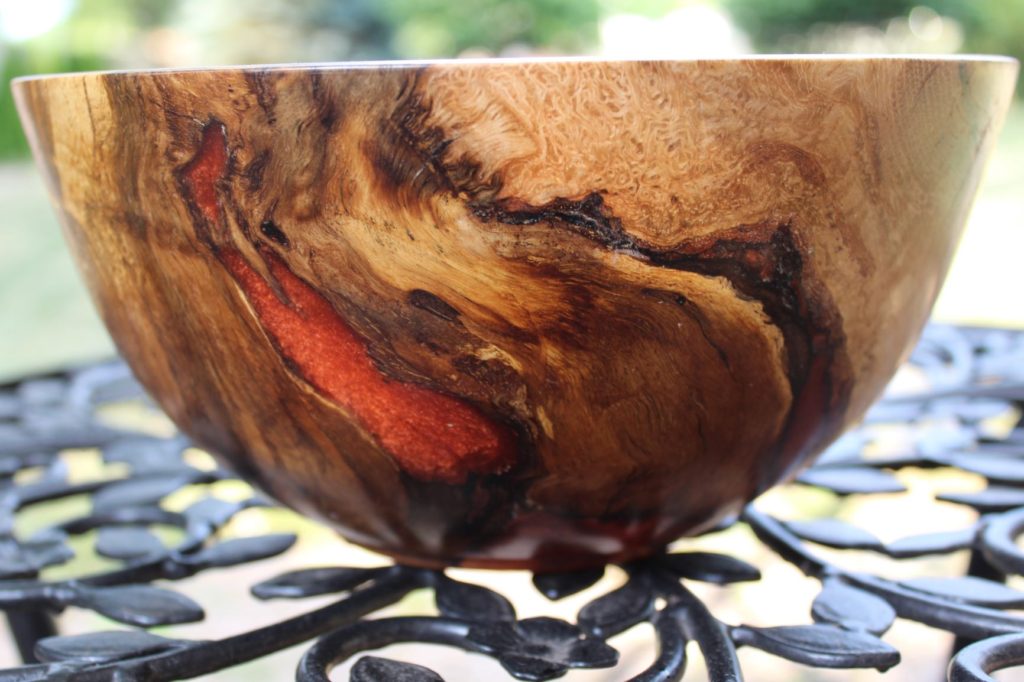
Time moved on, the chunk of wood sat by the house through the winter until I moved it to my new house, where it sat in my yard through yet another winter. During all that time, Mother Nature did what she does, trying to break the wood down, trying to change it’s color, and trying to split it in half. By the time I got the wood into the new shop, Mother Nature was clearly winning the battle! There were cracks and splits appearing in the wood, and parts of it were becoming unstable as the wood had already begun to decay. In all honesty, it looked more like bad firewood that anything usable. I cut it into a large bowl blank, which revealed two facts. First, while there was going to be some damaged spots that would need to be addressed. Still, there was plenty of good wood that could be turned, the weathering had actually added the kinds of colors and figure that only Mother Nature can truly create, and the piece was going to be large! Second, those bark inclusions were so deep and the cracks were so extensive, there was no way to spin that on a lathe and expect it to stay in one piece. Without some kind of intervention, it would explode as soon as it got the chance.
The only way I knew to proceed, was to use epoxy resin to fill the cracks, strengthen/stabilize the bark inclusions, and “glue” the piece together. Sounds like an easy process, but it actually took about two weeks to get all the places filled without having epoxy run all over the shop floor and ruin whatever got in the way. There were at least 10 different pours of resin, filling cracks and voids little by little. I also added a mica powder to color the resin that I hadn’t used before. This powder is somehow color changing. It looks sea foam green when it’s mixed, then changes to a bright purple if the light hits it just right, and once it was in the cracks, it almost looked black or very dark purple in places. Really cool effect!
to keep the resin from spilling out, I hot glued pieces of wood around and over the cracks, so the resin would stay in the cracks without leaking out. Each pour of resin took a day to fully cure, before the next crack could be addressed.
Then, it was time to see how my new lathe did with large, uneven chunks of wood. After getting it mounted, the new lathe didn’t even bog down! Turning the outside shape went relatively quickly, but it revealed gaps in the cracks and inclusions where the resin hadn’t been able to get into. Before turning the bowl around to start work on the inside, there were additional pours of resin in small batches to fill the newly discovered gaps. Once everything was done except for the final sanding, I flipped it around to start on the inside.
The outside of the bowl looked pretty good, once everything was filled, sanded, and re-sanded with abrasive paste.
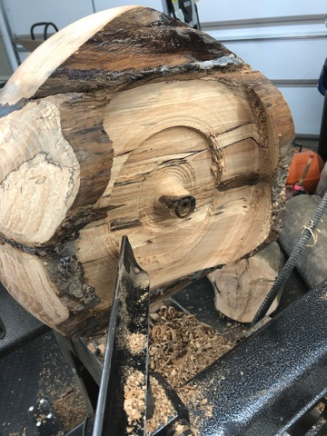
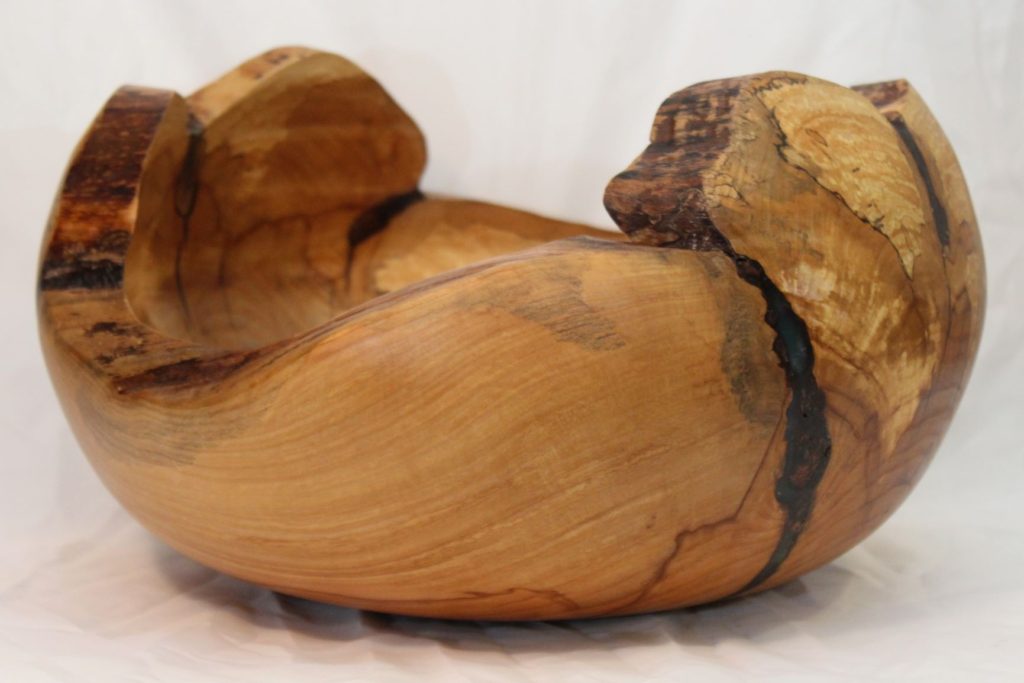
This was taken after the outside of the bowl had been shaped and the removal of the middle of the bowl was just starting. At this point, dodging those uneven edges of the bowl was like trying to clean a spinning mower blade. NOT something for the faint of heart!
Turning the inside was nothing short of dangerous! At one point, I was doing something really stupid that I knew I shouldn’t have been doing, got the tool overhanging the tool rest WAY too far, and ended up getting a catch. The catch pulled my left hand into the spinning bowl, where the uneven rim took a chunk out of a finger and the tool bounced directly bank into my chest, surely bruising a rib. I got off lucky, because this is the kind of thing that causes digits to have to be reattached with pins and stitches! Two days later, I was back up and turning, just a LOT more cautiously! The rest of the turning was thankfully, uneventful.
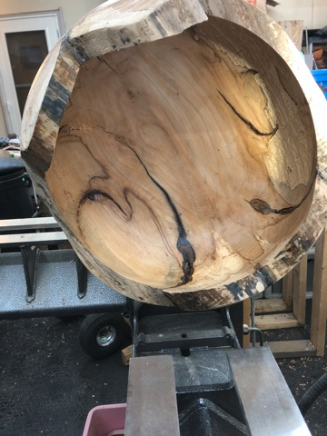
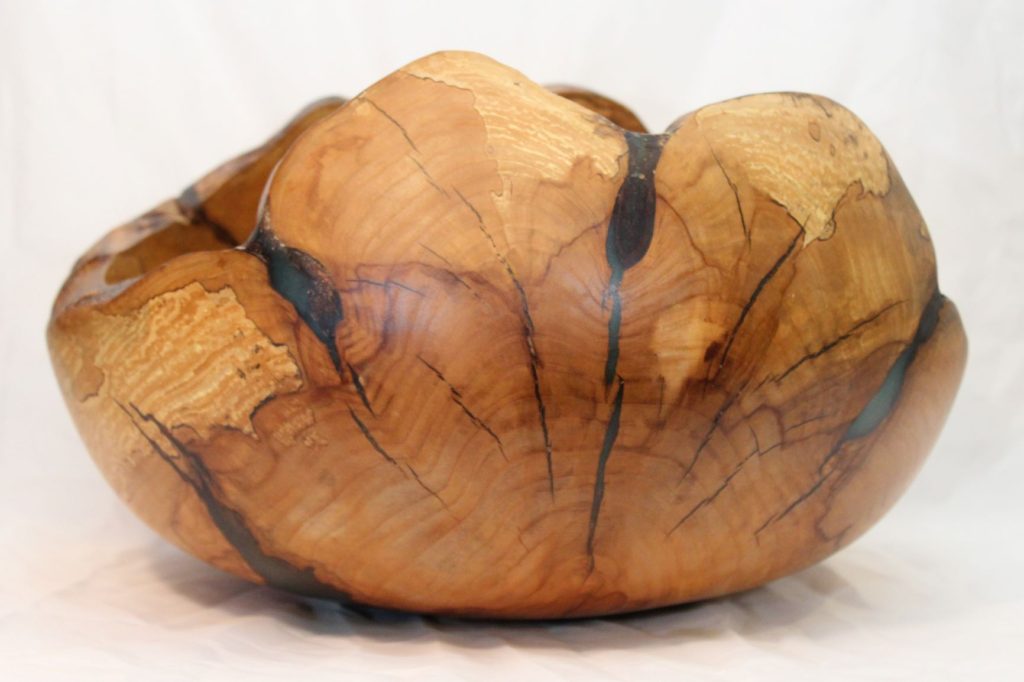
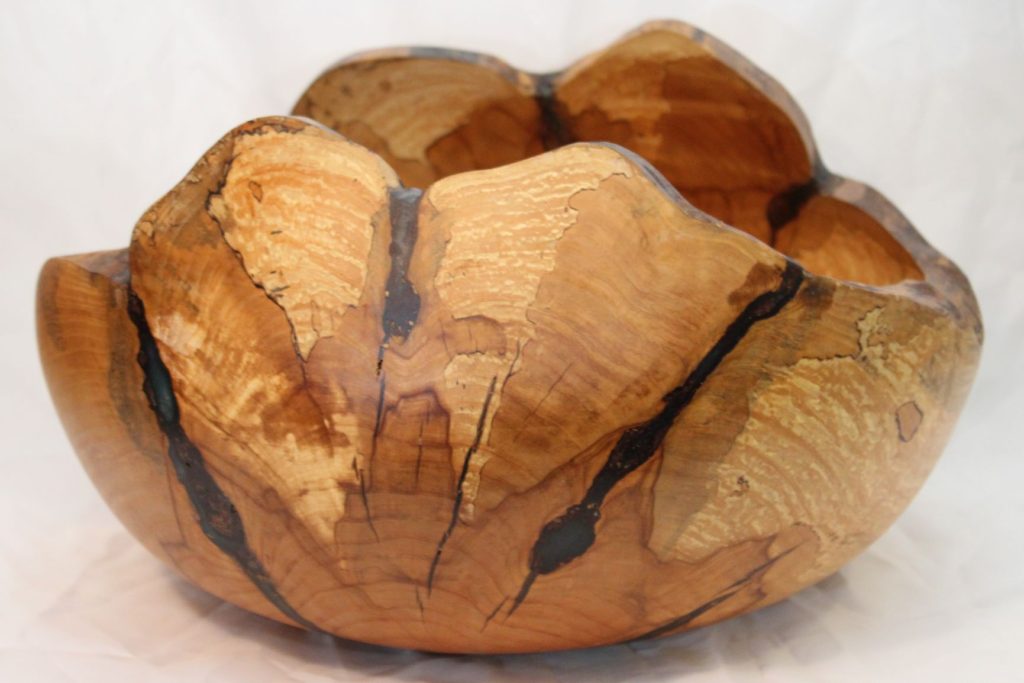
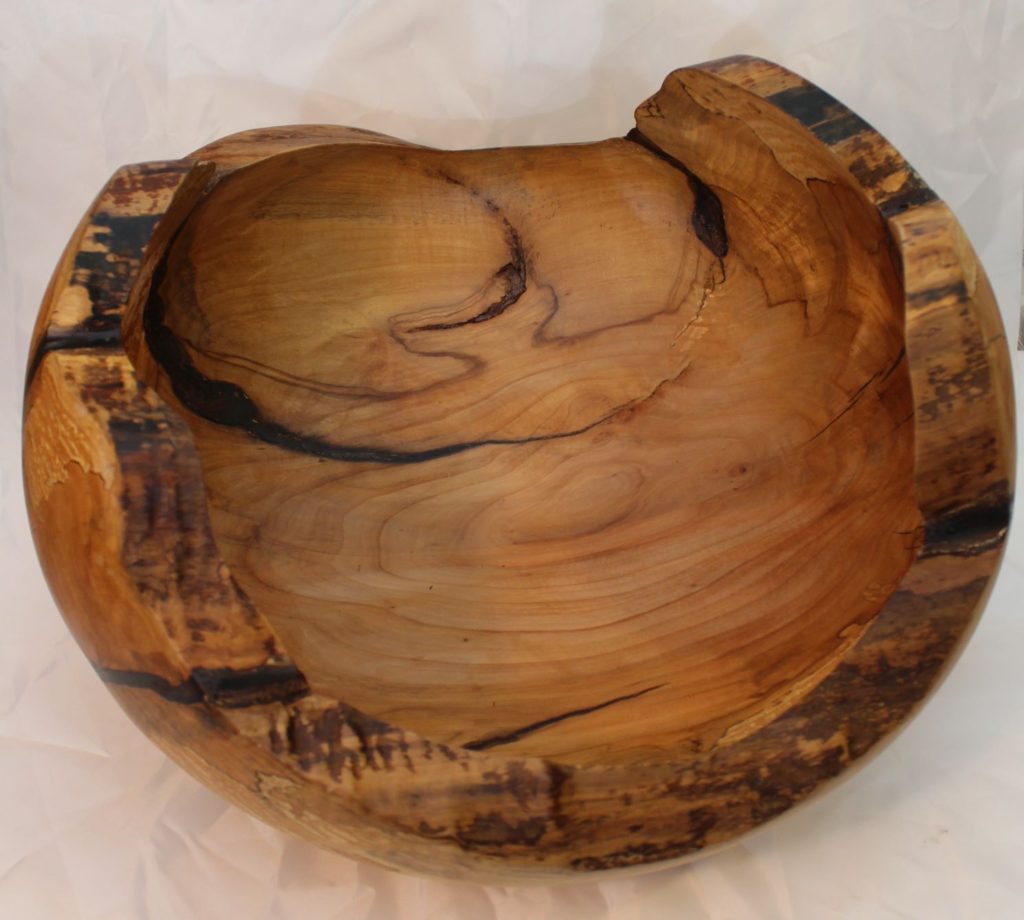
From this view, the overall effect of Mother Nature changing the color of the wood and adding all the lines can be seen, as well as the way the top of the bowl curves back in on itself.
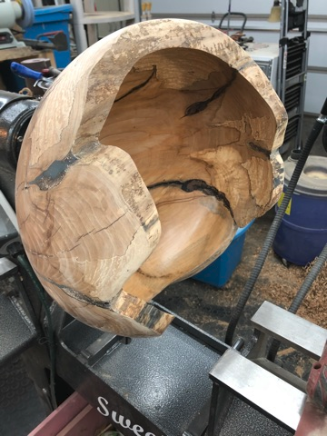
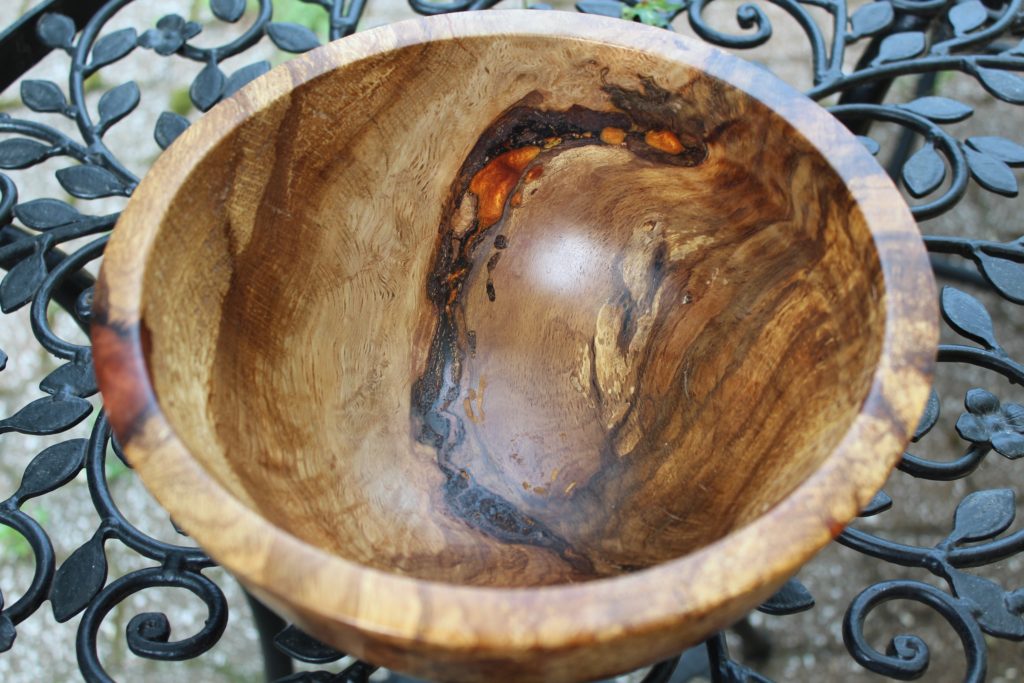
From here, the unique shape of the rim can be seen, as well as how deep some of the cracks were that had to be filled.
After the turning came the sanding! Since there was no safe way to sand the inside of the bowl, much of it had to be done by hand and each “patch” of resin has to be hand sanded up to 30,000 grit to make the epoxy look like glass. In all, it took over a week to get the sanding completed. After the sanding, was at least a can and a half of spray lacquer, with a four hour (minimum) dry time between coat before the wood quit sucking all the finish into the wood and it could be seen. Here’s a picture of the bowl after the second coat of spray lacquer. The shiny parts are where the lacquer was just sprayed and the dull parts are where the bowl instantly sucked the lacquer into the wood.
The end result, though, is stunning! This is one of my favorite pieces that I’ve made so far and was certainly one of the most labor intensive. It’ll be hard to give this one away, but it only seems right to return this piece of wood back to it’s rightful owner. Happy Birthday, Emily!
After the divorce, my daughter started spending more and more time at a friend’s house. Given all the issues that were in play, I was glad that she had a supportive place to go that had a LOT less drama to deal with. They were good, supportive, people, who seemed to help her adjust to the new normal. They were even into cosplay and Dungeons & Dragons (old school) which gave her constructive distractions from the mess we found oufselves in. Over time, she became very attached to their “normal” family atmosphere, went to their family celebrations and met their extended family. When her friend’s grandma moved in with them to get help with some health conditions, my daughter formed a bond with her. From my daughter’s description of “grandma”, she was a tough old broad, who’d lived a life, and had litte tolerance for stupidity, and I say that with love and respect.
Years passed, my daughter got on with school, work, and life, but still managed to keep some form of contact with her “adopted family”. When she got the call that her friend’s grandmother had died, she was devastated. Having never had to deal with the death of someone she knew and the grief that comes with loss, this was one of those life lessons she just had to get through.
At the funeral, which was right in the middle of the pandemic lock down, she found a role helping the funeral director by starting small talk with visitors so she could herd them away from the door and spread the little groups out to keep some kind of social distancing enforced. Being the first funeral she’s attended, it was hard on her. When the service was over, the family asked her to take one of the flower arrangements or plants with her, since they didn’t need nearly as many as they had been sent. Rather than take one of the big, splashy arrangements, she selected a simple vase with red and white roses.
When she came home, I could tell the day had been very stressful and asked her how it went. The initial part of the conversation was what you might expect: sadness, grief, surprise/realization at her inability to make the situation better, surprise at being offered a job by the funeral director, and a general deep sense of loss. I tried to reassure her that this was part of adulthood and she did what she could, which is all you can do.
As she continued talking, the conversation suddenly went off the rails. At one point, she slipped in that as she was talking to the mom who had just lost her mother, my daughter relayed that she has told them I would make her something in memory of the deceased, incorporating the flowers she had brought home with her. Then she went on trying to tell me a story about this one group of people who came in but would NOT move more than three feet away from the front door.
Wait, what? Can we back up just a bit?
When I stopped her story and asked exactly what she had volunteered me to create, things got real nebulous, real quick. At first, it was a simple bowl, with rose petals affixed on the outside. Then, it morphed to the rose petals being encased in resin. Then it became big enough it could sit on their coffee table and be used to hold “stuff”. Then, as she was throwing out ideas for adding color, pyrography, and even some hand carving, I stopped her. My initial reaction was anger, that she’d put me out on a such a thin limb, for a project that would have such a sentimental impact. It’s one thing to screw up a bottle stopper she wanted to give to her professor, it’s a whole different universe when you’re literally dealing with a deceased grandmother and flowers from her coffin. I told her I’d have to think about it, so she continued with her story of the door blockers.
After a night of sleep, some quiet reflection, and what I think is a better understanding of the situation she was in, I chose to do the project. Not because I was particularly thrilled to do it, but because she had absolute faith in me and that I’d create something that would more than cover the gift she’d promised. Somewhere in that vote of confidence was a reason to start.
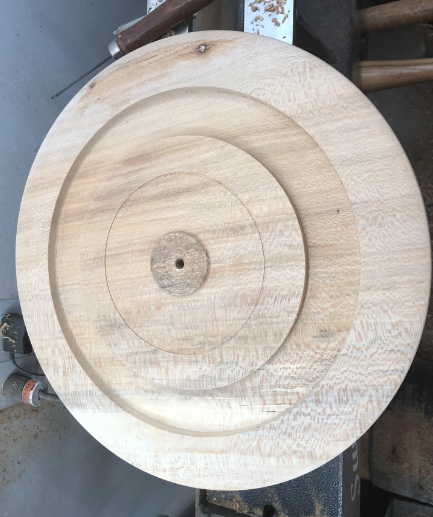
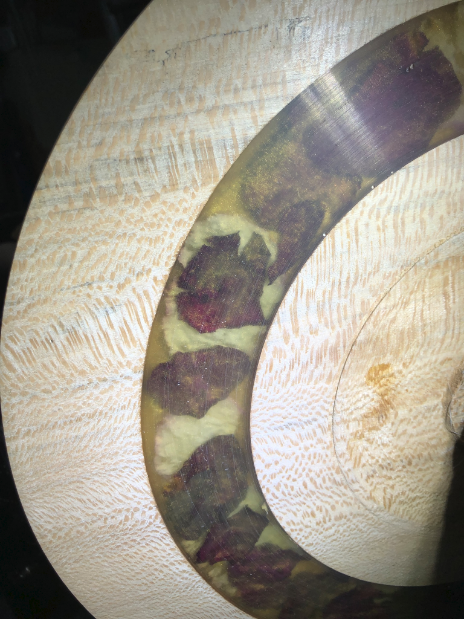
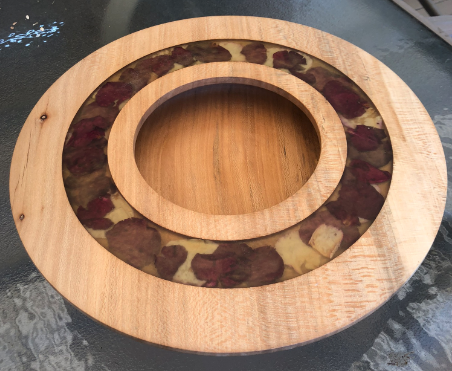
After a brief conversation the next day, I showed her a piece of sycamore that I was planning to use for a large shallow bowl with a highly embellished rim, explained that I could encase the petals in epoxy, but NOT in the way she thought, and that I could undercut the rim and make it deeper than I had planned. She was smiling as she agreed with the design. Then the hard part of pulling this off started.
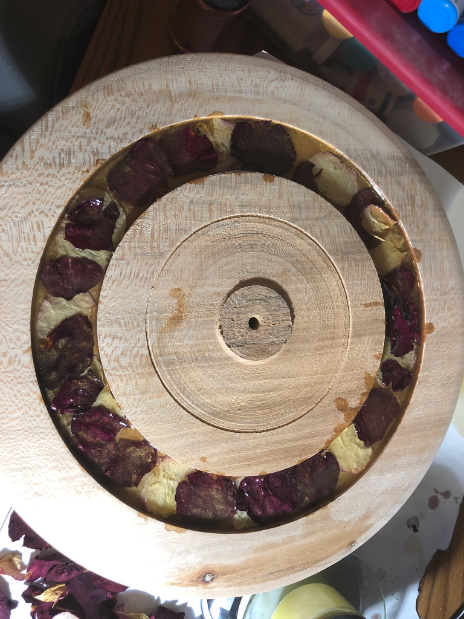
The initial turning part was pretty easy: Create a bowl with a flowing ogee curve and create a channel in the top that could hold the petals and epoxy. Then came the petals. Epoxy and moisture do NOT play well together, so the petals had to be dried. Rather than wait for mother nature and risk the colors dulling, or risk setting them on fire by using an oven, I put them in silicone desiccant for a couple days and that did the trick.
The epoxy work was pretty straight forward. Pour some resin, let it cure. Put down some petals, pour some more resin, let is cure. Put down more petals, pour some more resin, let is cure. Lather, rinse, repeat. There ended up being four layers of petals. On a whim, I added just a hint of yellow, iridescent, mica powder to each pour, thinking it would add just a hint of sparkle mixed in with the resin. It didn’t turn out to be a hint, it was more like a 4 year old yelling out what the secret Christmas present is before anyone had a chance to open it. I showed my daughter, bracing myself for the look of disappointment and thinking I had enough petals left to turn it all out and start over. When she saw it, she smiled and said yellow was her adopted grandma’s favorite color and this was perfect! Guess sometimes you just get lucky.
A little more time on the lathe to smooth out the top, turn out the middle bowl part, and work on the undercut of the rim and it is finished. It ended up being about 16″ across, which should sit nicely on a coffee table, and deep enough to hold TV remotes.
Hopefully, the family that gets it will appreciate the effort
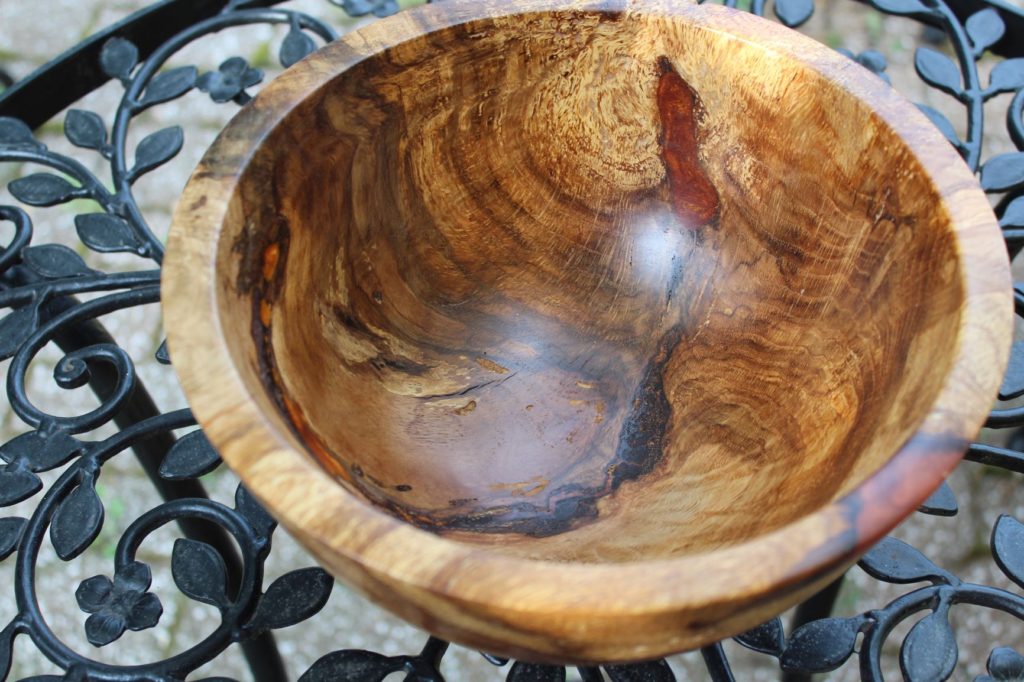
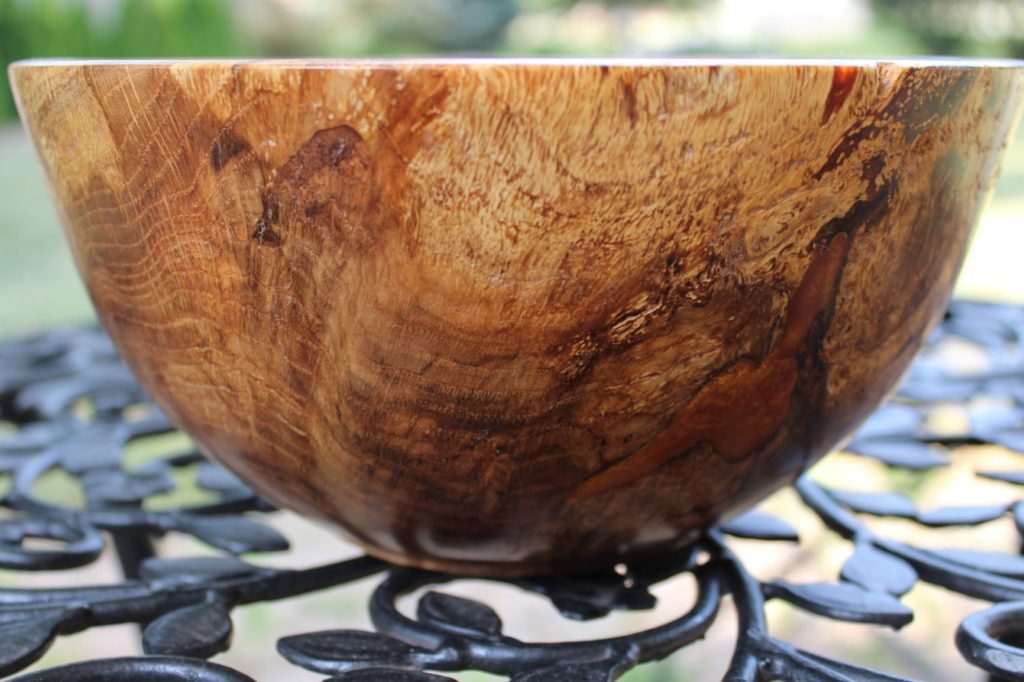
One of the pieces that I found was a chunk of wood that a friend had given me at least a year ago that at some point in the shuffling I’d stuffed in the box with the partially completed projects. It was a piece of oak, white oak I think, that looked like it might be a burl, but it was in such bad shape, my friend wasn’t sure how to even start making something out of it. There was a huge crack going through most of it that was lined with bark, but since the wood was so “twisted” looking, it was unclear if the crack was shallow or if the whole middle part of the blank was hollow. With defects like this in the wood, it suddenly becomes a crap shoot as to what the wood inside is like, because it could be completely rotten.
I started by cutting it mostly round, then cut the top off the bark part so I could see what I was dealing with. A little work with the air compressor and the best guess was that the inside wasn’t rotten, but it did have a significant crack/inclusion that ran pretty deep. I mixed up some resin, colored it with a red iridescent mica powder, and slowly poured it into the hole. It drank in the first four ounces of resin and I still couldn’t see how deep the hole went. Not a good sign! A couple days later, I fed it another 4 ounces of resin, but this time I could tell that the hole was nearly filled. Another couple ounces of resin and the crack was looking like it had been filled, so I figured I was good to go.
When I started turning the bowl, just getting the outside shape set, only to discover there were multiple holes inside the wood and the initial resin hadn’t filled all of them. That took be back to the resin table so I could fill in the missing bits.
After finishing the outside, it was on to the inside. My hope was that turning the inside of the bowl would be a nonevent, since all that resin must surely have make the blank solid. I also hope that Arabs and Jews can make peace somehow, that the rumored sequel to “The Craft” won’t suck, and that Tom Brady will put up “career worst” kind of numbers with the Buccaneer’s. Guess we don’t always get what we hope for. On the inside of the bowl, there were multiple voids in the wood that weren’t connected to the part I had already filled with the red resin. Back off the lathe and back to the resin table for another round of filling the gaps. Aa I was mixing the resin, I was talking to a daughter and in all honesty, picked up the wrong bottle of mica powder. Instead of being red like the rest of the bowl, I dropped in some irridized copper powder in by mistake, but I actually think it was a happy mistake, because I like the way to two colors look together.
After about a week of mixing little batches, pouring in it, waiting for it to cure, then starting with the next spot, it was back on the lathe. Below is the finished product. This is another project that will definitely be staying at home.
Top view showing the red
Side view showing the “good” side
Side view showing all the resin and bark inclusion.
A couple months ago, right before the virus lock downs started, I was driving home from taking my son to school and saw that a house about a block away from mine had two guys with chainsaws and a pickup studying a tree in the yard. The tree looked really bad: Inconsistent leaves, bark missing, and limbs on one side that looked really brittle. It didn’t take more than a second to realize something bad had happened to that tree and it needed to go.
A few hours later, I ran out to get some errands done and on the way back, there was a two foot stump where the tree used to be, and a whole lot of wood piled up next to the street. I stopped the car, looked at the wood, and muscled a large chunk of the tree trunk into the car. Based on the size, my guess was I’d be able to get four bowls out of the one piece of wood. As I was stuffing the tail end of the log into the truck, the fate of the tree was revealed when a big black ant crawled out of a hole in the tree. Carpenter ants like these bore into trees to make nests and will eventually cause the tree to rot from the inside out.
I got home, cut the wood into four pieces, threw one of them away because it was just too damaged, and continued to process two of the three pieces. The last piece had an odd shape, a whole bunch of bug damage, and some nasty looking cracks that had already started to form. I set it outside next to the garbage can and figured I’d throw it away with the garbage. After a week, it has started to crack and there were obvious signs of wood rot where the bark was missing. We missed garbage night, so it sat for a second week. By then, it was looking really nasty, but the cracks were arranged in a really interesting way, so I started thinking.
The initial plan was to cut the piece of wood into a round bowl blank, fill all the cracks with resin to hold it all together, then turn it and see what it looked like. I got it almost round, but my bandsaw blade broke halfway through, so I had to go to plan B. Plan B was to put it on the lathe, dangerous cracks and all, but only turn it enough to get it round. After about 20 minutes, it was done, ready for the resin. I shut the lathe off and was absolutely amazed that ALL of the cracks and all of the wood rot had been turned away. I was left with a fairly solid bowl, with the only damage being the hole through it where the ants had chewed a highway.
I filled the highway with blue resin, let it cure, and went back to turning. Below is the final product. Guess I should be happy that we forgot to set the garbage out, or this one would have been lost.
The plan now is to wait until night and leave this on the neighbor’s porch, with a note explaining why it was left there. I figure one of two things will happen. They could either read the note, say to themselves “I always hated that tree” and chuck the bowl right in the garbage. If that happens, then I guess we’re back to my initial plan to throw the wood away and no harm, no foul. The other possibility is they’ll see the bowl, appreciate that it used to be growing in their yard, and smile. I’m really hoping for the second outcome. We could all use a few more smiles these days.
The hole through the wood started at the blue part on the rim and went all the way through to the blue spot on the left. The grain is also really good and there’s even a few spot of burl on the one side.
When you open a box of squirrels, they tend to all come out at once. Some of them you can put back away, but some of them will just refuse to be put back in the box. The usually find some place to roost where they’re visible, just waiting to be picked up and finished, while they mock you for not being completed the first time. In the same box with the fat bottomed white oak piece was a small piece of mulberry that at some point I had turned into a bowl and wood burned large squares into the side. I remember making it from a cut off, remember making the squares, but got side-tracked and didn’t start doing any of the zentangle burning that was planned.
As luck would have it, the day I picked the piece back up, three things had different events aligned to form a perfect environment for finishing the piece. First, I had just sprained my ankle and was trying to NOT stand on it or walk much. Two days of ice and probably more ibuprofen than I should have taken and I was feeling better, but didn’t want to push it out of fear of re-injury. I had also just subscribed to a new podcast and was looking at just over a hundred episodes to binge-listen. Doing something repetitive like wood burning is a really good excuse to put on the headphones and just zone out. Finally, it was also a beautiful day! High 70’s, sunny, nice breeze blowing, the kind of day that makes it you want to just sit, veg out, and enjoy the first moderate day of summer. within 30 minutes, I was sitting on my back porch, had the woodburners heated, and a cold drink making rings on the table as the ice melted.
Zentangle is like doodling. Each square is a different pattern, but the patterns repeat, so once you do one, the rest are easy. The only hard part is coming up with patterns that are different form the others. The internet is a wonderful resource for patterns that can be either copied or used as a starting point. In all, it took about 4 hours to do all the burning. By the time I was done, my hands and forearms smelled like a campfire, my right hand was threatening to cramp up into a claw, and I’m sure the couple walking their dog in the public area behind my house was wondering why I hadn’t move since the three trips they had made with their new puppy.
Here’s the final project. All that remains is a couple coats of finish to keep the burned smell hidden and to protect the wood.
If you have no idea what the title of this post is, I STRONGLY suggest you find some way to watch the movie UP!. It’s a Disney/Pixar movie that will literally make you laugh, cry, and love life again. If you’ve seen the movie, then you’ll understand where I’m going…
I’ve been spending a lot of time in the garage, trying to shuffle through the remaining crap that’s blocking my ability to start the final phase of getting the shop fully functional. That’s all good, and I’m just about to the point of being able to call the garage door people in for a much needed replacement. I was making progress. Serious progress! Then I opened a box marked “unfinished projects”. It might as well have been labeled “a box of squirrels”. Many of the partially completed items I remembered starting, remembered why I quit, and remembered what needed to be done to finish them. Some, however, are complete mysteries. To be brutally honest, some I don’t even remember starting and figure they must have been from an all day “bowl rough out” session thinly disguised as a poor excuse to just make a mess.
One of the projects I remembered. Kinda… It’s a piece of White Oak from a co-worker (thanks again, Lisa) that I started on a day when I was in a particularly bad mood and thought some shop time would help. It did, along with the companionship of my friend Bob who let me use his shop. Looking at the bowl now, the bottom of the bowl was grotesquely thick. It’s been YEARS since I had done such a poor job keeping the overall thickness of the walls uniform. Either it was left that way for a reason, or I just sucked that day! My best guess is It went into the box for three reasons:
Shame. If this was a rookie mistake, a beginners face-palm, or something you know someone will pick it up and ask “why is this bowl so heavy”, the best you can do is hide your mistake and stash it away.
Logistics. I was pretty sure there was enough meat left in the bottom to salvage a decent bowl, but it was gonna take some to figure out how to make it happen. Do I use a tennon or a recess? Do I take the extra heft from the inside or the outside? Do I… Figuring out the “how” part – especially when applied to fixing a failure – could be just enough to make me pack it away.
Laziness. One of the most true things about woodturning is it’s always easier to start a whole new project that has a very high liklihood of success than it is to fix a bad project that has a much lower chance of paying off. Could be there was a new blank sitting in the shop, so this one could wait.
Squirrels, however, seem to have a magical property, especially if you catch one! When I picked this one out of the box, the logistical problems were gone. I instantly knew exactly how to remount the piece – by gripping the rim of the bowl with my monster jaws, so there was no need for either a tenon or a recess. I knew the extra weight would be removed from the outside of the bowl, and a bonus revelation that the extra thickness could easily be turned into feet. I also vaguely remember talking with Bob about leaving it thick to accommodate the carving of feet, but I couldn’t remember if we were talking about this specific bowl. That took the shame away, because now I could lie to myself about plausible deniability. the laziness melted when I looked at the potential project in my hand, then quickly at the mess and chaos that is the garage and decided “Yeah, this squirrel needed chasing”!
The turning part didn’t take that long. Since my big chuck already had my monster jaws attached, and since I’d already changed the spindle adapter for the big chuck to fit my new, big, lathe, I decided this would be the first project completed on my new toy! White Oak, when it fully dries, is HARD! Even though I had to stop twice to resharpen my tools, I was still able to get the extra thickness of the bowl turned down to a ring that would become feet in about 20 minutes. The carving part didn’t go as fast. It took about an hour to get the rest of the wood removed and another hour sanding to get rid of the tool marks.
Overall, I like this one! The legs provide a little “lift”, without making it look like the bowl is on stilts. There was also a branch trying to grow through the blank, and I kinda like the way both ends of the branch can be seen. This one’s a keeper!
From the top, you can see the branch that was growing through the blank. While it made it harder to turn, it did some really cool things to the wood grain!From the side, the feet can be seen, but only slightly. That’s what I was going for. There’s about a quarter inch between the bottom of the bowl and the surface. The spacing of the feet had to account for that nasty little knot in the bottom of the bowl.
With the COVID19 panic still in full force in Illinois, pushed by a Governor who seems to like the power he has seized and a political machine that seems to think everywhere in the state is just like Chicago, the May meeting of our woodturning club was cancelled. Like the April meeting, my son and I decided to do another remote demonstration in place of our regular club meeting. This time, rather than do one from our dining room, we decided to go to the club meeting place in Bloomington and try to do something with a little more quality. Better sound, better lighting, and I could use the club’s lathe, which is also better than my Jet mini.
Being basically lazy, I figured if I was going to have to turn something anyway, I might as well turn something that also satisfies one of the president’s challenges. Kill two birds with one stone, as it were. I decided to show the club how I turn miniature bird houses, only instead of my usual design, I decided to meet the challenge of making a project with a finial at least 6″ long.
The demo started as I expected, with club members giving me a hard time about my self-quarantine hairdo. No, I haven’t shaved my head, yet, like Quintin did. I haven’t had hair that short since early grade school and I have no intention of going back to it. Instead, it’s gotten quite long, quite shaggy, and is easily the longest my hair has been since joining the club. One member asked if I “was getting ready to try out for the Passion Play”, comparing my hair style to that of Jesus. Another asked if I “was gonna put all that hair into a bun and start wearing skinny jeans”? No, that’s not going to happen. I took the light hearted kidding as a good sign that the club felt comfortable enough with me to take a swipe, knowing I wouldn’t be upset.
My biggest fear in doing a demo that actually involved me showing my skills at the lathe, people would find out I’m not the best turner out there. From a technical standpoint, I know that I don’t always have the proper technique and others in the club are far superior to me in that regard. I was pleasantly surprised when no one made comments, pointing out my obvious (to me, anyway) flaws. My other fear was that as I was turning, I’d make a mistake and the piece would simply shatter into a million pieces, filmed live for constant ridicule. Luckily, that didn’t happen, either. All in all, it was a good night!
Here’s the mini-birdhouse I made at the demo. It’s finished with an abrasive wax on the house part and blue spray paint on the roof to add some color. Because of the way I made the top of the finial, there was to way to attach an eyelet, so I twisted up some very thin copper wire to make a hanger.
The house part is a little over an inch square, and hollow. Since this is very light, it will most likely become a Christmas ornament.
Since I had made the pieces for another one, just in case this one blew up halfway through the demo, I ended up killing three birds with one stone. One of the other president’s challenges is to make something that was demo’d during a club meeting. Here’s my “spare”, also finished with a paste wax.
The roof is maple, the house could be sycamore and the finial is cherry. I think it needs a bird, sitting on the perch…
So with the COVID-19 pandemic, and the hysteria, panic, and mandated quarantines that followed, the woodturning club I’m in had to cancel our April, 2020, meeting. Like a lot of other people, it kinda hit the club by surprise and I would certainly say we weren’t prepared. While many other groups just shook their heads, took a deep breath, and embraced Zoom for online meetings, our club isn’t that technically savvy. Our choice was to just cancel the meeting and not meet for another month, or try to do something that would keep the club active, without violating any social distancing requirements or mandates from the Governor.
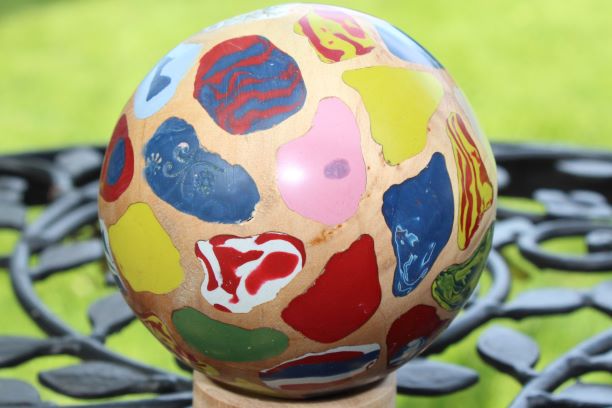
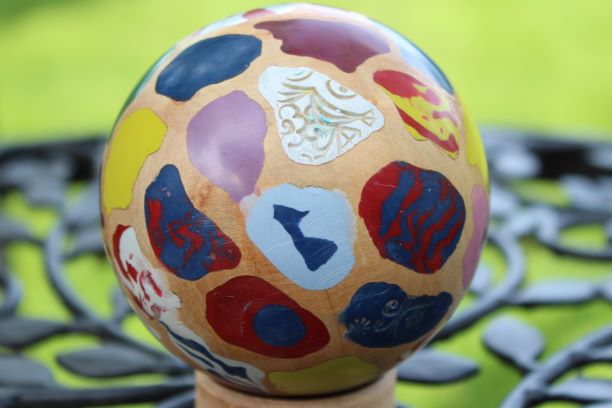
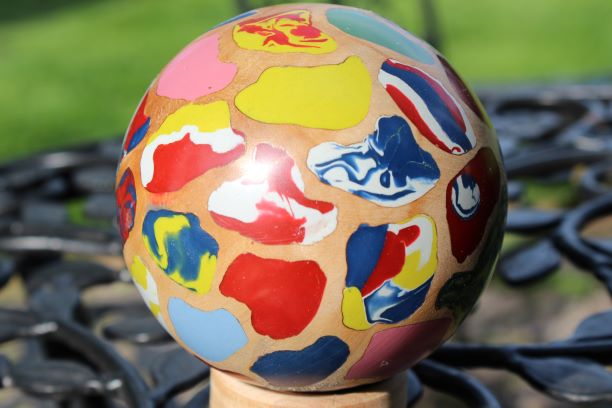
Since I’m now the President of the group, I kinda felt like it was my place to fill that gap and try to find a way to keep the club engaged. The first thing I did was create a special “President’s Challenge” so people would have a reason to turn during the quarantine. I decided on making a sphere, since all the pictures of the COVID-19 virus looks like a fluffy round ball, the challenge was to make a sphere. I figured that would be good because there hadn’t been a lot of spheres brought in to club meetings for show and tell, they don’t take much in the way of special equipment, and they don’t require 20 years of practice to learn. I was feeling good about myself.
While the feeling of goodness was still swirling in my head, I did a second thing. Before I could stop and think about what I was doing, I opened up my big fat mouth and volunteered to do a remote demo, using Facebook Live from our club’s Facebook group. Have I done something like that before? Um, no. Did I know what it took from a technical perspective to put on a decent Facebook Live presentations? Um, no. Did I have all the camera equipment sitting around at home to make this happen? Um, no. Did I expect it to go well? Um, sure! 14 year old girls can put on a Facebook Live to show off their new make-up techniques, so how hard can it be?
I quickly learned there’s a big difference between using a cell phone and it’s built in camera to stream a head and shoulders shot of a great “smoky eye” and using a camera to do a tight, overhead, shot of the task being demonstrated. This triggered a whole series of good news/bad news situations I had to work through. The good news is the club just bought a whole bunch of new AV equipment I could use. The bad news is it was stored at a club meeting site, so I’d have to break the quarantine rules to go fetch it. Once fetched, the good new is the clubs AV equipment is all digital and produces a high quality, high definition picture. The bad news is they output their picture through an HDMI cable, so I’d need to have some way to input an HDMI cable, which none of my computers have. After some research, the good news is I found a gizmo that would convert the HDMI input signal into a USB 3.0 signal that the laptop could accept. The bad news is it wouldn’t get here until the day before I was supposed to go live. That left me very little time to practice, make sure the camera worked with the gizmo, which worked with the laptop, which could run the software to control in the inputs, which would actually stream into Facebook. Thanks to my son “volunteering” to help, we were able to get all the tech set up, get all the materials gathered for the presentation, and even an outline of things to cover. When the big night came, it actually went off pretty well!
The demo was on using epoxy clay. This is a two part clay, that mixes together into a thick play dough consistency. Once it’s done being molded, it will cure overnight and become as hard as rock. Since I had to make a sphere for the president’s challenge anyway, I figured I’d combine the challenge with the demo and kill two birds with one stone.
Here’s the final product. All things considered, it turned out a lot better than I was expecting it so, and after buffing up the epoxy clay, it’s super smooth to hold.