Category Archives: blog

root folder for blog posts

Quilling and turning

The new shop isn’t finished, yet, but that hasn’t stopped me from thinking of projects. (I didn’t realized how much I missed the ability to just play around in the shop until there was no shop to play around in!) I was on the computer one night, deep in the black hole of time suck that is Youtube, and eating a piece of candy. As I watched the video, I was absent mindedly rolling the wrapper around in my fingers until it wouldn’t go any tighter, then rolling it the other way to straighten it out. At one point I stopped half way and looked down at the paper. what I saw, was two spirals, going opposite directions. I tore the paper in half and tried to see if I could make another. Eventually, the paper got smaller and smaller, but I had several nearly identical curly-cues. I figured I wasn’t the first one to roll paper into shapes, so I started looking on YouTube.

Turns out, there’s a whole art form of doing this called “quilling”. Who knew? About 75% of the videos I saw were from people I’m guessing were of Indian or middle eastern descent and the other 25% were soccer moms who seemed to be a little too cheery to be doing a craft project. All of them made it look like something even a child could do. The next hour was spent looking at examples of projects others had completed and every tutorial I could find on how to make different patterns. Some of them were extremely intricate, some were three dimensional, but to be honest, it looked pretty easy. I thought “I can do this, how hard can it be, it’s just twisting paper”.

The next day, after a quick trip to Hobby Lobby, I sat at the counter, preparing to attack the tiny strips of card stock I’d bought with the special quilling tool and tiny scissors that came with the set. I figured 15 minutes and I’d be staring at a masterpiece. After a half hour or so, I realized a few things. First, every one of those videos were made by a bunch of damned liars! I figure the hosts must have done 30 takes at each piece, then edited out the 29 failures so they could present the one good attempt with their fake smile, silky voice, and claim of grand master status. Bastards! Second, I realized that even if I was able to luck into something that even approached “success”, there was no real application for making this stuff. Seriously, even a bad bowl can hold stuff, but what can you do with even the best quilled paper? I put the stuff away, quietly swore to myself, and decided to wait for another day to do this again.

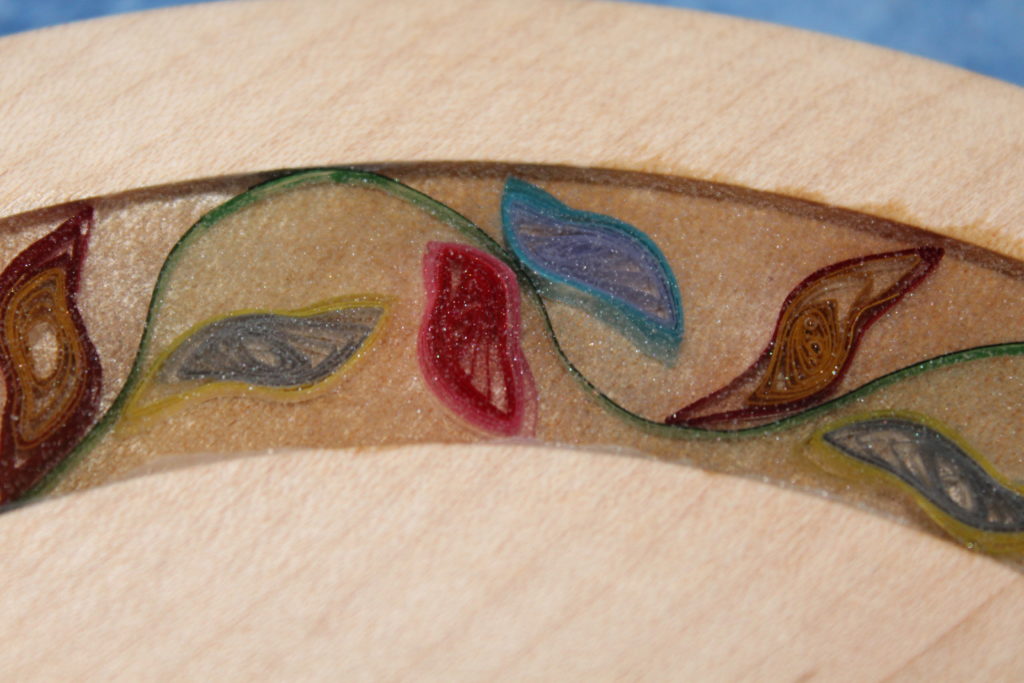
A week or so later, I was at Bob’s house as we started making a wide rimmed bowl out of some old maple boards that I had glued together. The initial intent was to dye the wood and try to do some kind of texturing across the rim, then stack layers of dye and hope to make something worth making. Then it hit me, I could incorporate the quilling into a channel, then set the whole thing in epoxy! I brought the bowl home and set about trying to improve my quilling expertise. After a week or so and many failed attempts, mulligans, and do-overs, I finally arrived at something that I thought looked at least passable.

The finished result is below and for a practice piece, I think it actually turned out ok! The glue job on the maple boards wasn’t the best, so there’s a crack in the piece that I had to “fix” and my sandpaper and supplies for polishing resin are all packed away, so don’t look too close at the top finish. Eventually, I’ll put this back on the lathe, work on the crack a little more, smooth out the resin surface and polish it back down to a glass-like flat surface.

Now, I’m already thinking about the next project, to see if I can do something like this on a wig stand or even an entire bowl made from quilled paper and resin. I have GOT to get my shop back up and running!

Overall, I really like the overall look of the bowl. There’s a crack on the one side where the glue joint partially failed, but other than that, it looks good.
Here’s a close-up of the quilling. There are iridescent flecks in the resin, that I had hoped would catch more light than it actually does, but this will at least show the quilling that was done.

Wendy’s bowl

So…  I started the divorce process in April of 2013 and it’s still going on.  VERY long story there, but the only part I’ll put in this post is that way back when, my attorney made this huge, poured concrete table for the office’s conference room.  He did a really good job, but there was nothing on the table, except for a pile of post it notes and pens.  I told him I’d make him a bowl that would look good and help consolidate the mess.  Well, after the three year mark, he quit practicing law and I got a new attorney from the firm.  After a year or so, the second attorney left the firm to concentrate on appeals, so I got a new attorney from the firm.

Wendy is the newest, and hopefully last, attorney that I should need to finally put a stake through the heart of this beast.  She is an exceptionally nice person and a very good attorney. After a very long meeting with her, going over a whole list of motions that were filed and were to be filed, we were chatting and I mentioned that I still owed them a bowl for the table we were sitting at.  She seemed really excited at the prospect, but since the divorce has caused me to (temporarily) lose my ability to make anything, it was understood that it would still be awhile before I could come through on my much earlier promise.

As I was cleaning out the house to get it ready to put on the market, the shop had to be packed up.  As I was removing things, I found a huge piece of spalted maple that I had been saving for over 9 years.  There were three reasons to hold on to a gorgeous chunk of wood that long.  First, I didn’t have a lathe big enough to spin a piece of timber that big and heavy, so there was a logistical concern.  I also didn’t want to cut it down and make something smaller, because the whole point of keeping a large blank was to make something LARGE!  Second, it had been placed safely under a work table, then several other boxes of supplies and miscellaneous crap had been placed in front of it.  Out of sight, out of mind.  Lastly, since this was my last piece of large spalted maple, and since I already knew the coloration from the fungal zone lines was going to be exceptional, I kinda had this fear that I’d screw it up.  If you don’t start, you may never win, but at least you can’t fail.

Well, as luck would have it, I was able to use the lathe of a very good friend to finally process this piece of timber.  We decided on a traditional bowl shape, keeping it as large as possible and leaving it a little thicker than I normally would have done.  Even with the thickness of the final project, this bowl is surprisingly light.

As I had expected, the coloration in the wood is absolutely gorgeous. I fully intend to keep my word and give it to my attorney, but I will admit it’ll be hard to set it on the table and walk away.  Even harder to continue going there because of the divorce and having to keep walking away…

From the top, the depth and amount of spalting this piece of timber had is amazing. REALLY like the way this one turned out.

From the side, the spalting is equally impressive. Is it just me, or from this angle, is there a grumpy face on the right side of the bowl?

Viking Bowl

So I was slumming around YouTube and found a guy that was using something called “metal reactive paint” to make brand new copper ceiling tiles look like really old, weathered ceiling tiles.  Metal reactive paint is apparently paint that has copper, bronze and lead particles floating in it, so if you spritz it with some kind of solution (most likely water) while it’s wet, it will rust the metal floating in the paint.  when everything dries, you’re left with the color of the paint, with the addition of either a blue/green patina on the copper and bronze or a yellowish orange on the iron.  I figured I’d give it a try and started looking for some of this stuff.

Amazon has it for the low, low price of $12 for a 6 ounce bottle, and that doesn’t include the spritzing solution.  WHAT?!?  $2 for each ounce?  Would you buy a can of beer for $24?  I figured there had to be some kind of craft supply house that would be cheaper.  I looked at the place I normally buy woodturning supplies from and they have it, too!  Their price for a 6 oz. bottle was $15.55.  ouch!  I figured I’d see if I could buy it directly from the manufacturer and save some money by cutting out the middle man.  Nope!  They point you to an authorized dealer, the nearest one being an hour away, the next closest two hours away.

After several hours searching, I found a place that sells what I am sure is a counterfeit version, under a different name.  They even had videos showing how to use the stuff and some tips.  For $38 I was able to score a 6 oz. bottle of copper, a 6 oz. bottle of iron, a 6oz. bottle of light bronze, a 6 oz. bottle of dark bronze, AND, a 10 oz. bottle of spritzing solution.  Still kinda pricey, but not sell off a kidney kinda pricey.

Here’s the final result.  The whole thing (minus the upholstery tacks added in an attempt to make it look like there were rivets on the top) is made of wood.  This one will not go to the burn pile…


Not sure I’m crazy about how tall the finial is on the top, but the overall piece looks pretty good.

Here you can see the inside of the bowl showing the un-oxidized copper color.

Close up picture of what the oxidation looks like.


The Jacobi ash series

I was talking with a co-worker and he told me about a storm that came through Central Illinois this spring and slammed his parents.  They had damage to their house, a shed, and it tore up an ash tree.  As is usually the case, as he was telling me about all the work he was doing to clean up the property for his parents, I kept hearing “free wood”.  The standing deal is, you bring me wood, I’ll make you something, so it didn’t take long to broker the exchange.  (I actually kinda like these deals, because it gives people the ability to say “remember that tree that used to be in the front yard?  Well this bowl came from it!”)  The two logs he brought, should yield 4 smaller bowls, about 7″-8″ in diameter.

I roughed them out back in May and left them to dry.   I figured there was plenty of time, so I just let them set, continuing to dry.  When I checked on them in October, one bowl developed a deep crack that may be problematic, but seems stable enough to continue.  The others look fine, minus the usual warping that comes as wood naturally dries, and will have to be “turned out” on the final product. I figured I had all kinds of time to complete the project, since there was no real deadline.  WRONG!  Things changed at work and my co-worker will be taking a buy-out offer and leaving the company.  I decided to get these turned and done before he left, perhaps even before Christmas.

One piece of wood I’m going to hold back (call it a tax) but the first three are all finished.  The first bowl started out as a typical, small, ash bowl about 7 inches across and 5 inches or so deep.  Ash can look kinda plain if left it’s natural color, so I decided to try to dye the wood with an airbrush.  This was only my second attempt at using an airbrush to spray and blend aniline wood dyes and I’m very pleased with the way this turned out:

Top view, showing the colors going from dark blue to green, to gold.

Since this is dye, not paint, the natural gain patter still shows through.

The second was really non-descript in terms of grain pattern and color.  As plain as ash gets!  I decided to add a ring around the top to give it some kind of contrast and decided on adding a ring of santos mahogany from South America.  Using just a renaissance wax for a finish allowed the piece to stay fairly close to the initial colors, yet still brining out the redness of the mahogany.  Like this one, too!

Top view, showing how the grain pattern looks inside the bowl.

Side view, showing the contrasting santos mahogany.

The third bowl had a significant crack that developed right across the bottom as I was turning it.  I tried to “turn it out”, but realized quickly that the bowl would end up paper thin if I kept going down that path.  Since I don’t know if the crack will continue to grow, heal up, or stay exactly like it is, I skipped adding any embellishments and stayed with the “brown and round” approach.

Adding the wood burned lines was a good touch!

the crack can be seen here, on the right side, moving form NW to SE.

Hopefully, Mr. Jacobi will enjoy the pieces and share at least one of them with his parents…


Airbrush practice

Since I started getting heavy into turning, I had always admired the way some turners were able to stain their projects to get deep, rich color, without covering up the natural grain pattern of the wood.  I did some research and found the best thing to use is aniline wood dye, so I bought some.  Even though the videos made it look really easy, by early efforts all ended with hard lines between the colors.  Instead of getting a bowl that was green on the bottom, fading into  purple, then fading into blue on the top, I’d always end up with something that looked like a bad Easter egg colored by a 5 year old.  Hard lines, splotchy coverage, and nothing at all like what I had envisioned in my head.

Last Christmas, I got an airbrush for my daughter to use on her costuming projects.  After seeing a video on YouTube from a guy in England who was using an airbrush to apply the dye, I figured I’d give it another shot.  While I still have a LONG way to go to get the effect that I want, this is a pretty good freshman effort!  I love the way you can still see the woodgrain and natural spalting of the wood through the stain.

When Hobby Lobby opens, I’ll be heading in for more airbrush supplies…

I left the foot the natural color, just to show how much different the wood looks with the dye added.

I tried to get the color the same density on the top as it is on the bottom, but I’m not sure it was successful.