Category Archives: blog

root folder for blog posts

Natural edge Mulberry

Last week, as I was getting ready to go to a friend and mentor’s shop to turn, I was looking for a project to take.  I stumbled on a piece of a tree that wasn’t with all the rest of my green wood and looking at it, I’d forgotten where it came from and couldn’t come up with a reason why it would have been away from the rest of the wood hoard.  I decided to take it and see what we could make out of it.  When we cut into it, it became clear that it was mulberry.  About a year ago, aco-worker told me his in-laws had a big mulberry tree come down in a storm and asked if I’d be interested in any of it to turn.  That’s kinda like telling a crack addict that you know a guy who cooked up too much meth and wanted to know if they want a taste. The answer is always going to be a strong yes!  The chunk of wood I took was thinner than the other chunks that came from the tree and was from a place in the tree where several branches had kinda joined together.  Usually, that part of a tree will give one of two things:  Either you’ll find a whole bunch of knots that are prone to cracking and are a pain in the butt to work with, or you’ll find some really cool looking grain patterns because the the tree doesn’t really know which way to grow when it hits those kinds of intersections.  I figured we’d spin it up and see which I got.

We finished the outside at Bob’s shop. This morning, I finished the inside, about an hour and a half of sanding, and then started applying the finish.  Mulberry is really good to turn, but it can get a little stringy and if there’s end grain, it can leave a really “chippy” surface.  The final product will look good, it’s just that you’ll have to factor in some time for extra sanding.  Here’s the final product.

I don’t make many natural edge bowls, because it’s hard to keep the bark on them and without the bark, they usually don’t look as good. This one turned out GREAT!
Another view…

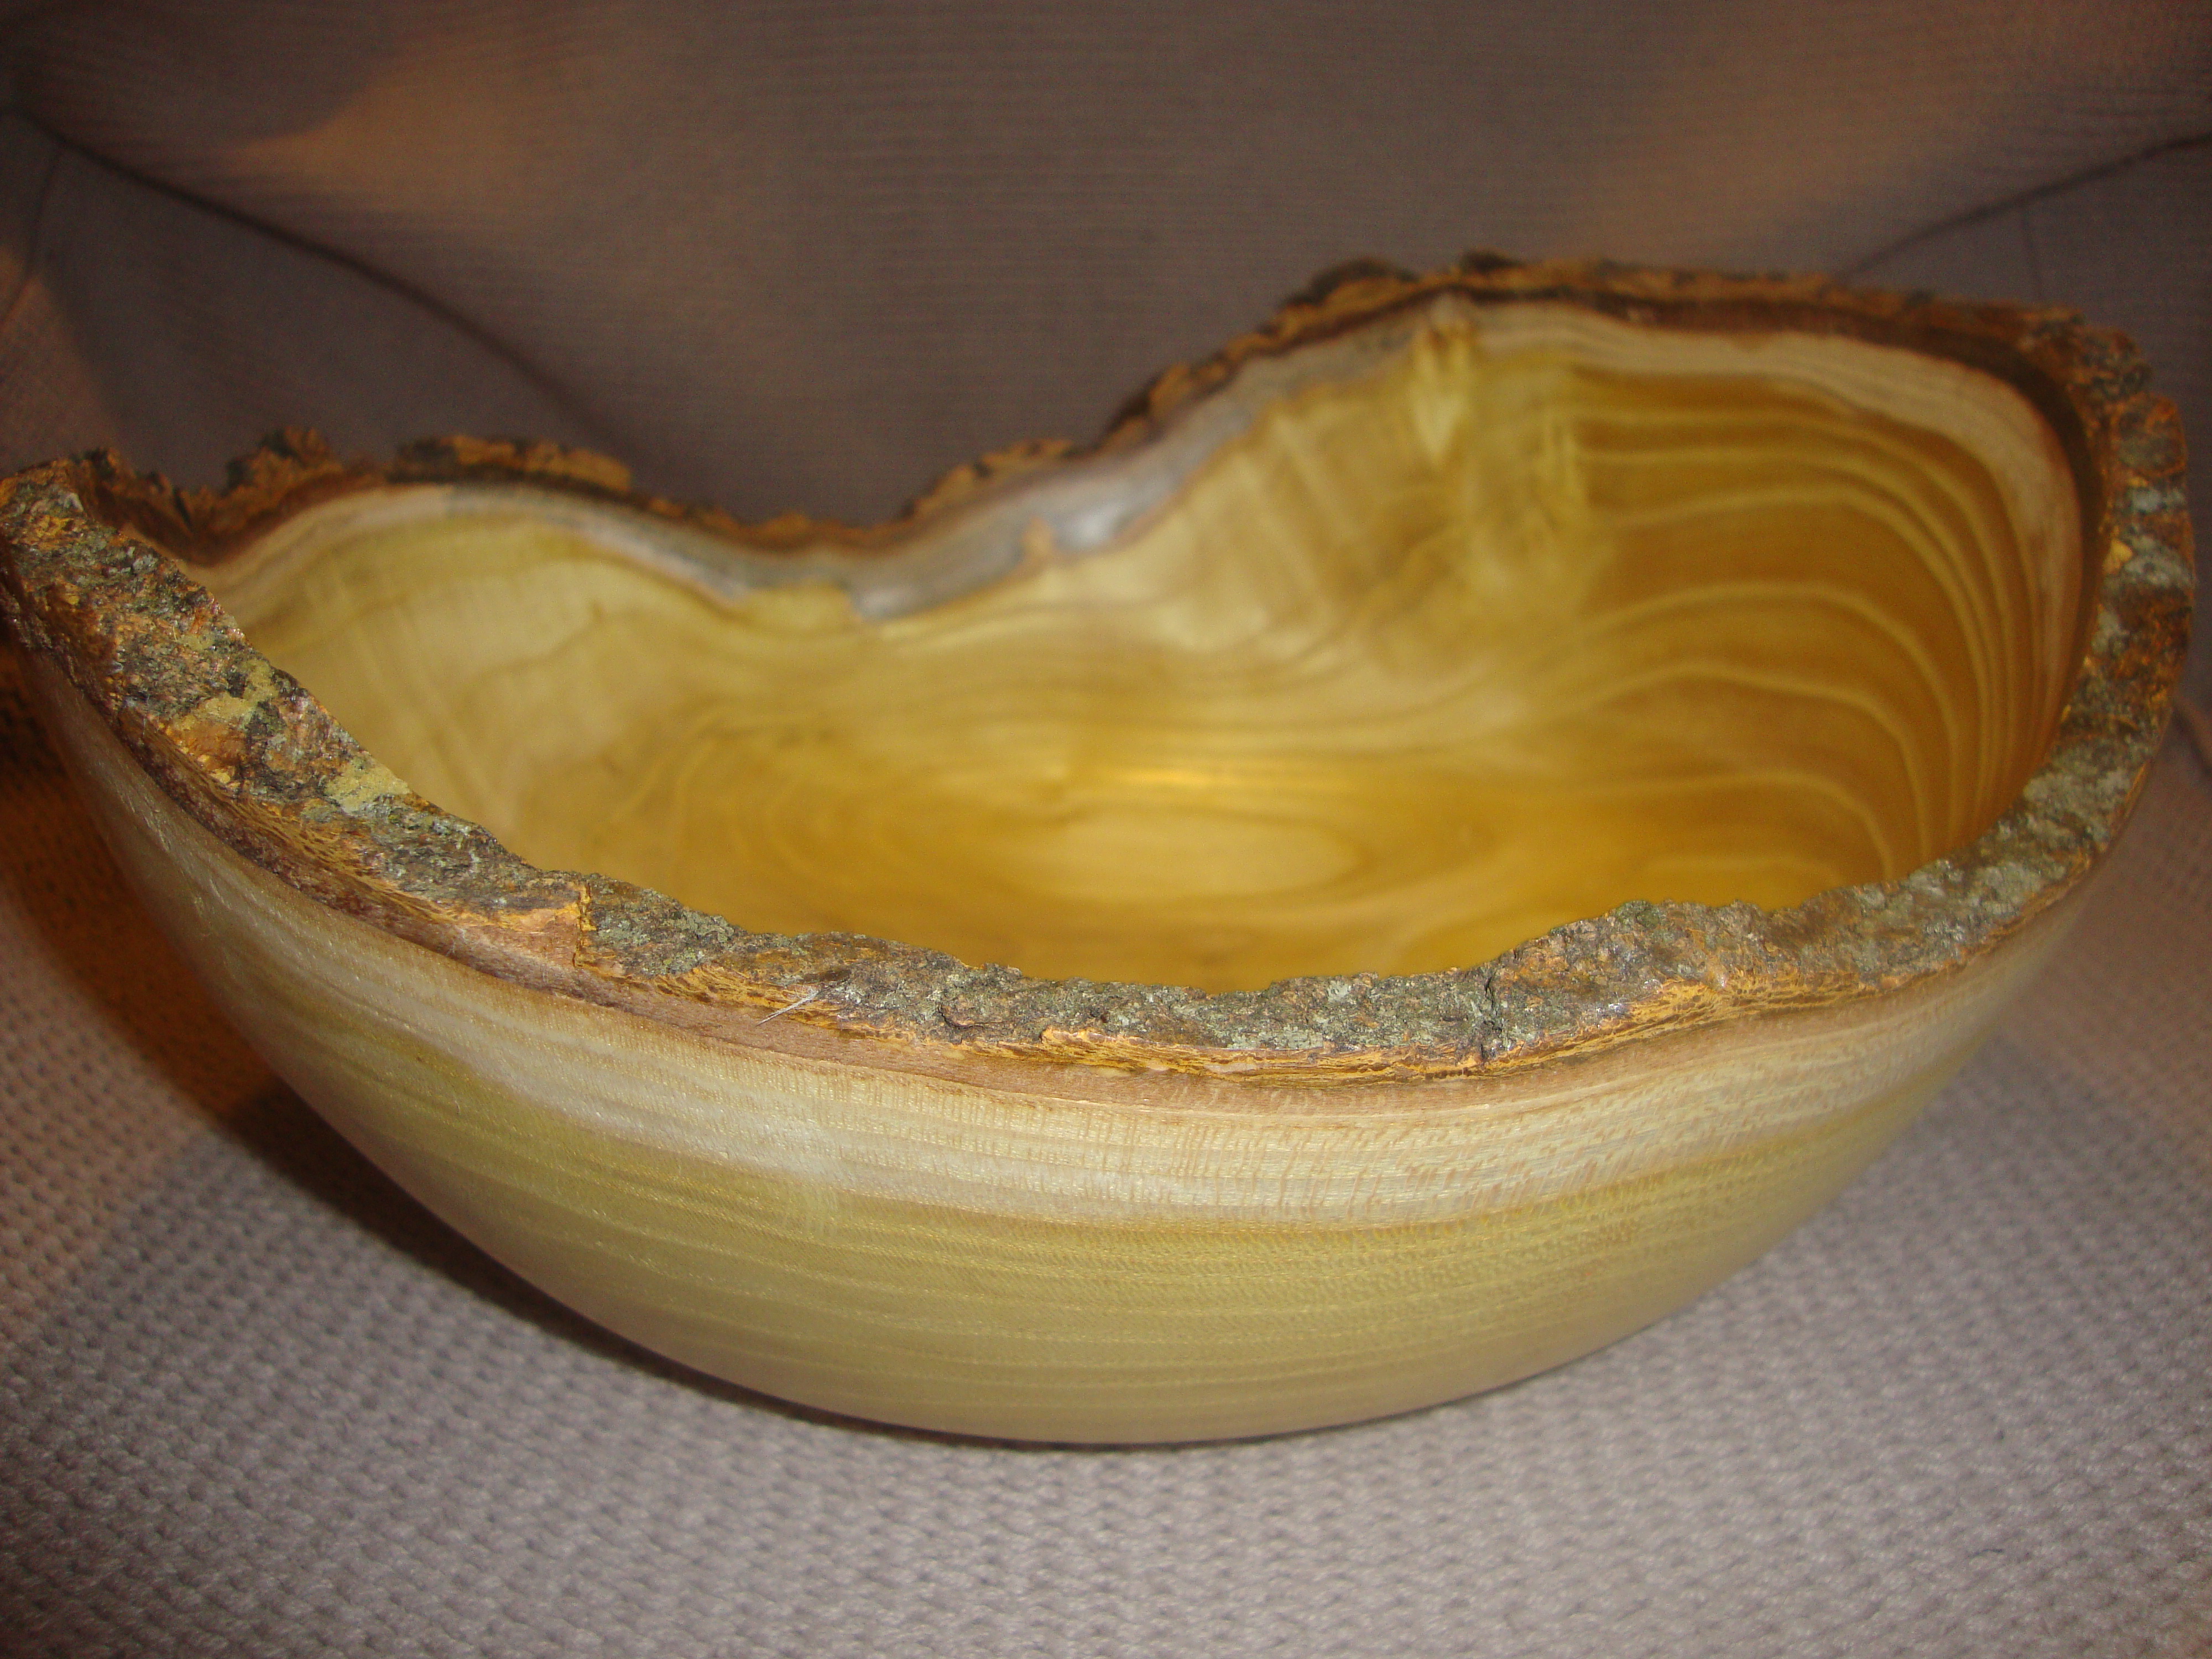
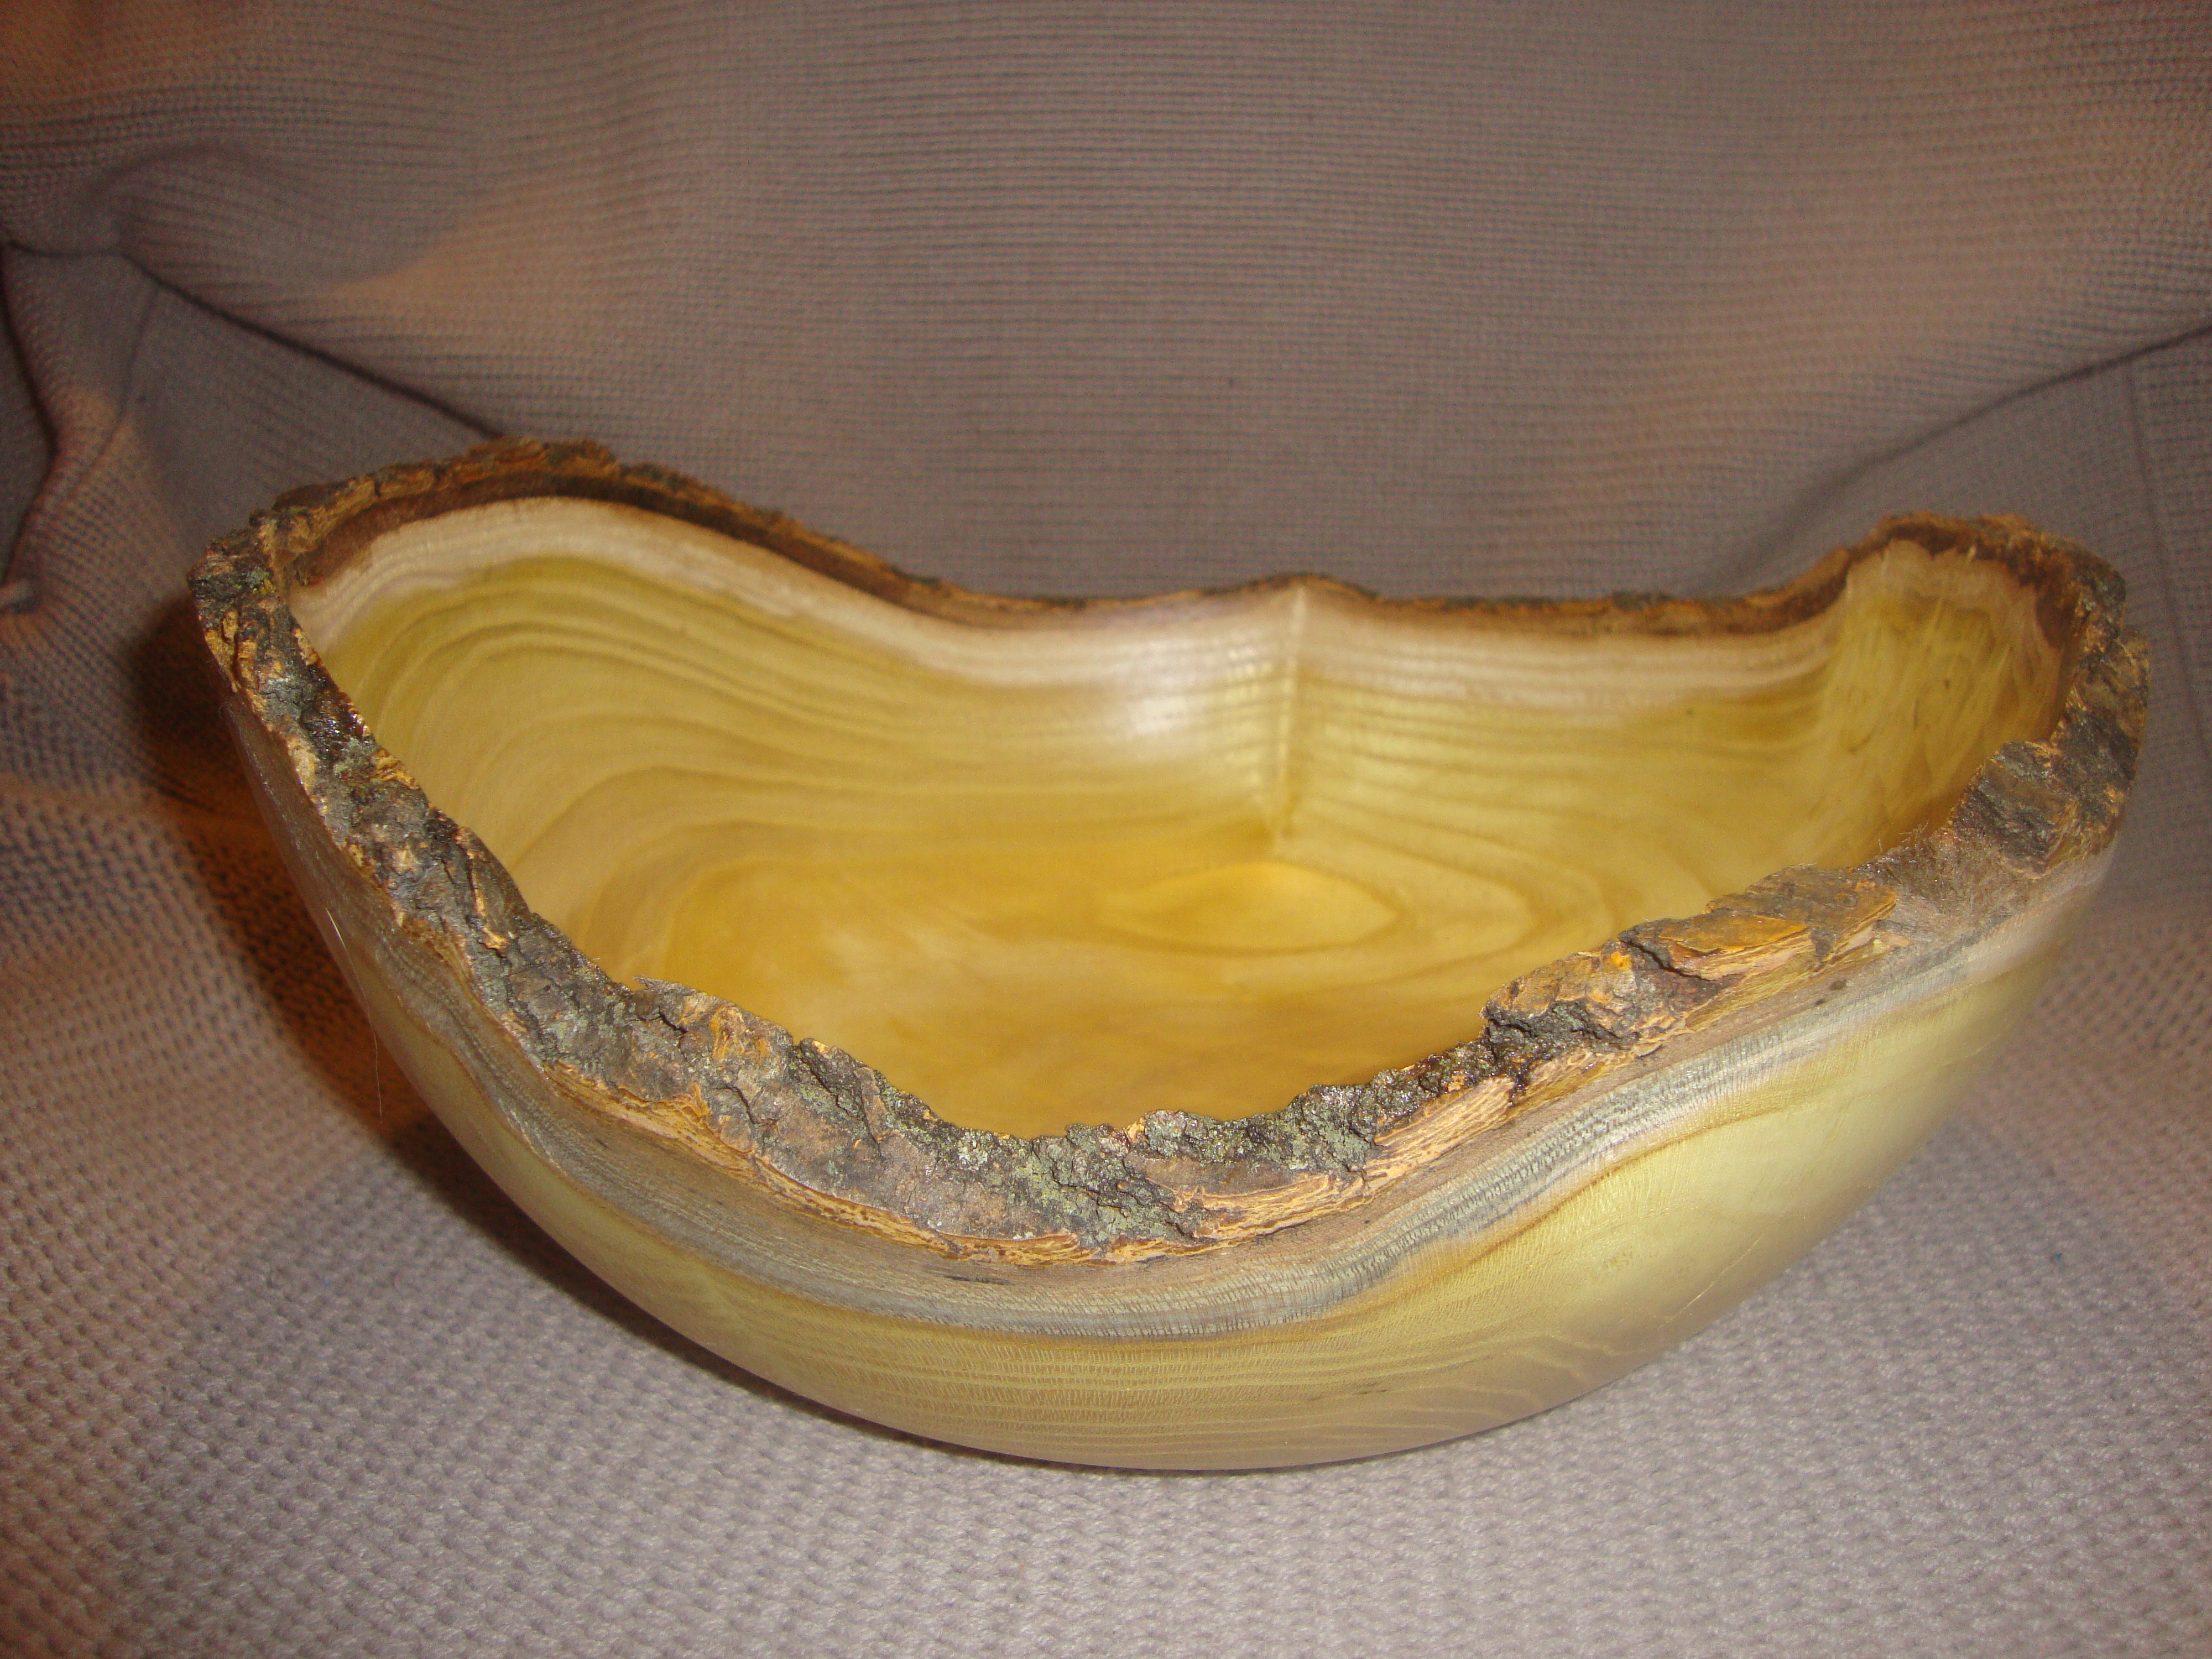
This one is going to the wood pusher who hooked me up with the fix.  That’s the standard deal.  You give me a tree, I’ll give you something made from it.


Offset ring bowl

I made a bowl out of white oak and it turned out pretty plain.  Not ugly, just plain.  As I was turning it down, it kept getting thinner and thinner, because of how much the blank had warped as it dried, so the end result was about a quarter of an inch thick.  Nice size for a finished project, but that doesn’t leave a whole lot of room to add grooves, inlays, or some kind of texturing to lessen the “plain-ness”.  I thought about coloring the whole thing, but my experience with oak said that’s probably not a real good idea.  I decided to cut the top of the bowl off, make a ring of some other kind of wood to fit in the cut, then put it all back together again.  I’ve done it before, and it’s actually a pretty simple process.

That’s where accidents happen:  right at the point you decide what you’re doing is easy, doesn’t require a whole lot of planning, and will only take a minute to accomplish.

When I put the bowl against the resaw fence on the bandsaw to cut the top off, I didn’t really check the bandsaw to make sure it was “set”.  I had been messing around with some angles for a segmented project I’m thinking of and had moved the table off zero degrees, so the table had a slight tilt.  On top of that, I didn’t check the blade guides, and the blade was pushed off-center to one side.  When I started cutting the bowl, the two issues seemed to magnify each other, and there was a horrible “drift” in the cut that was made.  Instead of making a cut that was parallel to the top of the bowl, I ended with a horrible, wonky cut that isn’t even a straight line because the blade drifted so bad.  The line was so wavy, a segmented piece with any thickness at all won’t make contact with the bowl when it was glued back together, so I decided to use some very thin veneer to make the ring.  That was flexible enough to bend to the wonky cut, but how do you clamp it all back together?  Since it was cut on a angle, the pressure from standard clamps just caused the pieces to slide off each other.  I tried using CA glue to glue scrap wood to the bowl to keep it from sliding, but the scrap wood either broke loose or left a gap, so that wasn’t any help.  I ended up using a couple of strap clamps to  get everything to hold and it actually worked out pretty well! Next time, I need to be able to control the cut, and need to use more strap clamps to make sure the pressure on the veneer is consistent.

The end result didn’t turn out too bad!  I wonder what it would look like if there were multiple offset rings cut into the bowl?  hum…  Suddenly need to go to the shop and look for bowl blanks that are ready to be turned…

White oak with a veneer ring of walnut and maple added. The off-center cut wasn’t planned, but I think I like it.

Woven bowl

This weekend, I found a small piece of something that I think was from an ornamental pear tree.  The wood turns nice and finishes to a glass like finish, but it’s pretty boring wood, with no real grain pattern to see.  After the basket/bowl collaboration that I completed earlier, I decided to tinker around with a little weaving myself.    How difficult could it be?  This is the final result.  Not sure I like it, but I did learn a couple of things.  First, wrapping some kind of material around posts sounds like it’s really easy.  Not so much…  Second, the ends of my fingers are still sore from all the poking and pulling the grass strips.  I think I’ll stick with the turning part and leave the weaving to someone who knows what they’re doing!

Doing the weaving myself felt like I was somehow cheating on Michelle (the woman who did the weaving on the last project), anyway.

My first attempt at weaving. My intent was to let the brass rods show through the weaving, but I used an even number of posts, which caused a “design enhancement”. Who knew this would be so complicated, so quickly?

Maple and plexiglass tea light

So I was cleaning some things up and found a piece of plexiglass that had been cast aside from the failed attempt at making a vacuum chamber our of a pot used for canning.  Remember that epic fail?  I set it aside, thinking there was something I could do with it later and kept cleaning.  A few minutes later, I found a small piece of maple that I had roughed out when it was really wet, but since I stored it incorrectly, it had warped to the point I thought it would only be good for firewood.  When I went to put it in the burn pile, I saw the plexiglass and had an idea.  I turned the maple into the only shape the wood would allow, then cut it into pieces, then glued it back together, with the plexiglass where the cuts were made.  Two things were learned.  First, I used CA glue (super glue) to hold it together.  If I ever make another one, I think some kind of epoxy would be much better, since the glue joints failed about 5 times while I was turning this.  Took quite awhile to sand the damage marks out of the piece each time it went flying off the lathe.  Luckily, none of the pieces shattered!  Second, plexiglass doesn’t really “cut”, it just kinda heats up, melts, and then gums up your chisels.  Pretty messy project!  Can’t argue with the final results, though.  This turned out WAY better than I expected it to!

Got me thinking, though.  I wonder if I could cut the bottom off of a wine bottle, turn a base to hold the candle, then put the wine bottle over the candle like a chimney?  There’s a crappy brand of Riesling that comes in a pretty blue bottle that might look kinda nice…

Here’s a picture with the lights on and no tea light. When I cut the lines on the bandsaw, the blade drifted, so the plexiglass isn’t exactly parallel with the rim of the bowl. Another learning lesson…
With the lights off, this looks pretty cool as the light comes through the side of the bowl.

Purple bread bowl

A few months back, I wrote about a project that I had started in collaboration with a woman I work with from Atlanta, who is a weaver.  I had made two bowls out of white oak, cut them in half, and sent them down to her.  She was going to weave them back together.  The hope was we’d end up with an elongated bowl, like bread is served in.  Well yesterday, she returned them with the weaving done.  WOW!  Michele Payne, they look AWESOME!  There was a little “finish work” to do, so since an ice storm hit last night, I got some shop time today.  This is the first of the two bowls.

It needed some wooden strips across the top to finish off the top of the weaving, but I couldn’t find any white oak that would match the grain of the bowl without it looking “weird”, so I put in strips made from mahogany.  Finished the final sanding, hit it with a couple coats of a food safe polyurethane, and declared this project done.  VERY, VERY happy with the results!  I haven’t seen anyone else doing something like this, so if it’s nothing else, it’s original.

Thank you, Michele, for your work on this one.  Can’t wait to see what else is possible!

Side view of the purple woven bread bowl. With the way the weaving is done and the wooden strips to add stability, there is basically no “sagging” in the middle.
Top view, so you can see the work that Michele did a little better. Really, really like the look of this one!

Wig stand #2

So this one is made out of segmented wood, which kinda breaks up the vertical look a bit.  I decided to put a piece of Corian in the top, which felt like a really good idea at the time.  My thought process was that the Corian would help with some of the moisture issues that come with cancer patients who wear wigs.  After getting it done, I realized that even though I chose green Corian and not a softer pinkish color that I also have, it still makes it look very boob-like, which was NOT my intention…


Wig Stand #2


Wig stand #1

The turning club that I’m in was looking for some way to blend the art/craft of woodturning with some form of charitable giving.  Other clubs are supporting a group called “beads of courage” by making boxes that are given to young cancer victims who use them to hold beads they are given with each cancer treatment.  Cool project and it helps kids, but there are many, MANY clubs doing this.  Several clubs are turning pens that are donated to a group that re-sells them and keeps the cash.  Some clubs hold auctions of donated projects and donate the cash.  We were looking for something different.  For me, I really don’t like to just give money to a group claiming they’re going to do good things with it.  That kind of group always seems to grow the administration on the payroll, first.  I was thinking something that would help people directly, without having to have someone else decide how to “spend” the donations.

What we decided on was making wig stands.  May sound weird, but in talking to the Susan G. Koman Breast Cancer Center in Peoria, il., apparently they already have programs that make or give wigs to women who have lost their hair due to cancer treatments, but they have nothing to offer the women to put their wigs on when they take them off.  Makes sense, if you think about it.  For me, it’s a way to help someone directly and all the middle man gets is the time it takes to broker the trade. I like turning. I like women. I like boobies. So, I figured I had four good reasons to get behind this cause and help out.

Most of the stands being made are “brown and round”, like a dome stuck on a stick, stuck in a circle.  Very utilitarian.  I figure as long as the person is going to have to stare at it, I might as well try to do something to make it worth looking at.  I made the top out of colored epoxy clay, so it wouldn’t be damaged by the sweat, heat and moisture that comes from the wigs. The chemo apparently does horrible things to the women, sweating profusely being one of them, so you have to be very careful with the finish that you use. I also added a little indentation in the bottom to hold ear rings, necklaces, rings, or anything else that needs to be held.

Here’s my first donation:

Wig Stand #1
Wig Stand #1 – Top View

The sad thing about this whole project is that even though the club has already donated at least 50 wig stands in the last two months, they’re giving them to women faster than we can make them.  Way, way, way too many cancer patients out there!  Didn’t I hear a few years back about all these new treatments in mice that were eliminating tumors and new vaccines that could prevent some cancers from forming in the fist place?  What happened to all that?  I for one would like to put cancer industry out of business.  Just saying…


Ebonized oak vase

The process of ebonizing wood is actually a fairly simple chemical reaction.  Not to tempt the wrath of my high school chemistry teacher (thank you for putting up with me, Mr. Oyer) but it works something like this.  The vinegar breaks down the steel wool into something resembling a smelly rust.  Wood has some kind of compound in it called tannin, and oak has more tannin than most other types of wood.  When the tannin is exposed to the rust, it causes the wood to turn jet black.

I took a piece of oak, stood it up in the vacuum chamber, then added the fluid until about a third of the wood was submerged.  Then I turned on the vacuum, hoping the pressure would draw the ebonizing fluid up, through the grain of the wood, resulting in a vase that was black at the top with lines of black “flowing” down toward the bottom.  What a great plan!  After about a week, you could see the blackness had come all the way through the wood, so I figured it must be as done as it needed to be.  When I started turning it, ALL of the darkness turned away and it looked like a simple, oak vase.  Bummer!  I hollowed out the vase about halfway down (to make it thinner) and stuck it back in the juice for three days, then left it under pressure for another three days.  It’s in the kiln drying now, so I should have a final product pretty soon.

After a couple days of drying, I couldn’t wait anymore and did the final turning.  WOW!  I really like the way the black came through what would normally have been a plain, blonde looking piece of oak.

One view of the ebonized oak vase.  None of the black was present before being submerged.
One view of the ebonized oak vase. None of the black was present before being submerged.
second view
second view
third view
third view

Ebonized willow bowl

After ebonizing the piece of cedar, I suddenly had the urge to see what the process would do to other kinds of wood.  I found the last piece of willow that I had in the shop.  Willow is either the easiest wood to turn that yeilds a pattern kinda like an ambrosia maple, or it’s an absolutely nasty, chippy, cracky, punky, poor excuse for firewood.

I tossed it in the pot, added the fluid and put it under pressure.  After three days, it too looked like a lump of charcoal.  After a week in the kiln, I took it down to the shop and started turning.  Turns out that willow doesn’t really suck up the ebonizing fluid like I thought it would, so I put it back in the vacuum chamber, let it soak for three days, then left it for another three days under pressure.  When I re-turned it, I realized the color had indeed gone through the rest of the blank.  That was the good news.  The bad news was that a series of cracks developed on one side of the bowl that my mentor said was “un-fixable”.  I was left with designer firewood.

After staring at the piece for a couple of days, I decided to mix up some black epoxy putty and fill the holes.  At worst, the piece would fly apart on the lathe at some point, but that could be fixed by wearing a face mask and being a little less aggressive with my cuts.  At best, I’d end with a piece that showed off the sudden color changes, with the filled cracks “blending in” with the overall look of the bowl.

Here’s what came out of the process.  I’m extremely pleased with this one!  Not enough to go looking for another chunk of willow to turn, but enough to start looking for more wood that can be ebonized and turned.

Not sure why the fluid made such a dramatic change in color on only this side of the bowl, but I think I like it...
Not sure why the fluid made such a dramatic change in color on only this side of the bowl, but I think I like it…
the black lines on the side and top are where the black epoxy putty was used to fill the cracks.

Kenlee’s bowl

When my first daughter gave birth to my first grandchild, the theme for her baby shower was chevrons.  I figured out how to make a segmented bowl with a chevron pattern that could be used to hold cards for the gift table.  I was pretty pleased with the final product, then figured I’d customize it a bit to make it personal.  I carved out my grandson’s name in the bottom, inlaid it with ebonized walnut dust, and just because, I burned a little message to my unborn grandson on the bottom.  Alexa loved it!  My grandson has it now and plays with it to hold the wooden Easter eggs I turned for him.  Well, that started a tradition…

When my second daughter had my second grandchild, one of the first questions was “When will she get her bowl”?  Apparently, it was now a foregone conclusion that was going to happen.  The first problem is that my daughter wouldn’t name the baby until she came out.  Her logic:  “I don’t want to name her Sofia if she comes out and doesn’t look like a Sofia”.  Guess you can’t argue with a mother’s logic.  The second problem was that Megan had the baby at the worst possible time for me to get any work done in the shop, because of a whole host of other things all competing for time.  When I told her it might be awhile, she said “no problem, dad, I know you’re really busy”, but those big, sad, eyes said “my baby needs something you made just for her, too”.  It has always been hard to argue with those eyes.

So now, a month or so after the birth, the bowl is finished.  Like James’ bowl, this one also has her name inlaid in the bottom and a message on the bottom.  Since this one was made after the birthday, I went ahead and put her birthday by her name, too.  The material used for the pink inlay is colored epoxy putty.  Even though Megan was adamant that her daughter wasn’t going to be forced to wear pink everyday, the color looks great with her head full of dark black hair and the pink color actually matches the color of the first hair bow she wore.  Very happy with the way this turned out.

Now to start thinking about the bowl for my third grandchild…

img_0286