I seem to have been doing a lot of projects lately that involve significant amounts of time spent texturing wood with a wood burner. It can quickly become tedious, but the impact really is nice, especially when you pick the piece up and can feel the roughness. I turned a piece of cherry that really was bland. No strong grain pattern, no deep color, absolutely nothing to make the bowl appealing. I decided to burn a few flowers on it, then color in the petals with india ink to make them stand out.
As I started looking at the wood burning tips I had, I wondered if there was a way to leverage the fixed size of the tips to make the burning process simpler. My thought was rather than doing all the designs freehand, if I could “stamp” pieces of the design, it would be both faster and more consistent. On my second try, I hit the perfect combination of tips, resulting in flowers with eight petals that were VERY consistent in size and shape. My initial thought was to leave the bowl natural and only texture the very center of the flowers. That all changed when a new episode of a podcast I subscribe to started a new episode. The result was another bowl with an excessive amount of “fiddly work” completed to texture the whole thing.
I figured I’d start working on something else and went upstairs to get something to drink while I considered what might be fun. As I was looking through a cabinet for the missing lid on my glass, I found a tall, cylindrical, glass, vase. It could have come from IKEA, but most likely it was left over from an old anniversary rose my former company used to give to their employees. Either way, I started thinking and the next project was chosen.
I went out to the shop and found a piece of maple I had roughed out a long time ago, intending to make a vase. It was dry, had warped a little, but was perfect for the next project. Using a forstner bit, I drilled a hole that was slightly bigger than the glass vase, completed smoothing out the outside shape to remove the warping, and headed back downstairs. Rather than do the exact same design as what was on the bowl, I decided to see if the same process could be used to make consistent 5 petaled flowers. Turns out, with a larger fishtail bit, the process works pretty good!
A couple of days later, I was finished with a companion piece to the bowl. In all honesty, I also have no sense of feeling on the side of one finger from all the heat coming off the wood burner. Oh well, it was worth it.
Not sure where I’ll take this, or if I’ll do more of this, but for now, I love these two!
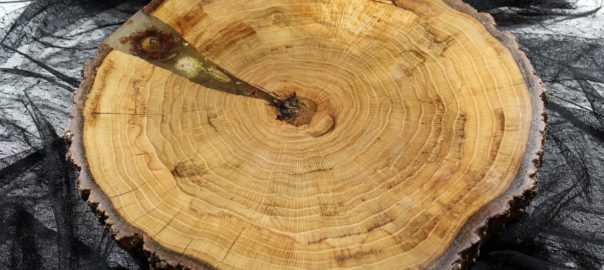
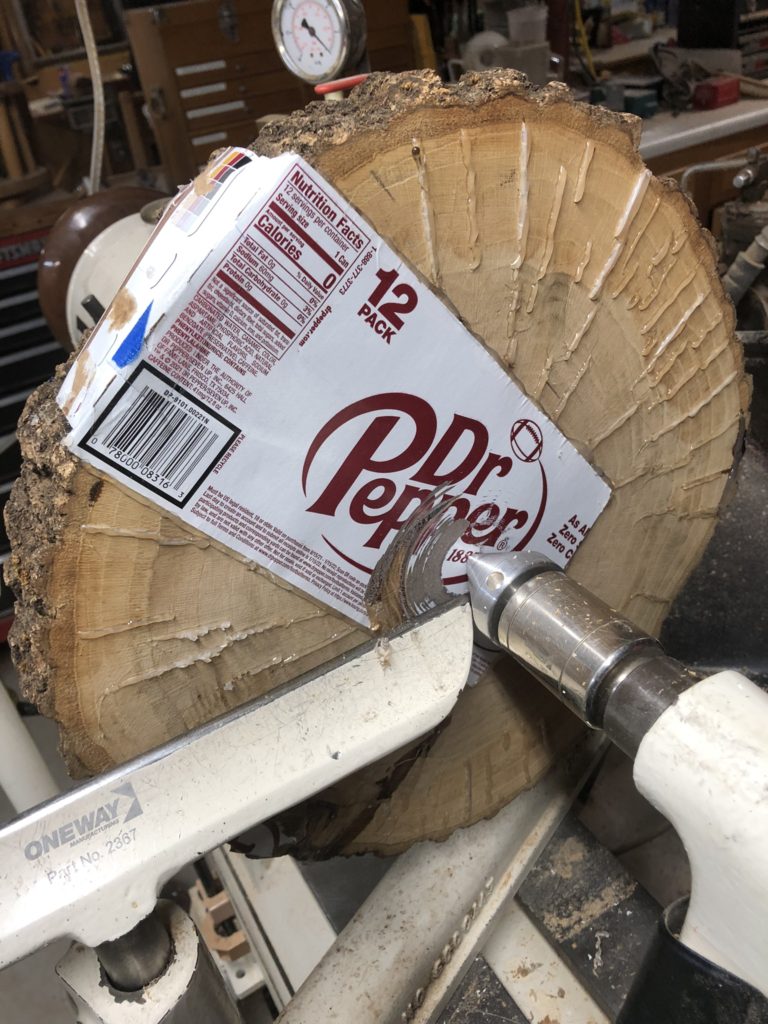
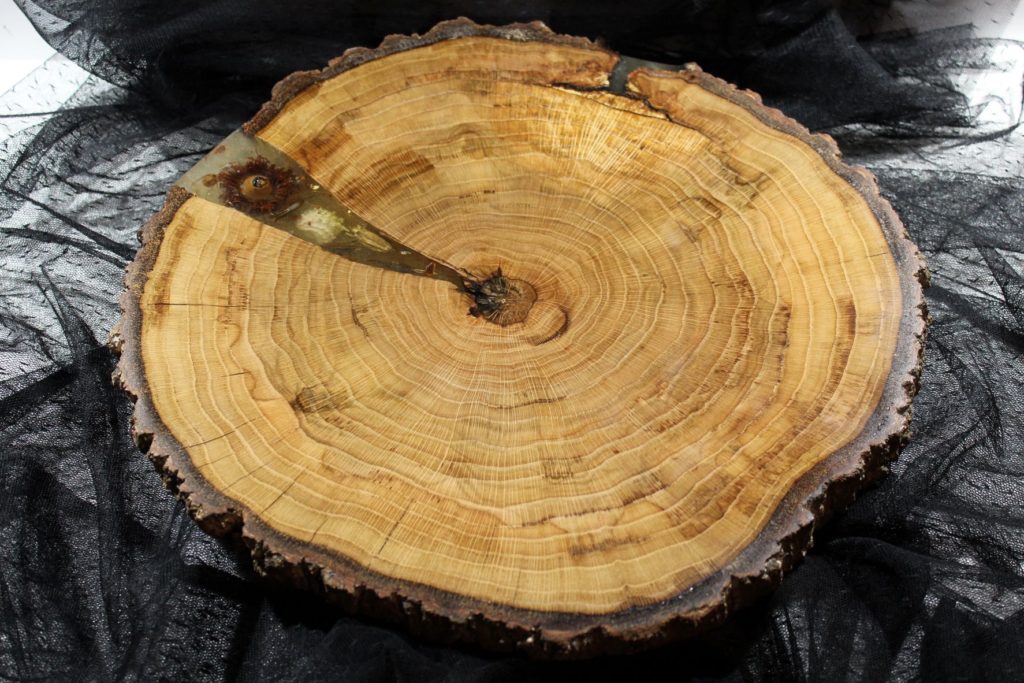
A very nice woman named Mona reached out to the turning club I’m in to see if anyone could help. She came into possession of three “tree cookies” that held sentimental value for a friend of hers and asked if there was anyone in the club who could help turn them into something more. I had to look it up, but a “tree cookie” is basically a round slab of wood taken off the end of a log, with the bark still all around the edge. There were some issues with the cookies, but I guess I’m a sucker for projects that have a sentimental attachment to them, so I said I’d see what I could do with them.
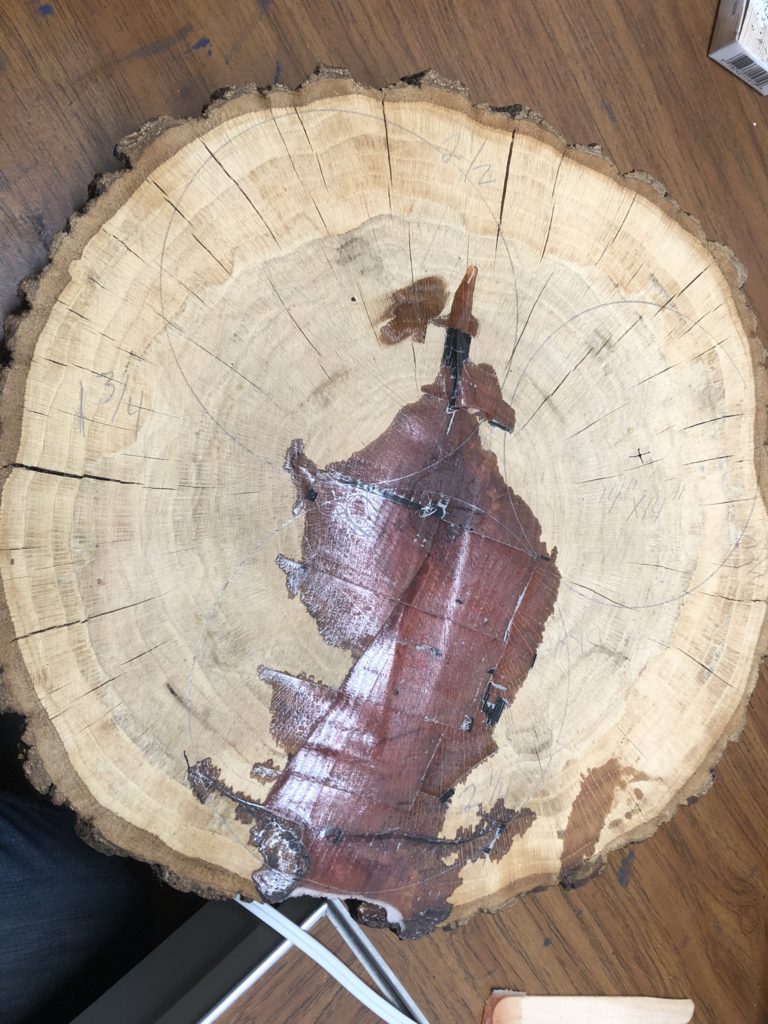
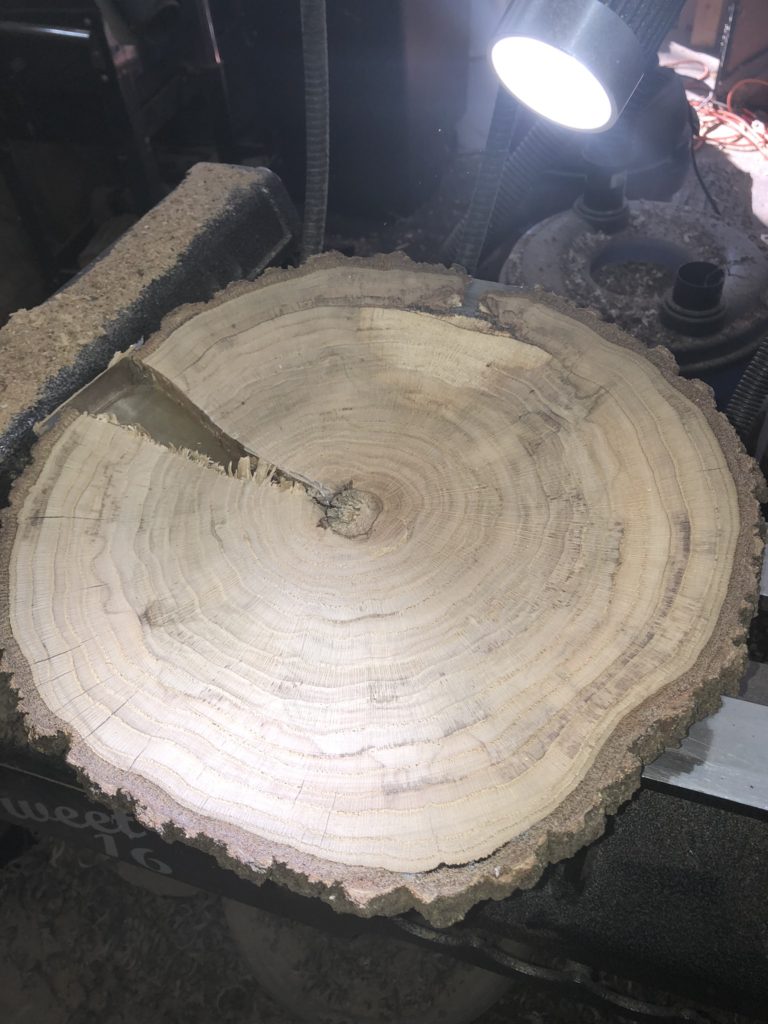
When I met with Mona and she showed me the slabs. All three of them were about 14″ across, were anywhere from 1″- 3″ thick, had cracked fairly severely during the drying process and the wood had warped as well. My first thought was “WOW, there’s nothing here to work with!”. One cookie was absolutely unusable, since it was cracked, twisted from warping, too thin, and had a large rotten/punky section that covered at least a third of the wood. It is now firewood. The second was also cracked and twisted, but had the extra issue of being thin on one side and thick on the other. I decided it might be possible to salvage something, but it would most likely be a much smaller project using only a portion of the cookie. The last blank was the most promising of the three. Yeah, it had a large crack from the pith to the edge, yes, it had at least 50 other cracks of various depths and lengths throughout the wood, yes it had twisted when it warped, BUT… It was a LOT thicker than the others, so I had hopes a more usable blank could be created. I took the two cookies, committed to doing something with the best one and said I’d do what I could – if I could – to the one that was a little iffy.
he first step was to make sure the cookies were completely dry, since no matter what I ended up doing, there would be epoxy involved in the process. If the wood is too wet when the epoxy is used, two potential problems are introduced. First, it could mess up the way the epoxy cures, potentially causing it to be cloudy, brittle or not fully cure. Second, once the epoxy cures, it’s absolutely solid and does not move, but the wood will always move. The more moisture in the wood, the more it will move, so if the wood was too wet it could literally rip the completed project apart as the wood moves as the moisture leaves, but the epoxy doesn’t. To pull the moisture out of the wood, I buried the cookies into a tub of silica desiccant. (Silica desiccant gel are what’s in those little packages you find in the bottom of new shoe boxes with the big “DO NOT EAT” warning printed on the side.) Not only does this draw the moisture out much faster than waiting for the moisture to evaporate naturally, it pulls the moisture very evenly, which reduces the chances of the drying process causing more cracks. Once the two cookies were dried, the condition of the cracks were assessed, and I had a little more time to think about what I felt I could do, the initial request split into 4 sererate projects. The second cookie would be split into three small blanks, then turned into three bowls. The “best” cookie would be kept as a single blank and turned into a large plate or shallow bowl.
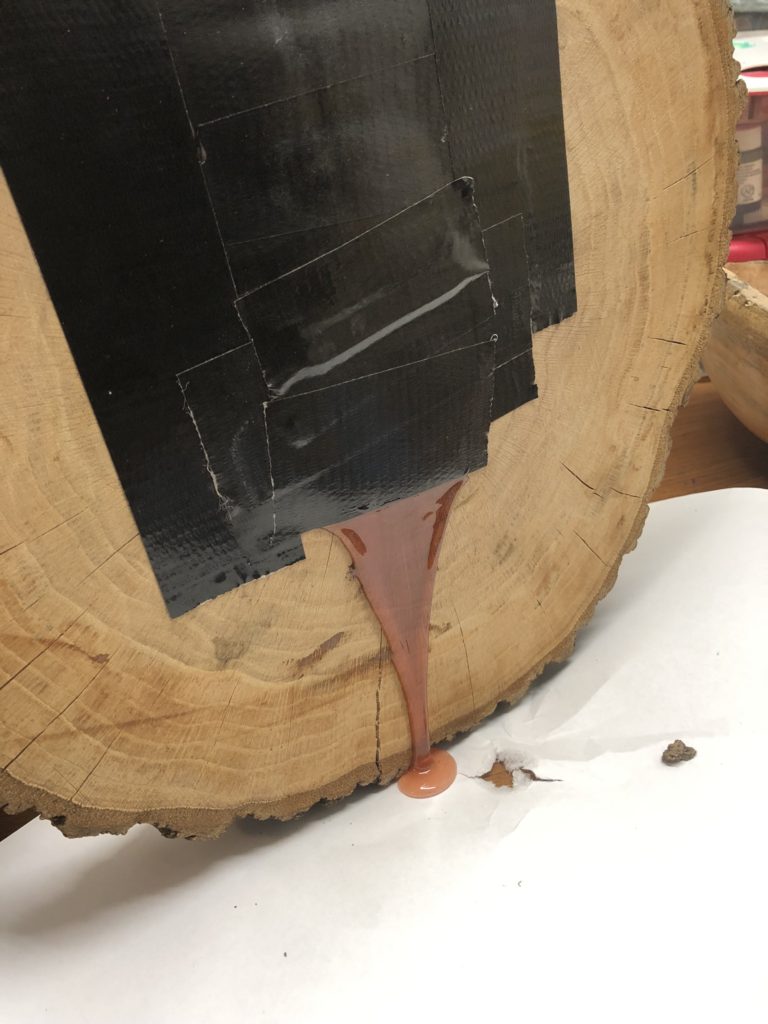
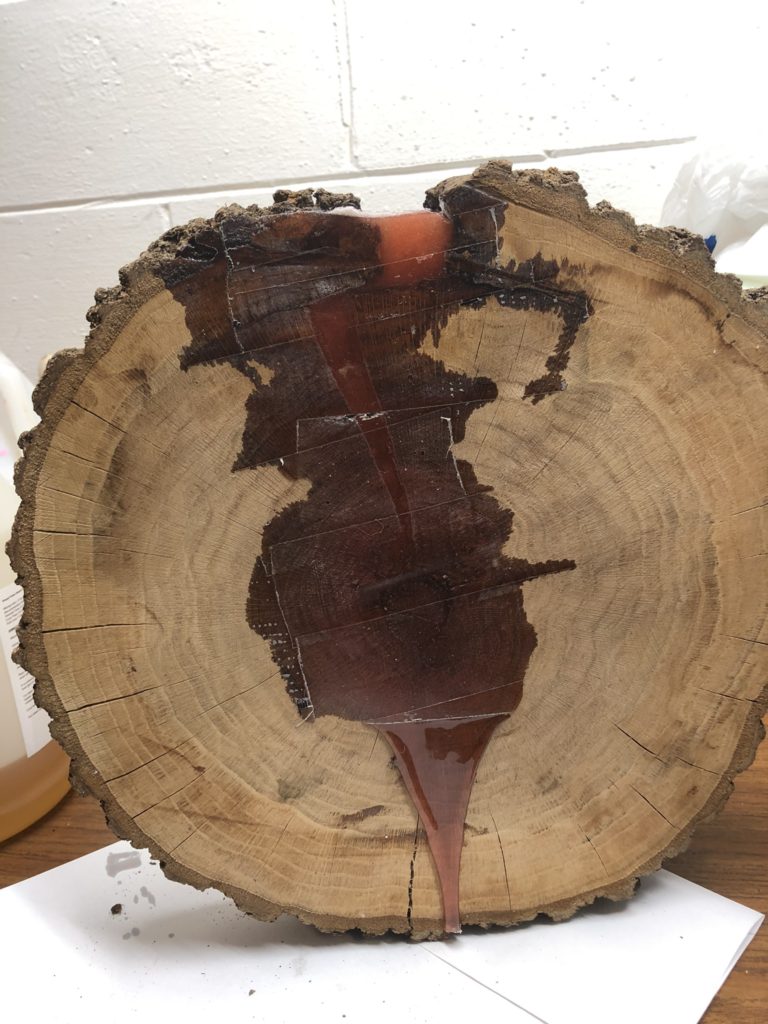
Once the eventual placement of the blanks was decided, the epoxy work was started to fill in all the cracks. For this, I used an iridescent cranberry colored mica powder with the epoxy to provide a contrasting color.
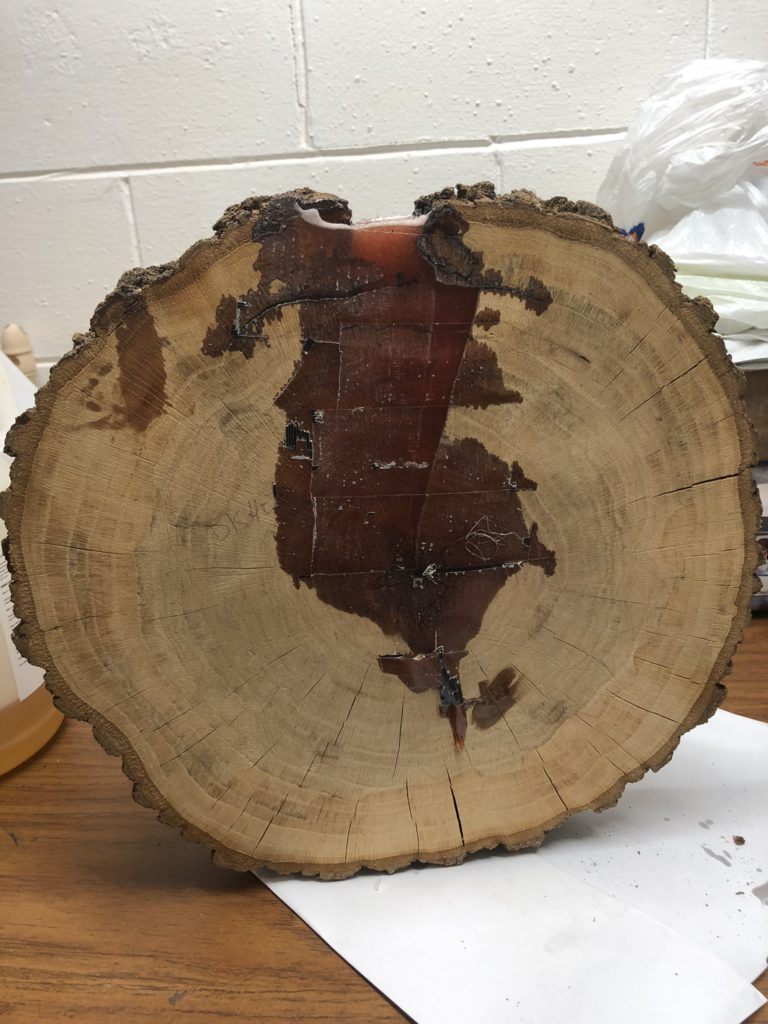
I started working on the biggest crack first. It ended up taking multiple pours to get the crack to fill, mainly since so much epoxy leaked out during the curing process.
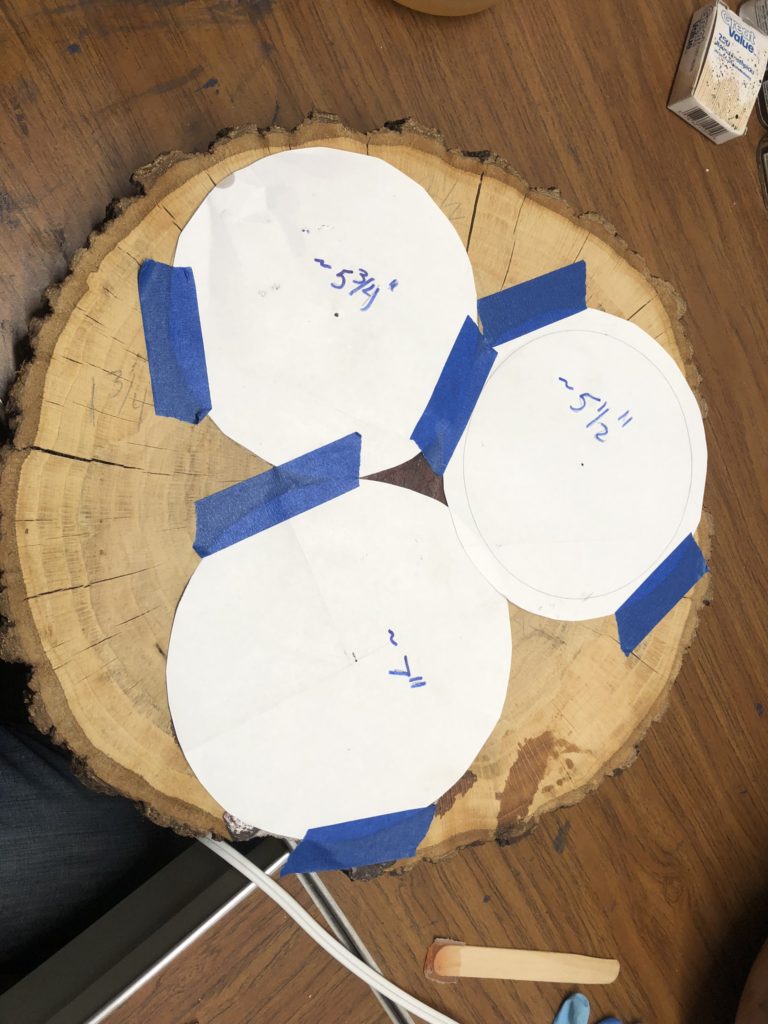
The next step was to lay out where the individual blanks would be cut from the cookie.
Once the main crack was filled, the three blanks were cut out where the circles were placed. Each of them needed additional epoxy work, so cardboard was affixed to the sides and bottom to prevent epoxy from leaking out, then they were flooded with epoxy.
These two blanks are the ones that do NOT have the big crack included in them. The blank sitting on edge is the blank with the large crack. It only needed a little more epoxy added, so a cardboard was glued to the top and bottom, allowing a grove to form on the edge that would hold the resin.
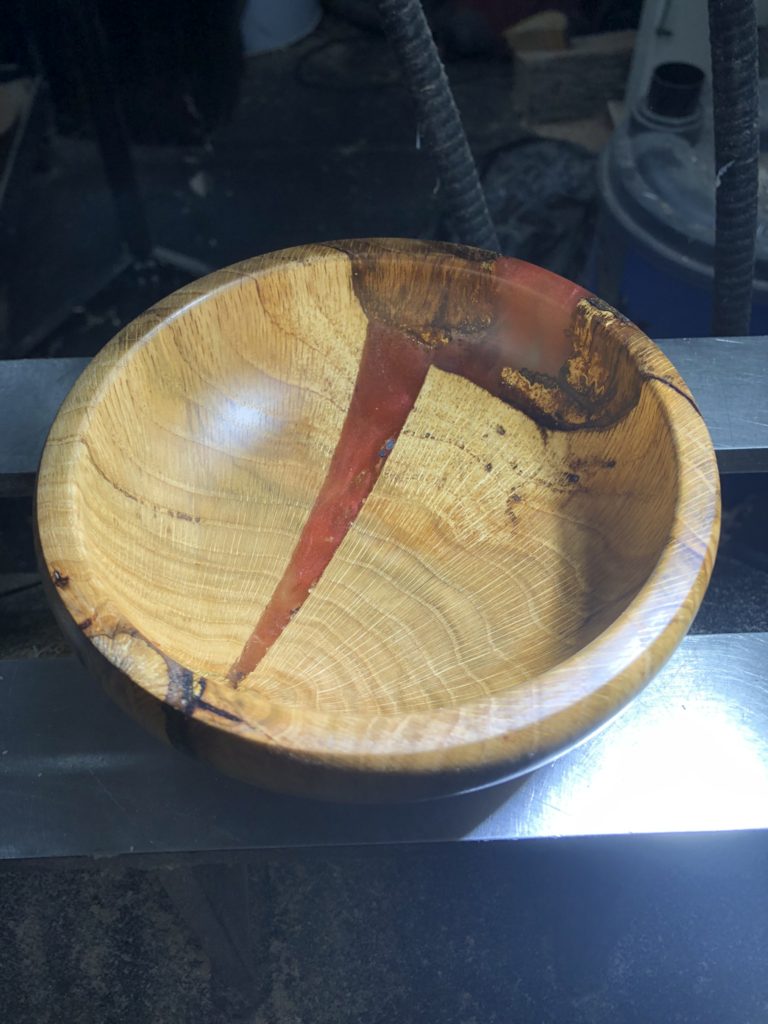
Project 1: The small epoxy bowl
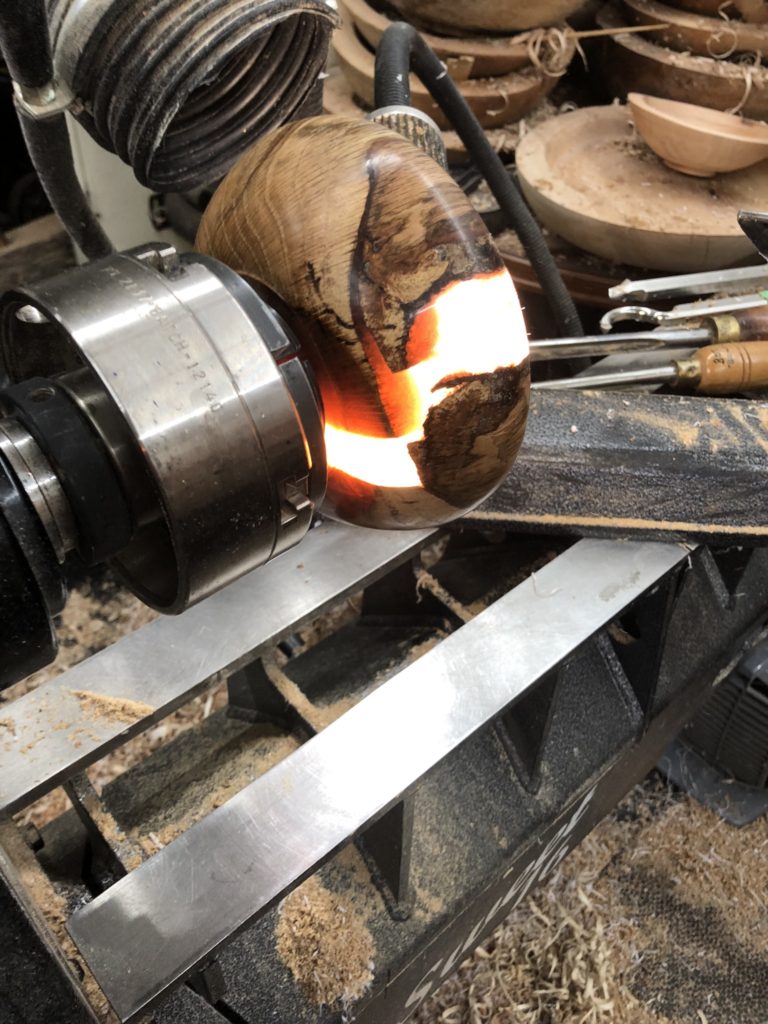
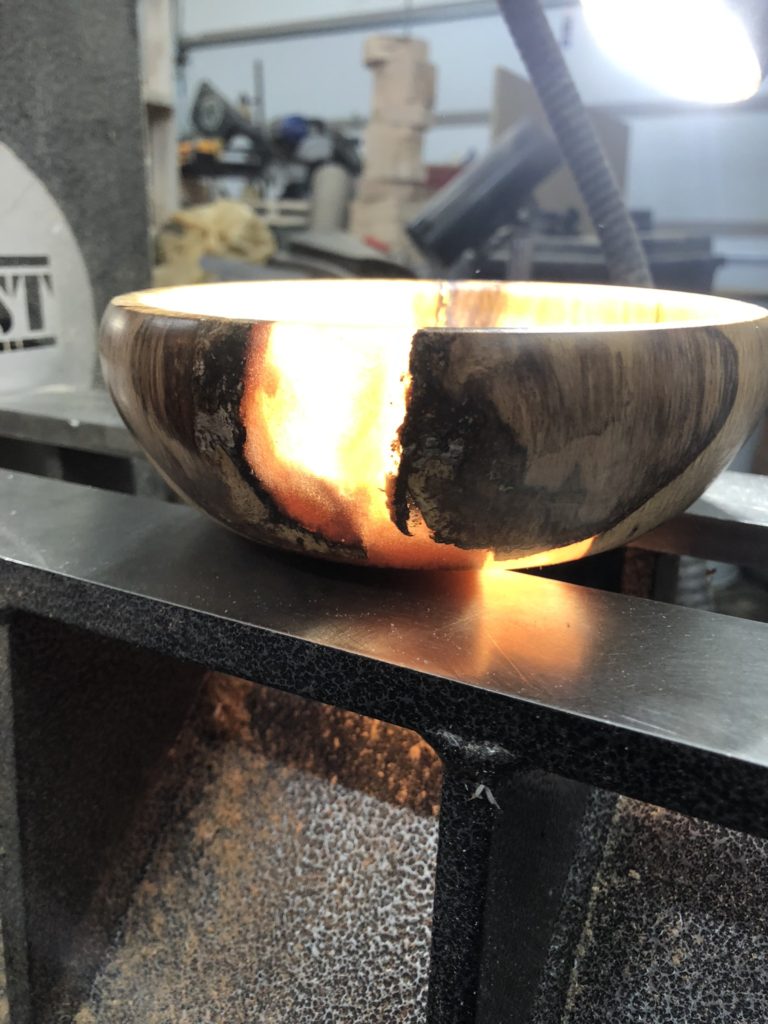
The first blank that I turned was the one who’s main feature was going to be the large crack that had been filled. After turning the outside of the bowl, it was pretty clear that the epoxy would be a prominent part of the overall look of the bowl. When the inside of the bowl was removed, it allowed light to come through, which looked pretty cool.
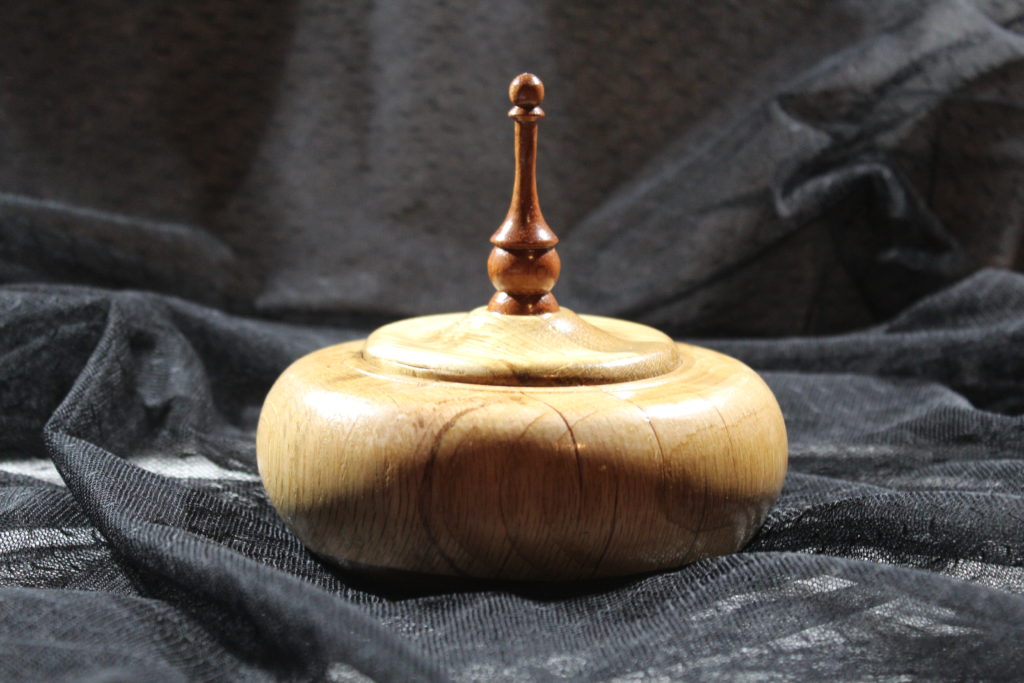
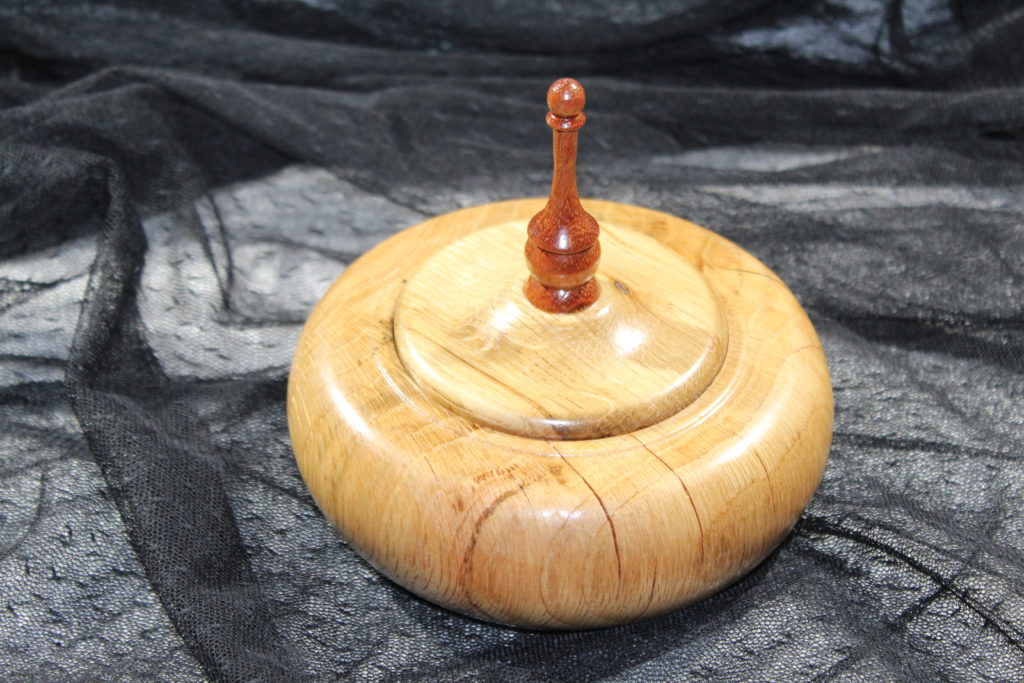
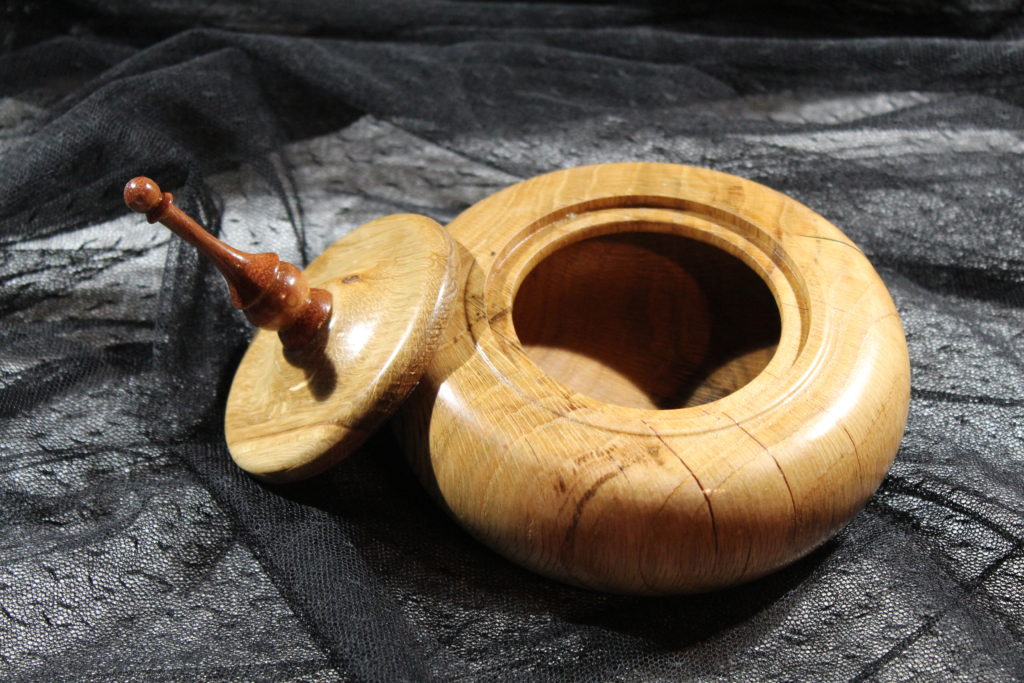
Project #2: The lidded bowl with a tall finial.
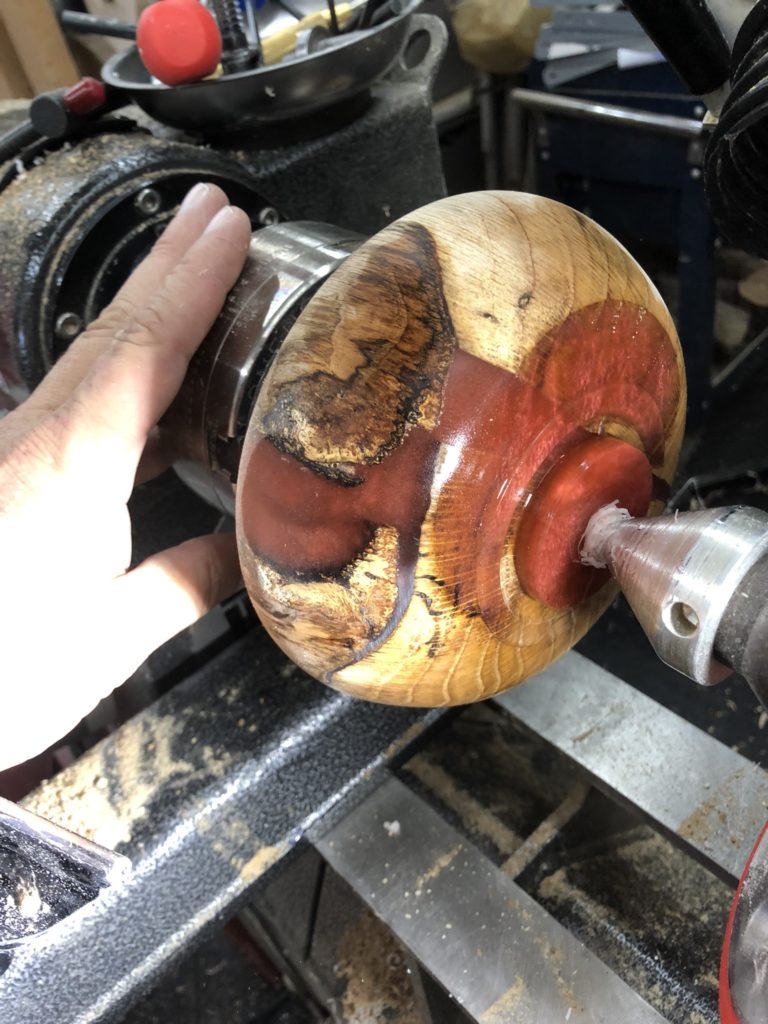
The thought behind this bowl, was to hollow out the middle of the blank to make a bowl that had a lid that fit on top. To get the wood to make the lid, I had to use something other than the cookie, since there wasn’t much of it left. I found a piece of oak flooring in that shop that was big enough to make the lid out of and after turning it, the flooring actually came out with a very similar color to match the wood in the cookie. For the finial, I wanted to use a different color of wood, something darker, just to provide more contrast. I ended up using a pen blank that was darker and had a reddish hue to is. It might be sepele or mahogany.
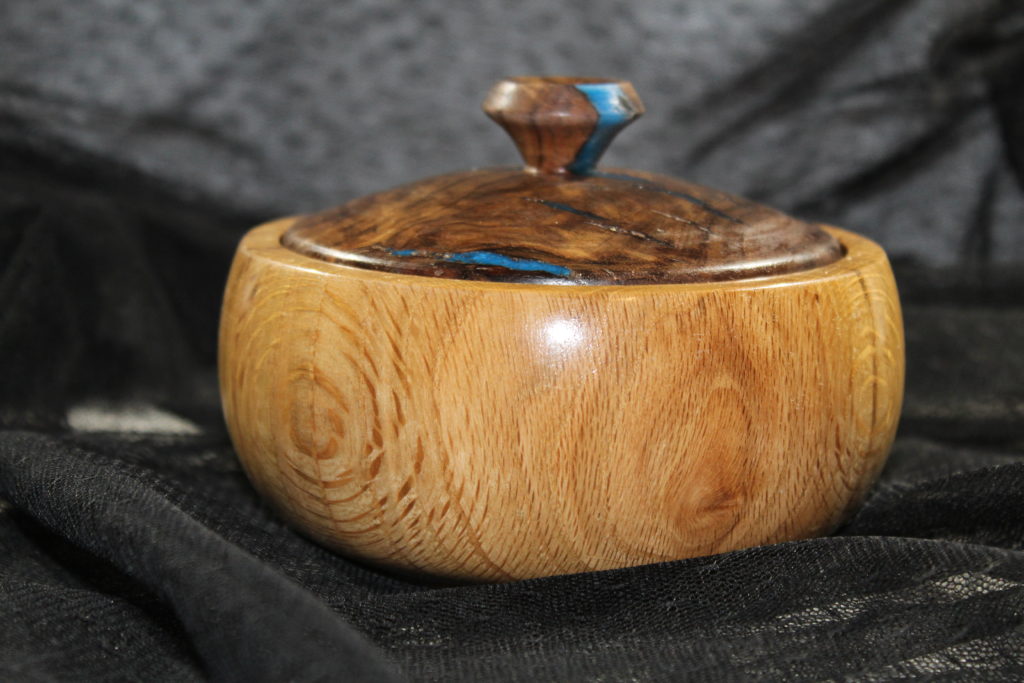
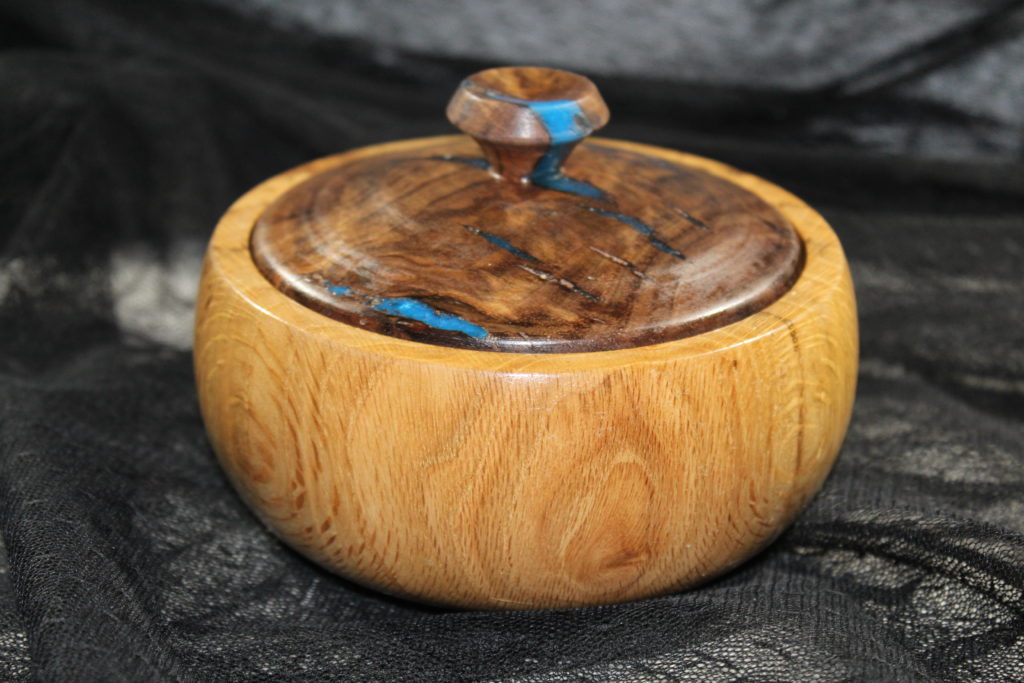
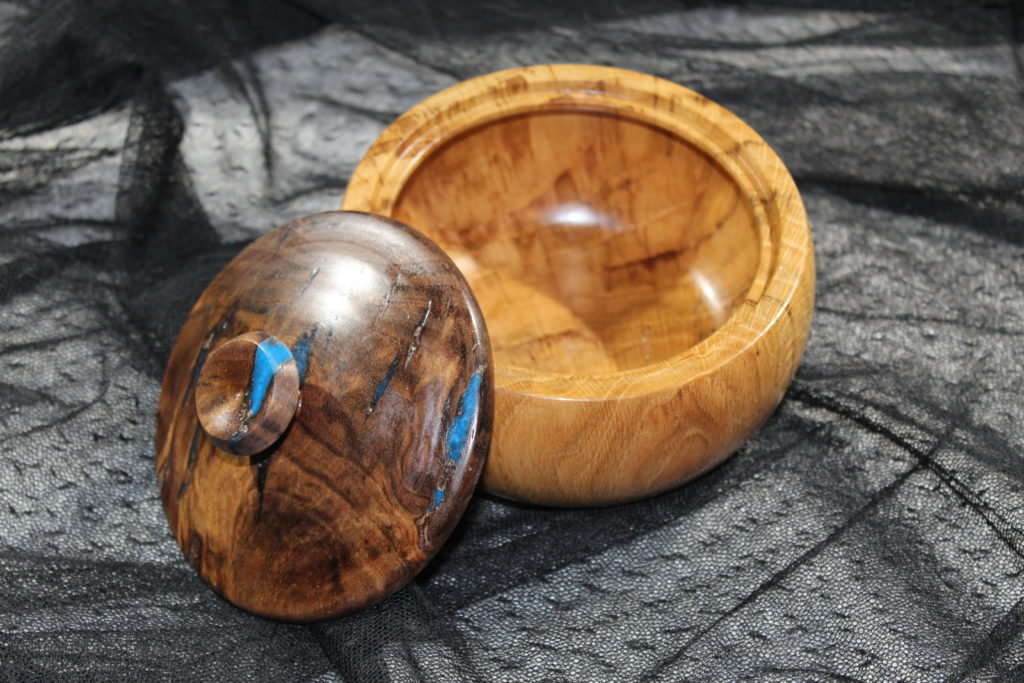
Project #3: The lidded bowl with walnut lid
For the third bowl, there was very little epoxy visible on the final turning. The cracks that were filled with the cranberry epoxy were deep, but they were very thin, so the lines left in the wood blended in easily with the grain. After shaping the outside of the blank, it became clear that the bowl would look very plain. To add some interest, I decided to turn this blank into another lidded bowl, except this lid would be much more of a deliberate contrast to the oak. After finishing the bowl, I found a piece of walnut that was very damaged, full of cracks and voids, which I filled with a blue iridescent epoxy. The blue really stands out against the dark walnut wood, and the dark walnut wood really stands out against the oak.
Project #4: The big bowl
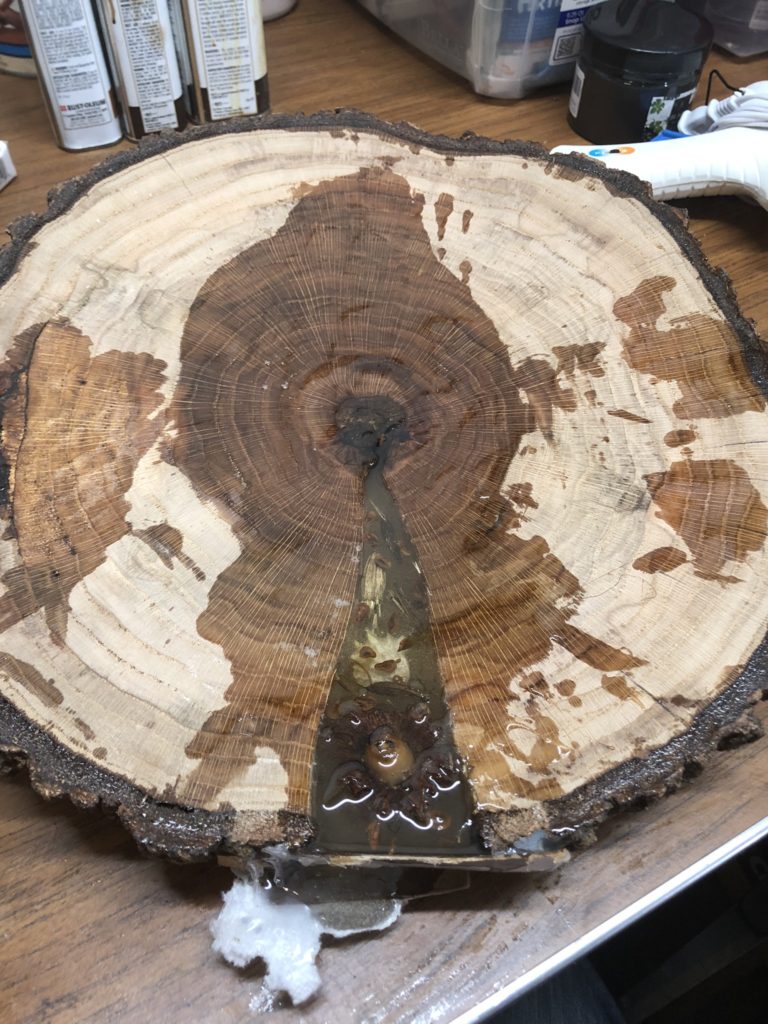
The main reason I agreed to do any of this work was to do something with this big, thick, blank. The plan was to fill the crack with clear resin, but add something to be suspended in the resin that would provide interest. Mona sent me a small box containing the items she’d like to have included. The seeds and seed pods wouldn’t be hard to include, but I wasn’t sure how to include the large acorn husk, the seashell, and the rock that was also in the box.
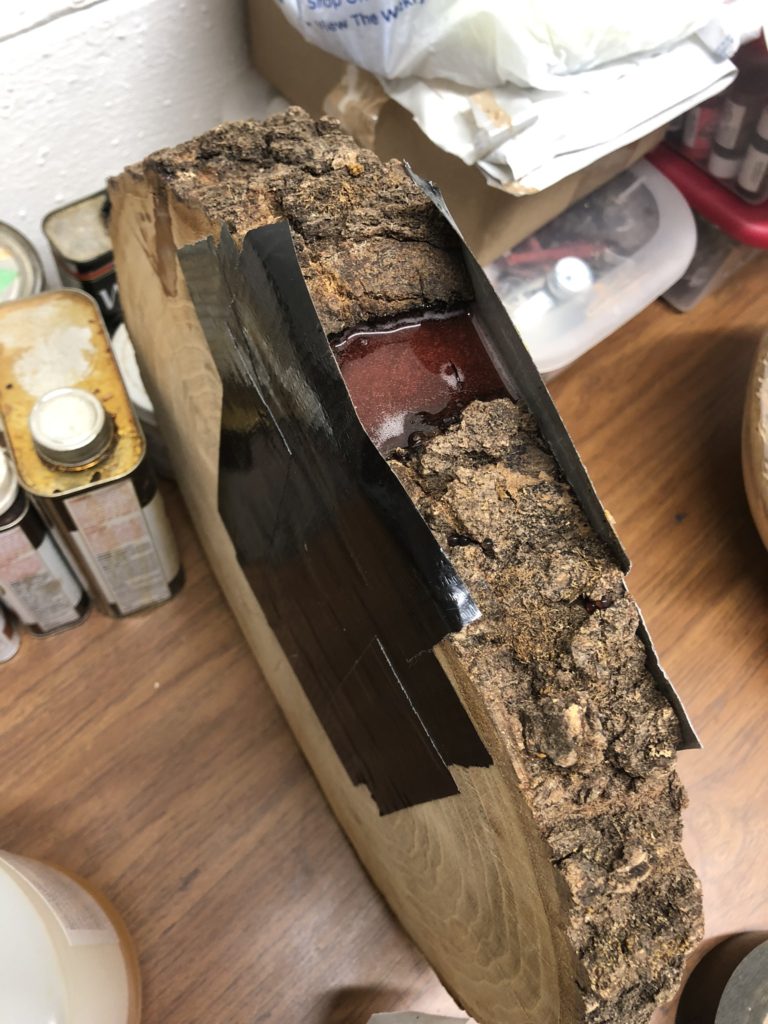
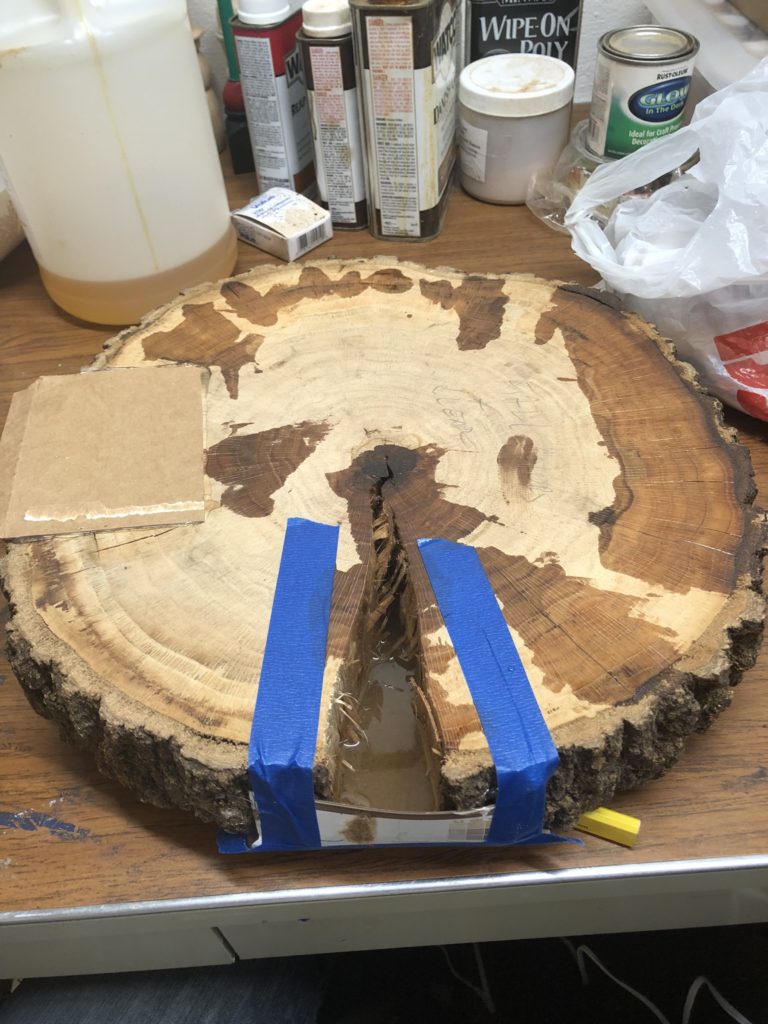
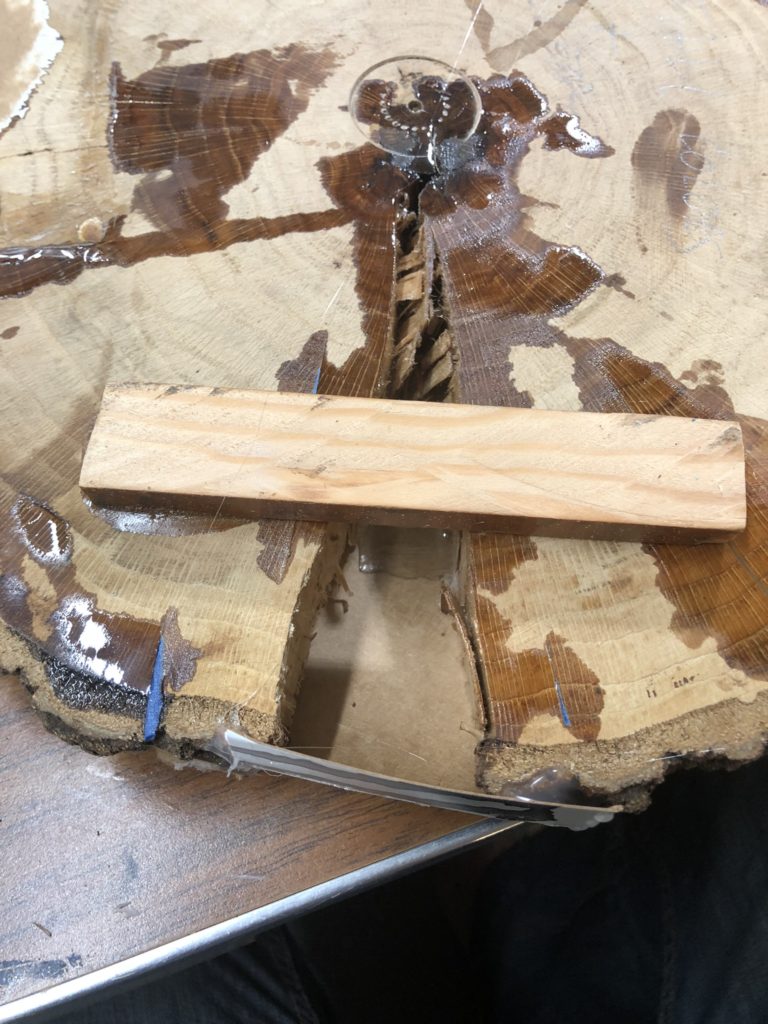
The first issue that had to be worked out was how to keep the piece from exploding while on the lathe. There were so many cracks in the bowl, one wrong move and the whole thing could easily explode. I knew they would need filled with epoxy, but I didn’t want to fill the main split until I was sure what the final shape and thickness would be or I’d run the risk of turning away the items that were encased in the resin. An iterative approach was needed. I put a line of hot glue on the underside of the blank along every single crack I could see to “plug up” the crack and prevent resin leakage. Then, I carefully added tiny amounts of resin into the tops of the cracks, letting it flow down into the cracks to seal them. This was a slow and tedious process. For the big crack, I put a thin (1/8″) layer of resin in the bottom that would eventually be turned away, and epoxy’d a scrap piece of wood across the crack so it wouldn’t move.
I had hopes of being able to turn the underside of the bowl once, then never return, but that’s just not the way this project went. Some of the cracks were so small that the resin couldn’t fully fill the holes as air got trapped inside the blank. Once I thought I was done, there was another round of sealing the cracks with hot blue (this time on the top of the blank) and adding tiny amount of resin into the cracks on the bottom to fully fill the cracks. Since the surface was now sloped, I had to build little dams around each of the cracks with hot glue to stop the resin from running down out of the cracks and down the slope of the bowl. There were multiple iterations of this process until the bottom of the bowl was in a final, finished form. Then attention turned to the top of the bowl.
To see what I was working with on the top of the bowl, I sealed any small cracks that were present with resin, then put the blank on the lathe and turned the top of the blank to nearly final thickness. About midway through the process, I realized the same issues that were present when turning the bottom were also present on the top, so I was back to the iterations of mini epoxy ours. Note how cracks had started to appear where the bark attached to the wood. jThose weren’t visible from the underside. As I was repairing that crack, I also brushed multiple coats of epoxy on to the top and bottom of ALL of the bark. My how was the resin would help stabilize any movement within the bark and that some of the resin would soak into the bark well enough that it would also adhere to the wood.
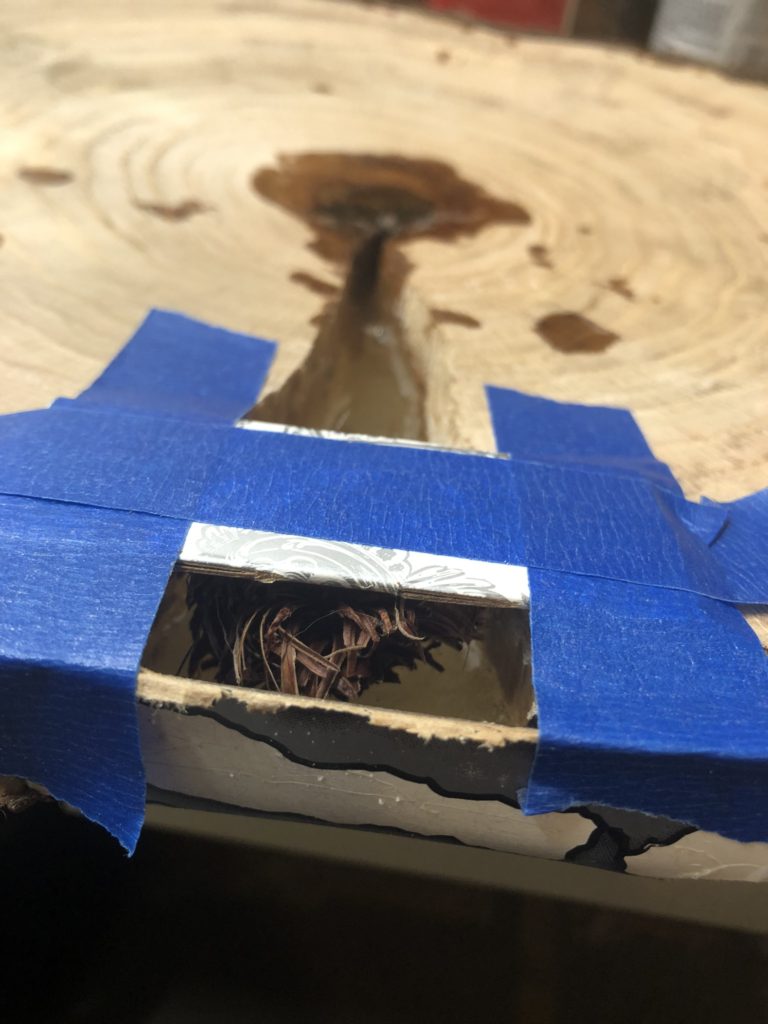
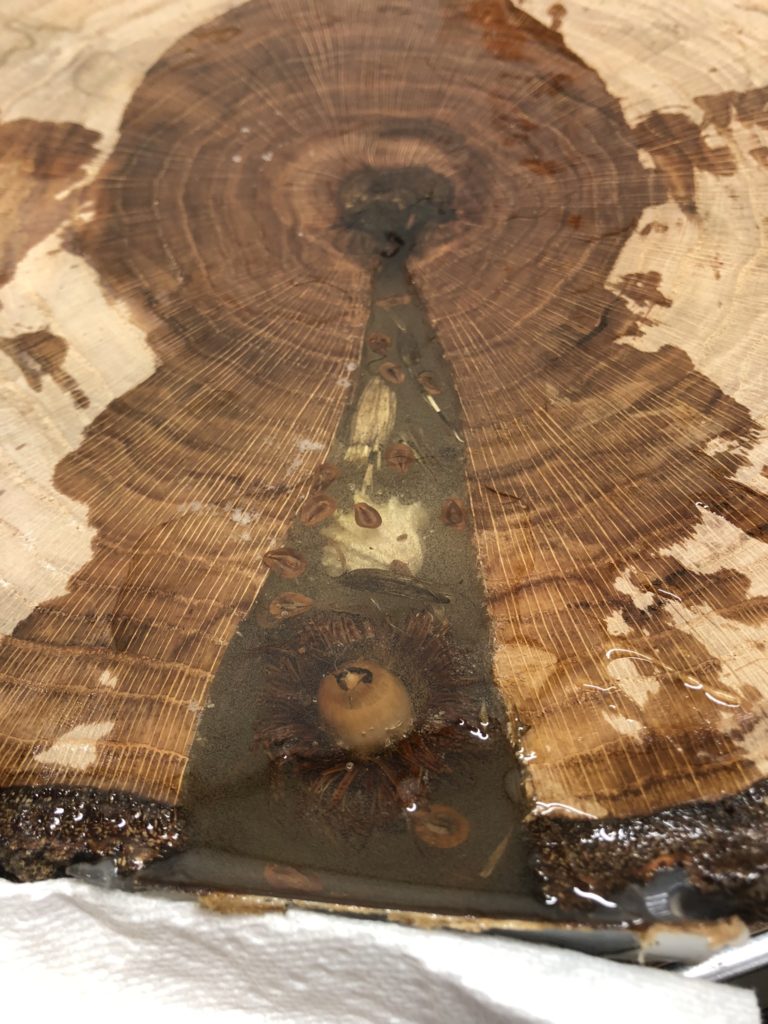
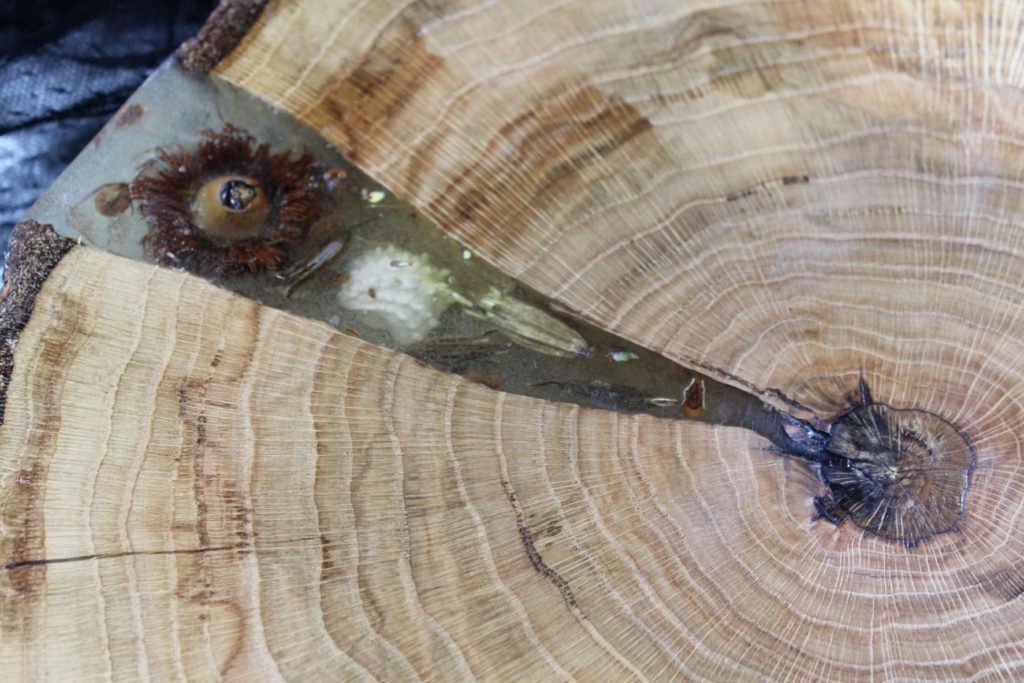
Finally, the top shape was complete, all the small cracks were filled, and I was ready to start adding epoxy and items into the larger crack. When looking at the items and the overall thickness of the platter, it was clear the rock would not be possible. It was bigger than the crack, and I really didn’t want to try to turn stone encased in resin, for fear of what it might do to my tools and that it would cause the epoxy to crack if the forces on the lathe proved to be too powerful. The shell, if it was going to be included, would have to be nearly exactly in the middle of the resin, since I thought it would explode as soon as the tool touched it. The trickiest part was to figure out how to suspend all of the items so they were evenly distributed throughout the crack. This required multiple, small, resin pours, essentially gluing something in place, adding a little opoxy, gluing something else in place, adding a little epoxy… I was back to the iterative process. The acorn husk wanted to float, as did the acorn, so I had to tape them down while the epoxy cured.
Little by little, layer by layer, the items were added.
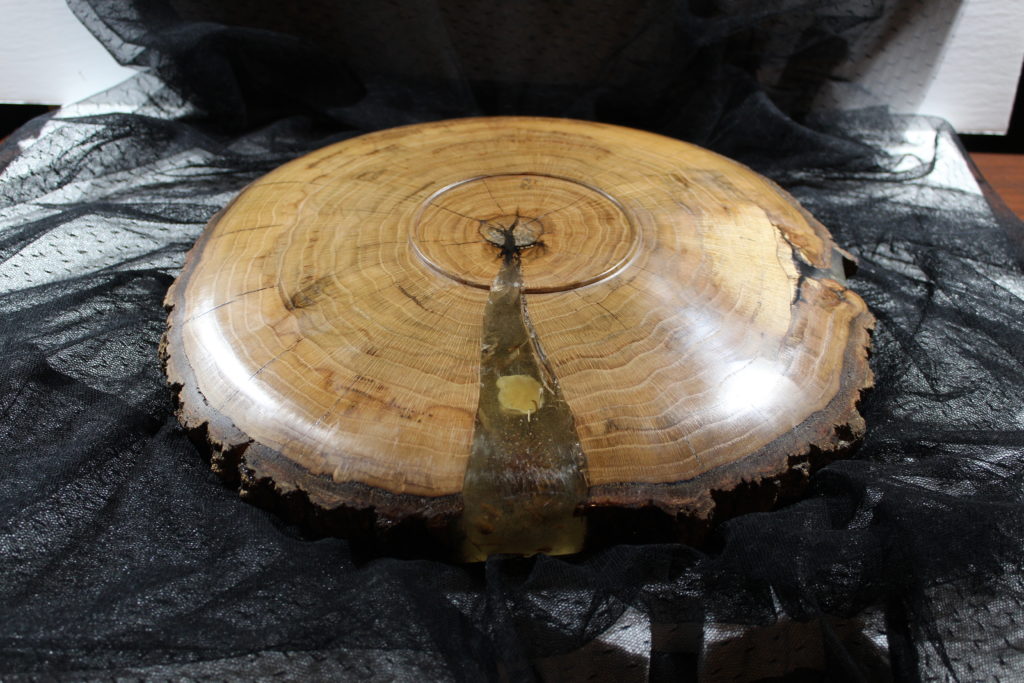
Then it was time for the final turning. To me, this is always the most anxious part, since one mistake could have easily ruined all this work. Luckily, everything worked out as expected.
The end result turned out very, VERY good! Even though this was a commissioned piece, it was still hard to see it go.
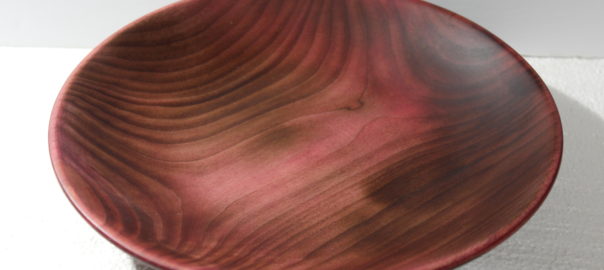
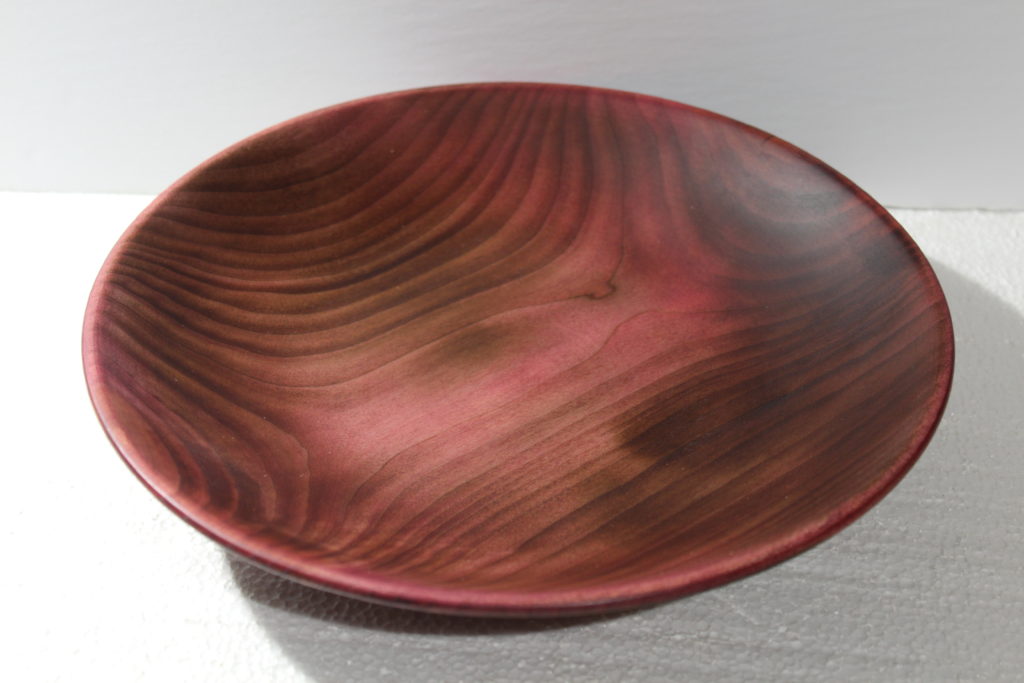
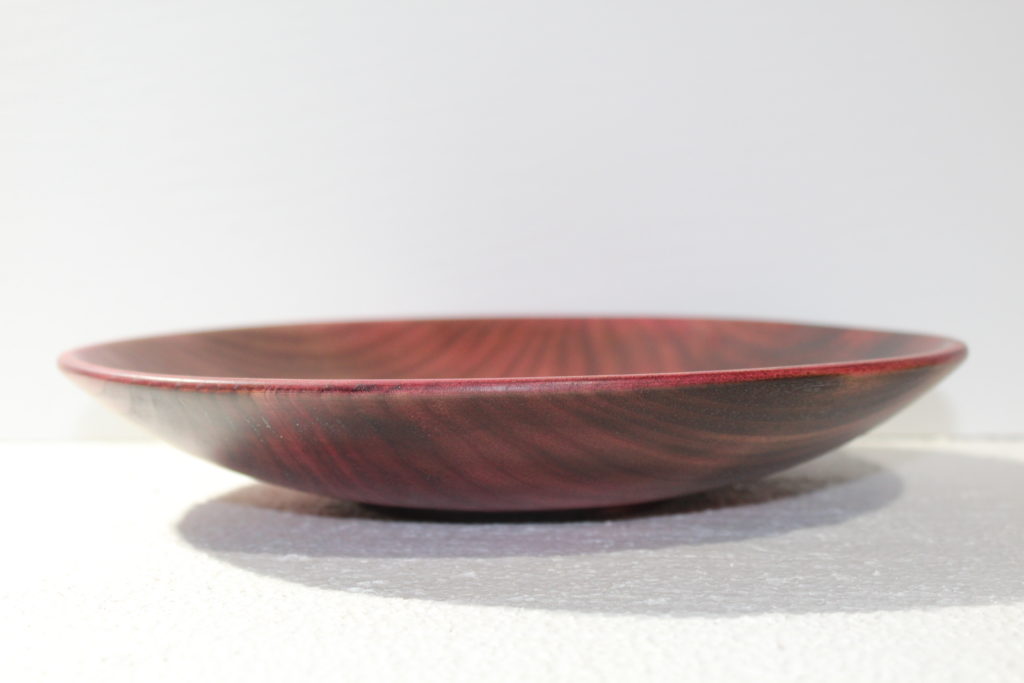
I found a piece of maple that I’d forgotten I’d roughed out. Somehow, instead of being piled alongside of all the others, it was sitting underneath the tool chest. Not sure how it got there, but perhaps I pushed it with the broom as I was cleaning up and just forgot to go back and retrieve it. Since it was dry, I figured that was a sign I was supposed to start working on it.
Looking at the shape I’d left when I roughed it, it was clear this was meant to be a shallow bowl. It only took about 45 minutes to get the turning done, even though it is about 1/8″ thick on the side walls. Surprisingly enough, the end grain wasn’t too chewed up, so the sanding went pretty quick, too! I was just about to take it off the lathe to remove the tenon, when I realized the reason it had been so easy to turn and sand is the grain was about as straight as could be. Not that there’s anything wrong with that, but to me, it just looked blah. Like vanilla ice cream kind of blah.
I took out the blowtorch and tried to burn the wood to bring out the grain pattern more. While that works really good on pine, on soft maple, it wasn’t nearly as striking. I sanded it back and realized that very little had changed about the piece. All I had done was darken the entire piece, and not in a good way!
Thinking the blowtorch was a bust, I decided this would most likely end up as a throw away piece, so it would be the perfect project to play around a bit. Since I hadn’t done anything with dyes in awhile, I figured this was as good a time as any other to play with them. At that point, I realized that I’d moved all the dyes from the garage shop into the basement AND that I was too lazy to traipse all the way through the house for a project I figured would be burnt within a week. Then, I remembered I still had a box of RIT fabric dye, in a multitude of colors that I had left in the garage. I found the bottle of black and went back to the lathe.
After coating the whole bowl, I let it dry while I mowed the yard. When I came back, the blank was a dry as it could be, so I was able t proceed. I sanded the bowl back using 240 grit paper, intending to leave just a little black remaining on the wood grain. Nice thought, but what I actually got was the entire bowl looking very dark. In all honesty, it looked surprisingly like walnut! . Next, I put on some red and liked the way it changed to color, without making it look too obvious. There’s still enough of color from both the burning and the black dye, that it didn’t come out a cartoon color. I decided it was as good as it was going to be, called it a day, and added three coats of lacquer.
I saw a new word today: Impermanence. The dictionary says it’s the lack of permanence, something transient, temporary. Most likely, I already knew the word, but seeing it in print hit me harder than it should have.
My oldest grand-daughter just turned 5 a week or so ago. As I watched her pregnant mother, my second daughter, fussing with all the details at the birthday party, it reminded me that it wasn’t so long ago I was celebrating HER 5th birthday. Another daughter brought her two over to my house a few days later and as I helped my grandson trying desperately to load a nerf gun and “loaned” a few coins to the my granddaughter so she could play with a toy vending machine, it struck me that a year ago neither would have been interested in either task. Something was different now.
Today, as I was picking my son up from work, I watched him come out of the building. He was laughing and talking with a co-worker. They stopped and although I couldn’t hear the conversation, I saw a level of maturity in my son’s mannerisms as the conversation played out that took me by surprise. With it came the sudden realization this was not the boy I thought I’d dropped off.
Just for giggles, I googled the house I grew up in and looked at the satellite image. The picnic shelter my father and brothers had built had been torn down as well as the barn I used to escape into when I wanted to be alone. Now, there’s a fenced back yard, trees missing, and a second driveway to a huge garage and a pool sitting where my mom always planted a garden that was much bigger than was ever necessary. Funny, I guess I had always figured those things would still be there, no matter who owned the property, but the landscape was different. Altered. “Improved”.
Everything changes. It’s an eventual progression, an erosion of what doesn’t belong anymore, or a subtle shift toward whatever comes next. There’s no stopping it, no controlling it, and no real way to even measure it in the moment. It can only be measured with hindsight, where memories mark the changes like old video tapes being rewound so all the little differences can be seen in their glaring reality. Initials carved in trees are cut up with the firewood, graffiti is painted over, records are broken, gravestones fall and get reclaimed by the soil, old songs stop being sung, and the list just keeps going.
Impermanence. Not something that’s occupied a lot of my mind up to now, but I suspect it will become much more of a focus in the future.
My turning club has been invited to do another demonstration, which will be held next month. I’ve learned that when we go to these kinds of things, the people who visit us want to see two things. First, they want to see chips flying! I’ve been turning long enough that the sight of wood being removed has long any kind of magic, but for those who haven’t been around turning much, they seem to get a real kick out of seeing the shape slowly take shape and marvel at just what a mess the whole process makes. Second, they want to see completed projects. It doesn’t seem to matter what the project is, just as long as there is a variety of things to see.
That second requirement got me thinking. There are many in the club who seem to make a lot of “brown and round”. Technically, many of these pieces are exceptionally well done! All the boxes are checked: very consistent wall thickness, sanded to the nth degree, and an impeccable finish applied. With an interesting piece of wood, these pieces can be very appealing. I tend to shy away from bringing these projects when taking pieces to a demo. To me, there’s a benefit to bringing items that have more embellishments, different shapes, and different materials, thinking the wider the variety, the more appealing the demo will be.
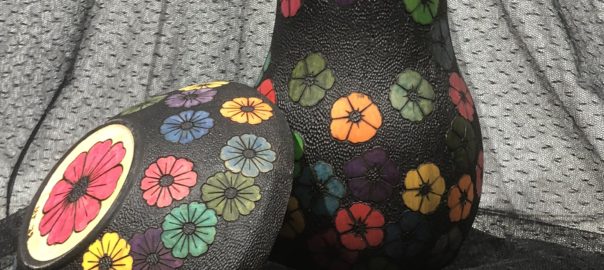
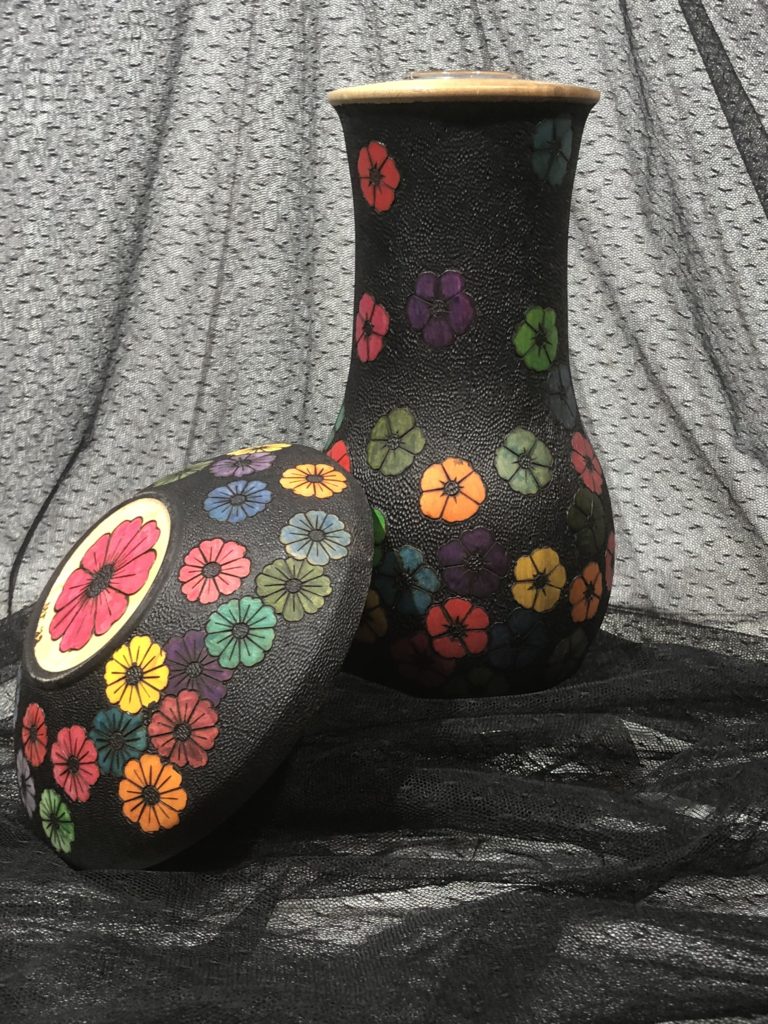
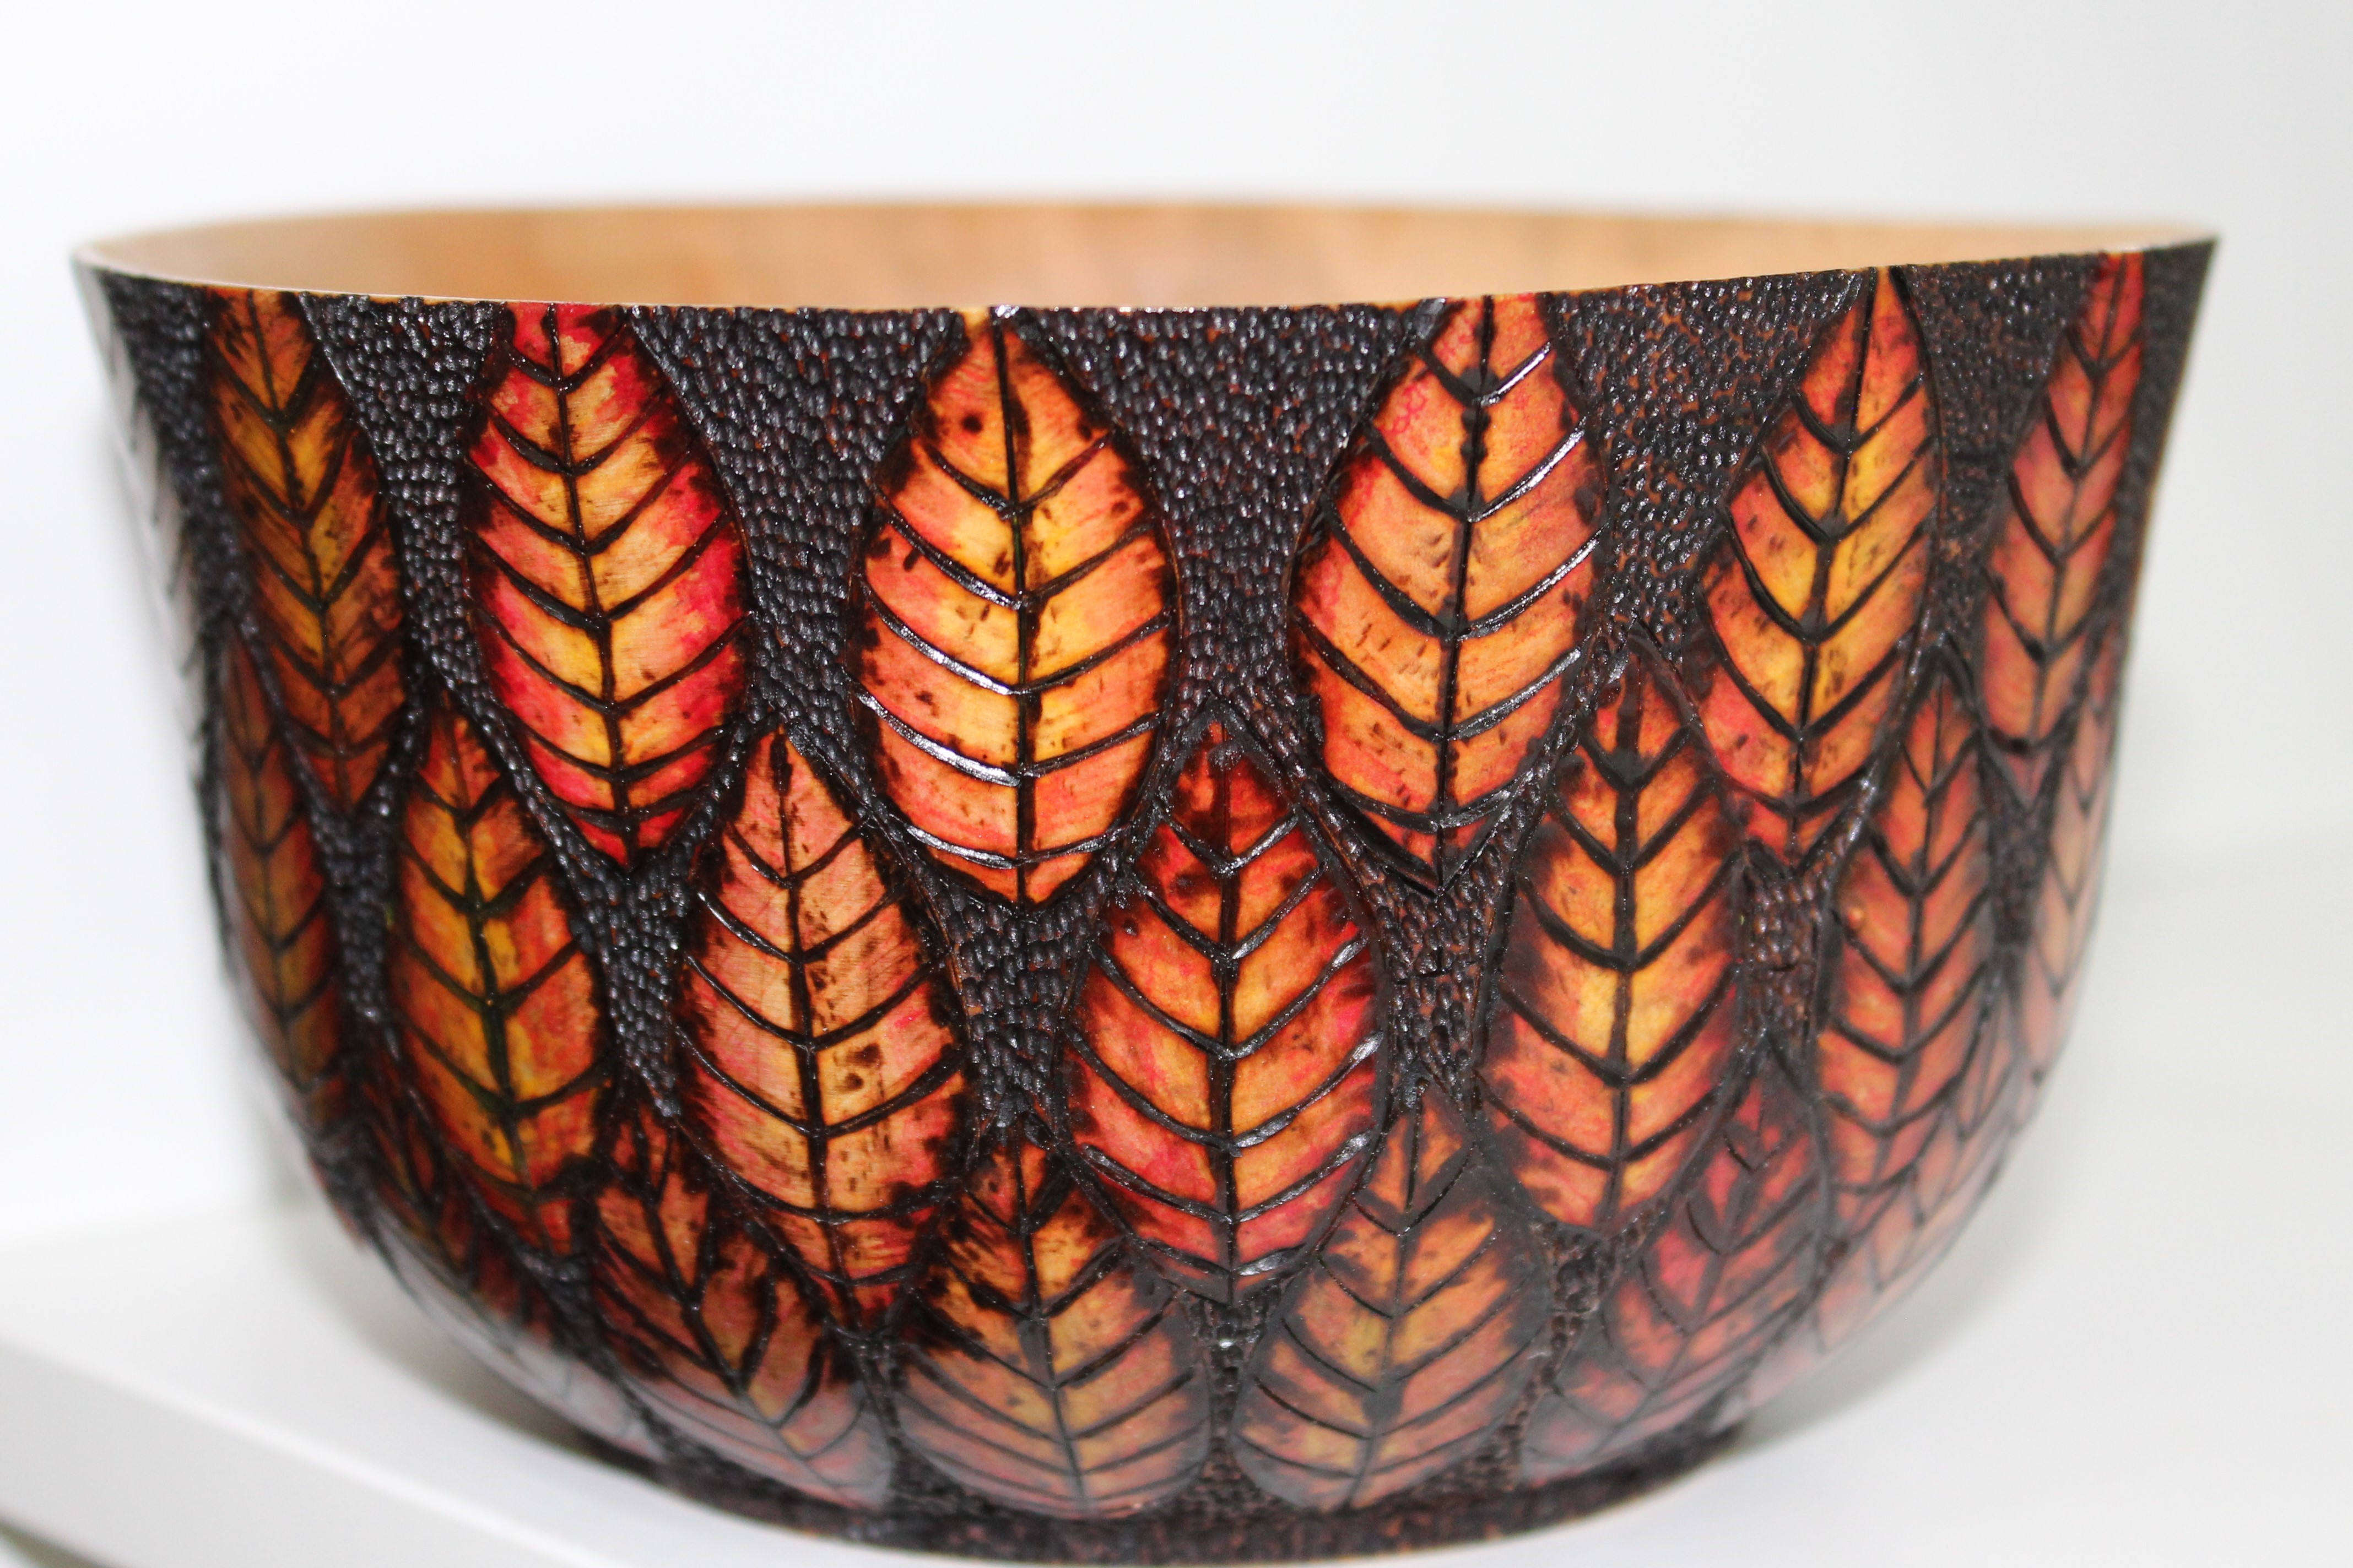
Since we’ll be in the middle of a maple forest in the middle of September, I thought I’d do something autumn themed. I found two bowls that I had turned, but hadn’t put any finish on them, thinking they were too plain and “would need something added at some point down the road”. Well, it looks like we’re down the road.
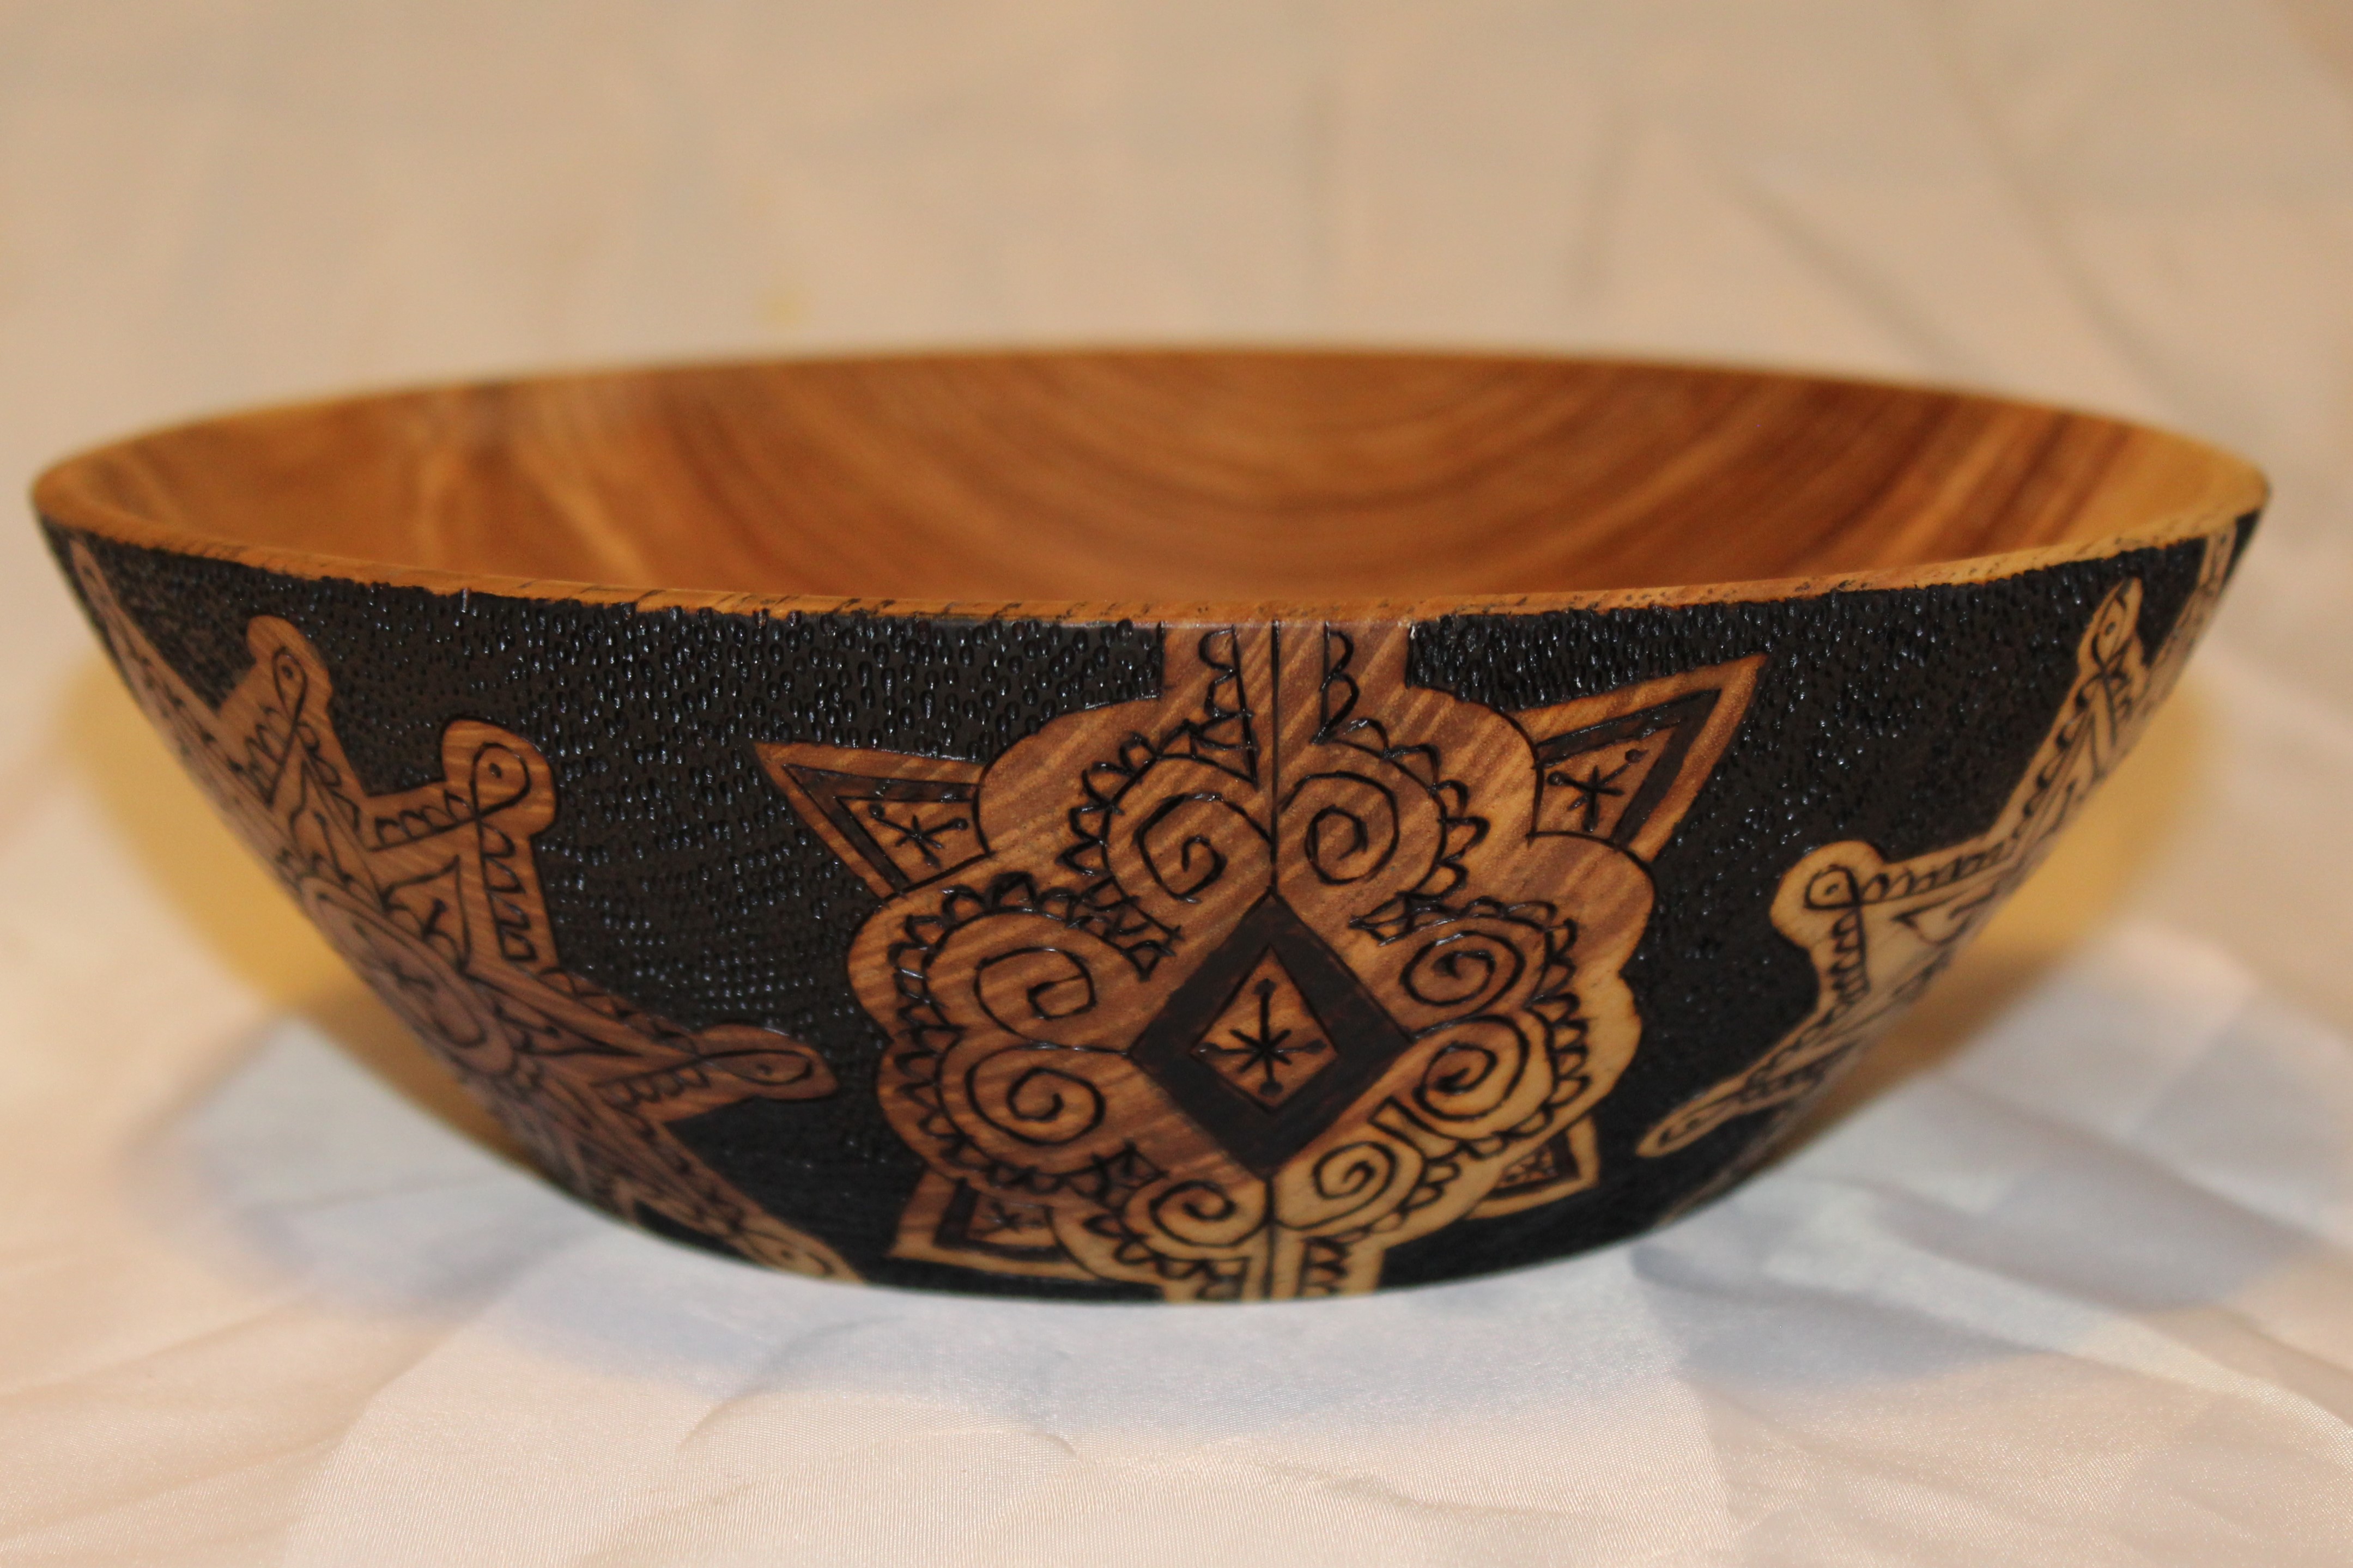
The first one was supposed to be a practice piece, since this was the first time I’d attempted blending india inks, but it worked MUCH better than I’d expected. The burning on this one took about 10 hours, most of which was spent putting in all the background texture.
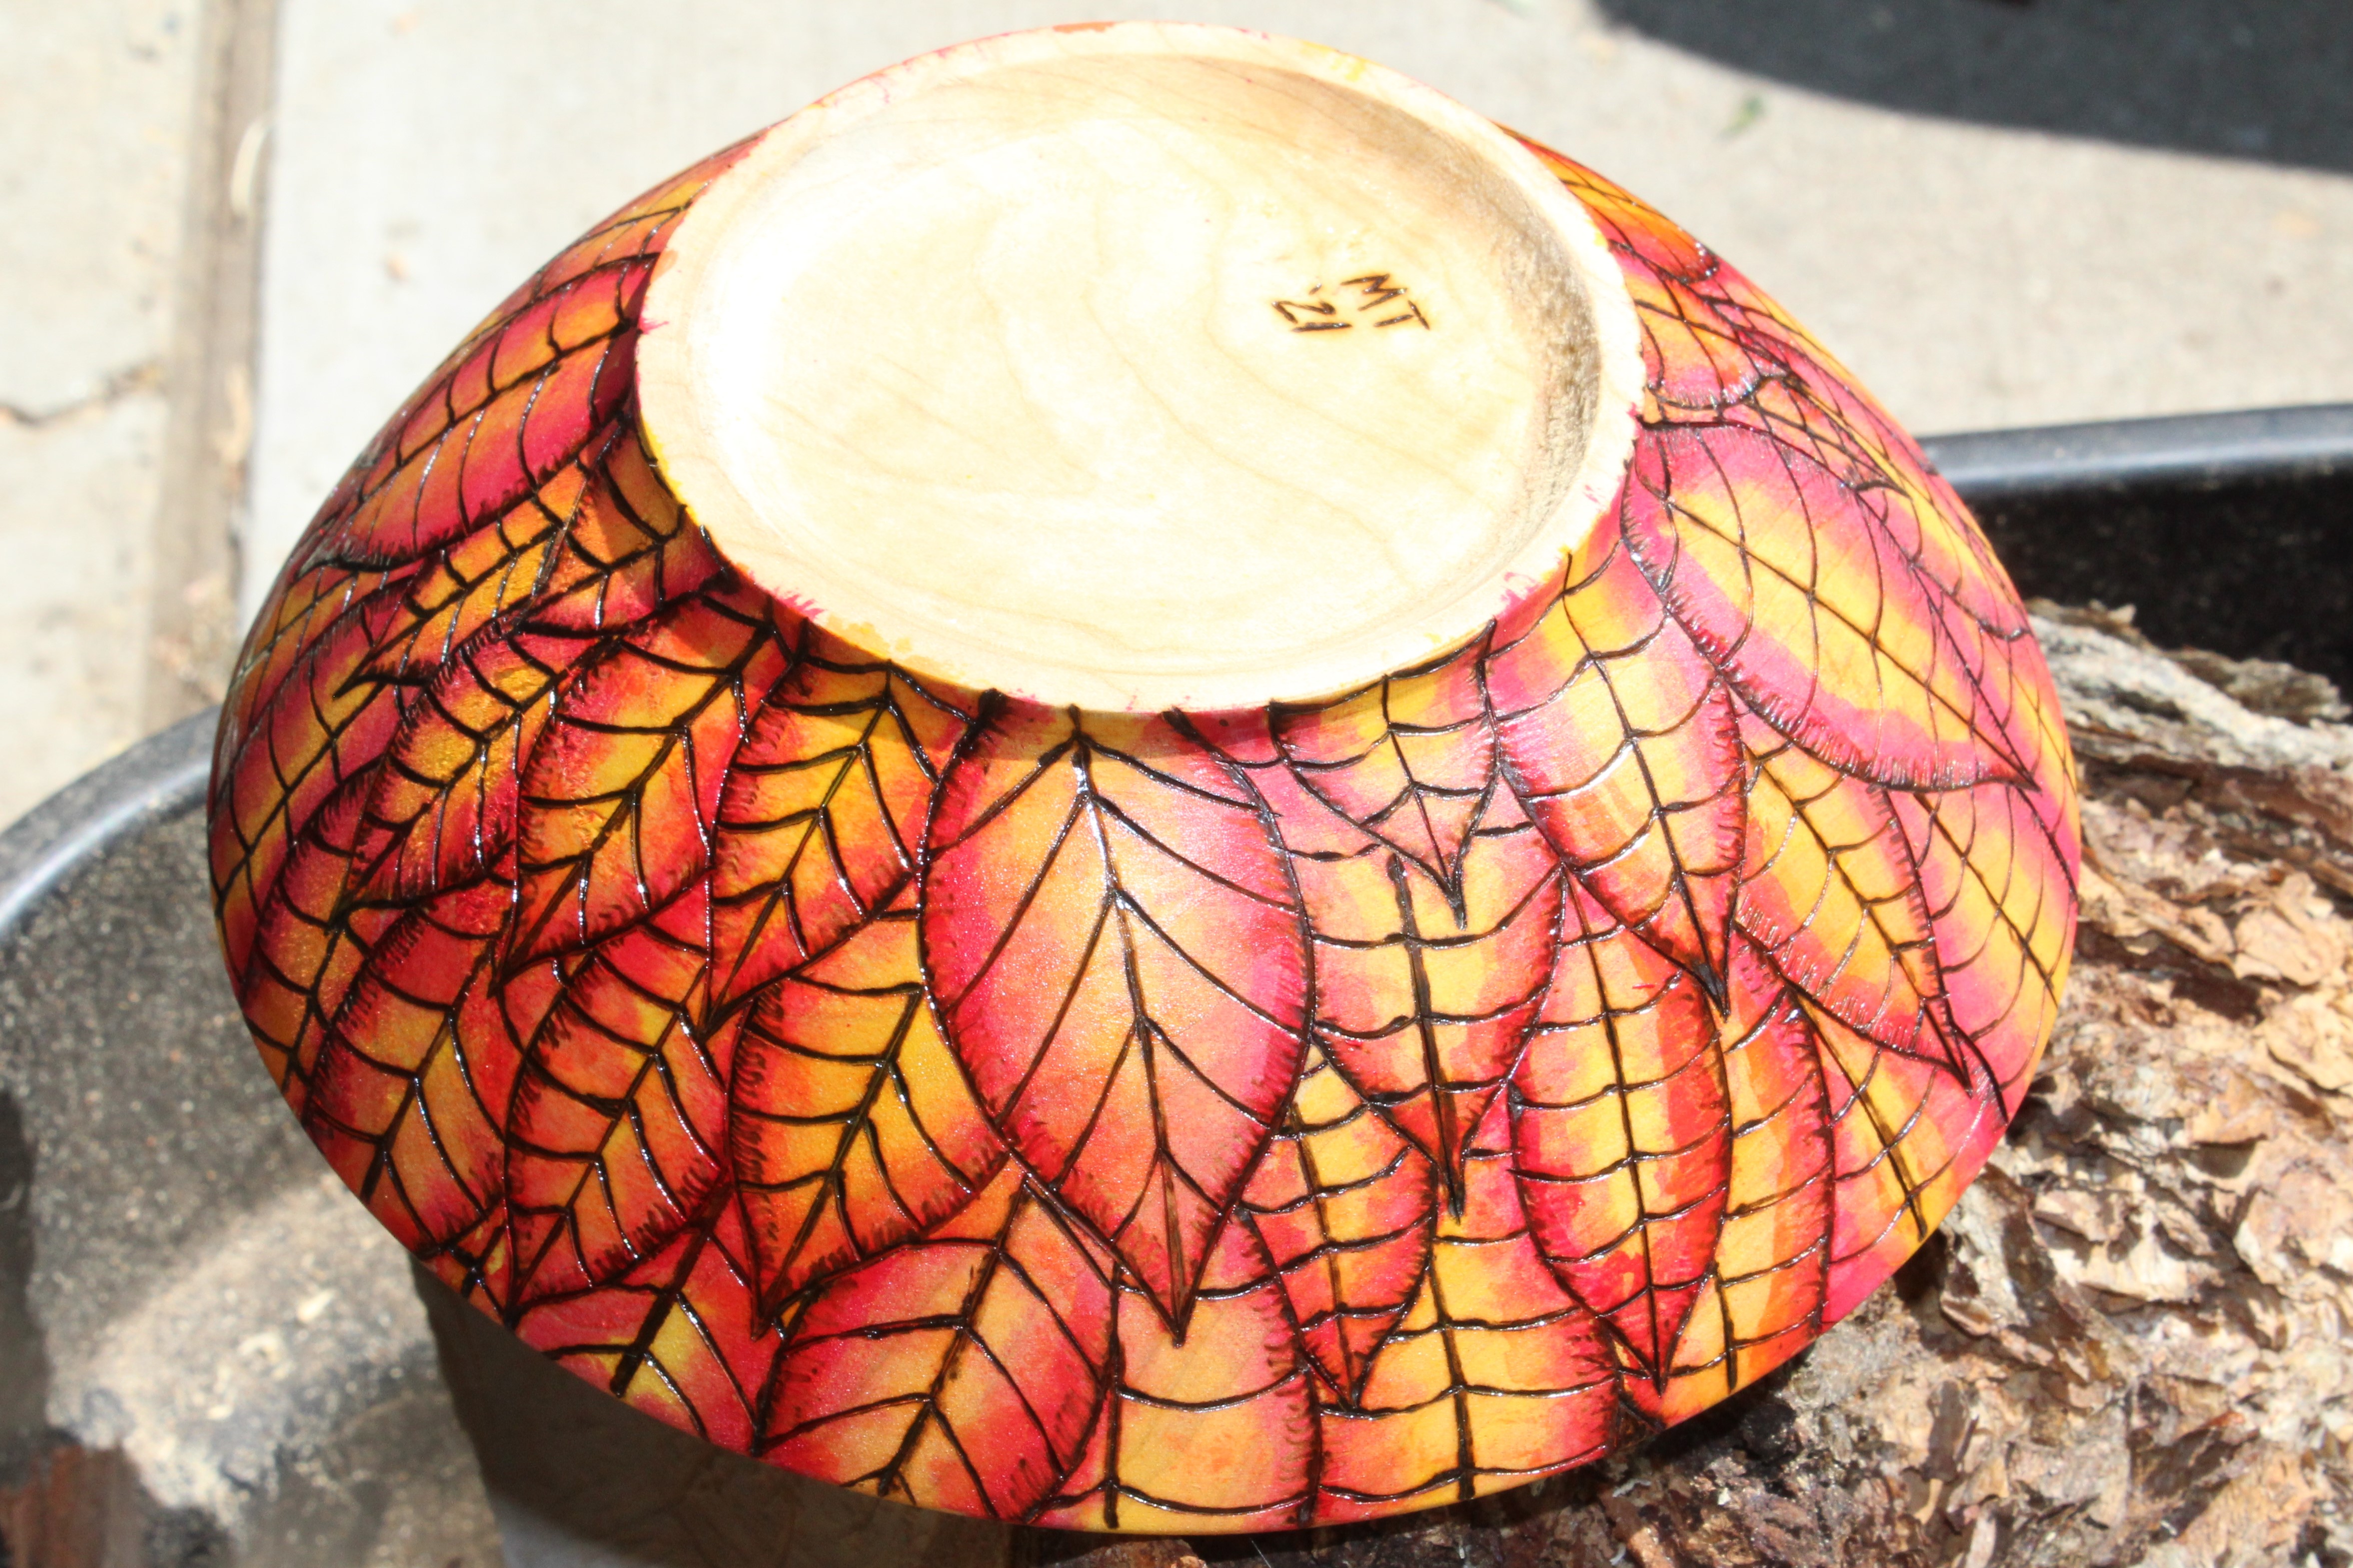
When I got done with the first one, I have to admit that my fingers were pretty sore from the heat coming off the wood burner, so I decided NOT to do the extensive texturing on the second one. Instead, I thought I’d try to make it look like the leaves were overlapping each other. I also threw away the template I had used on the first one and just did all the burning free-hand. This one turned out MUCH better than the first one.
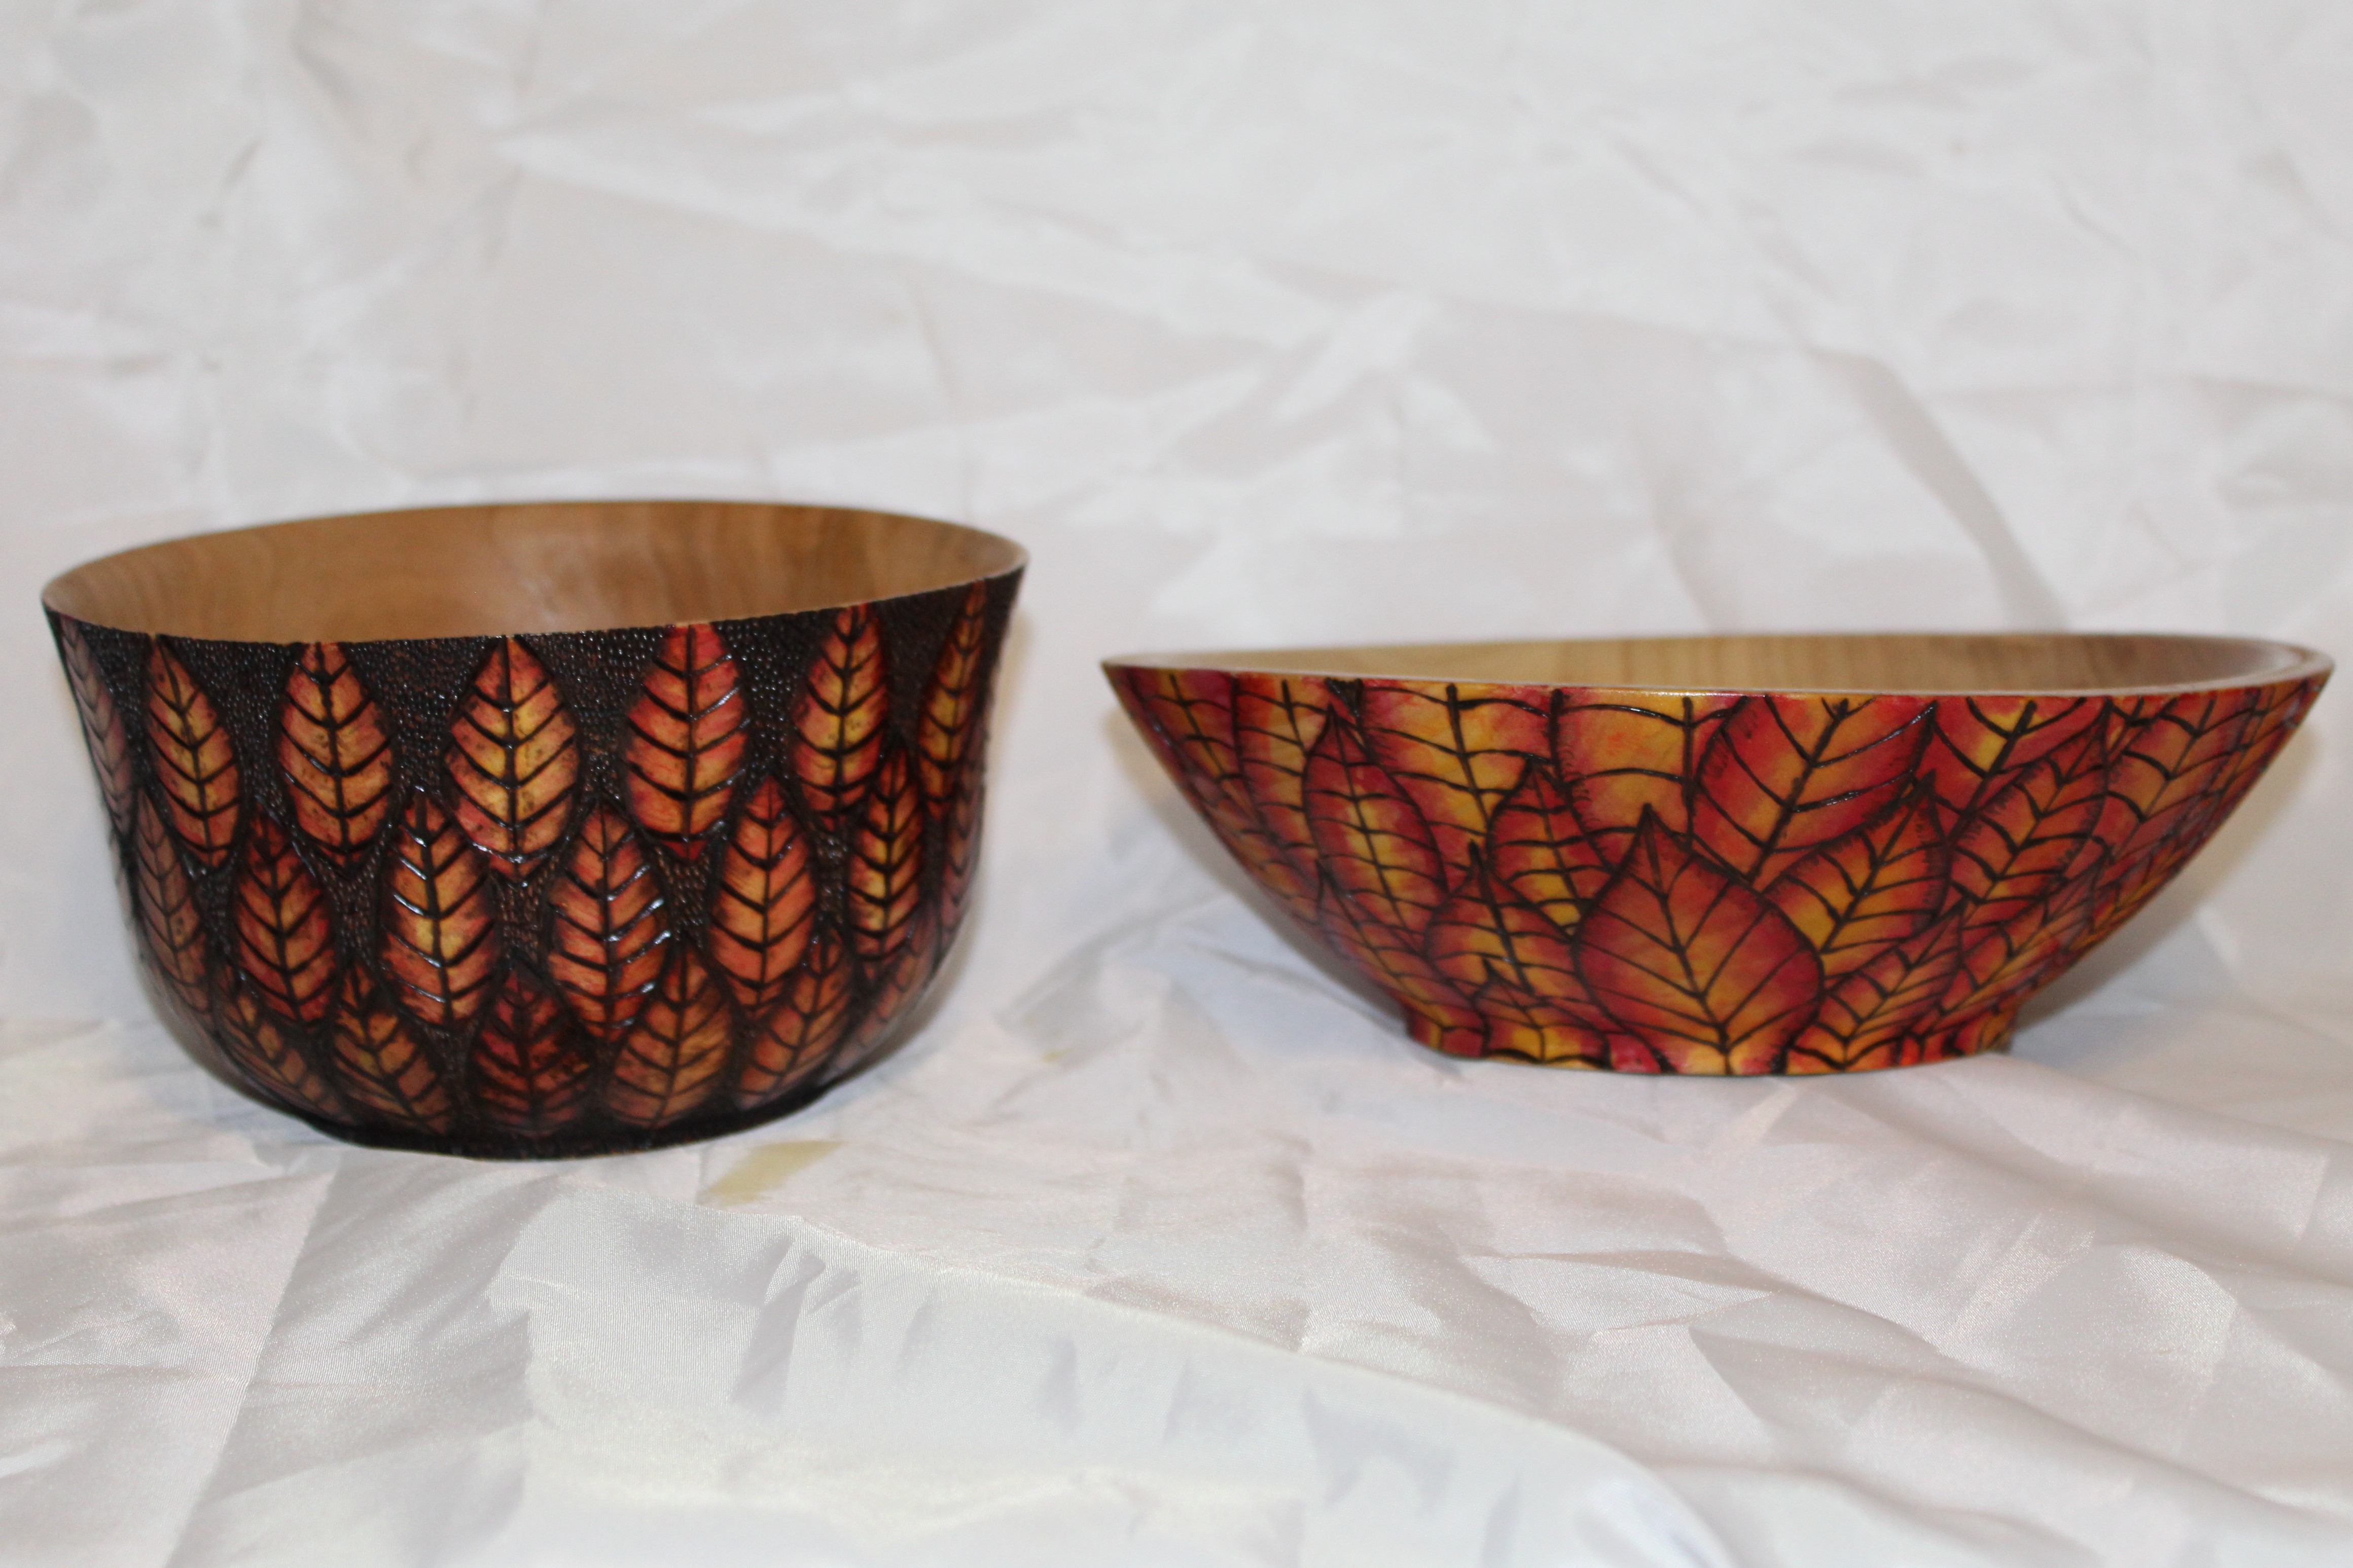
When you put the two of them side by side, I think I’ve done a fairly good job with the colors, but to be honest, the second one is much better than the first. Guess that’s to be expected. I’ve already got the next one in my head, but for that one there needs to be texture carved into the leaves before the burning and the coloring.
The fall demo has “suggested” that we offer pieces for sale and I was thinking of putting a price on these. When I asked a daughter what price she would suggest, there was an icy state and the answer of “dibs”. Not sure that was the answer I was hoping for…
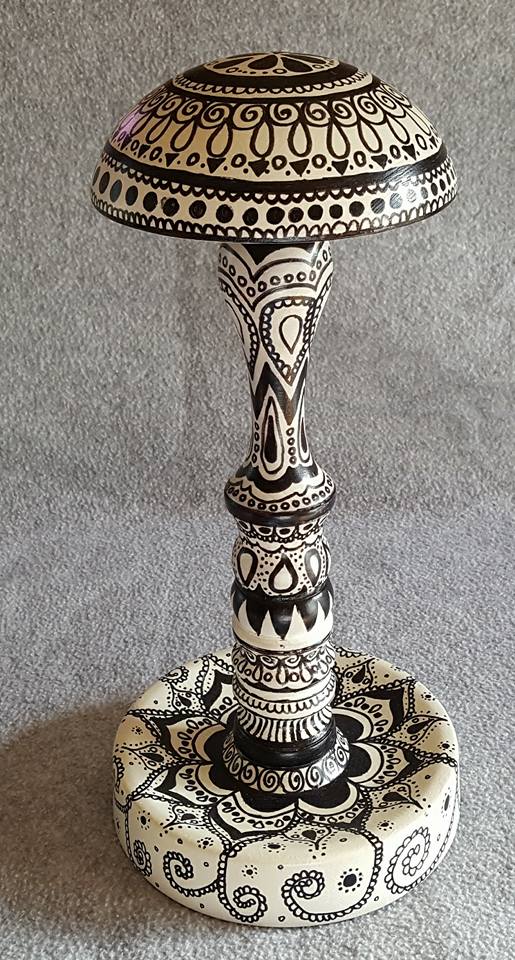
I’m sure I’ve talked about this before, but my second daughter just loves to doodle. When she was in high school, she’d take a pen or marker and just start making these intricate designs that remind me on henna painting on whatever was available. Paper, her arm, her jeans, other people’s arms, books… It seems just about anything that would stay stationary long enough to be doodled on was fair game. At the time, we didn’t see it as a good thing, but now, I have to admit I’m pretty impressed that she can just make these kinds of designs, seemingly without effort.
As I was looking back at some old photos on my turning club’s website, I came across the wig stand that she did to support the club and donate to the Susan G. Komen foundation. Here’s a picture of what I’m talking about:
When that was made, I’d always wondered if a design like that would transfer to a bowl, but then life got in the way and that fleeting thought disappeared.
During the pandemic lockdowns, I had spent some time turning up wood that had been sitting around for awhile. One piece was from this really, really nasty ash tree. It had been killed by the ash beetles, left standing for (apparently) years, had prior damage done to the trunk before dying, and was all around unusable. I took my best guess at where the bad spots would be and started cutting blanks. Sometimes, all I got for my efforts was more firewood for the hot dog roasts, but there were a few blanks that slipped through. I turned one of them, but was immediately struck by just how plain the grain was. All that work, and nothing of any interest to show for it.
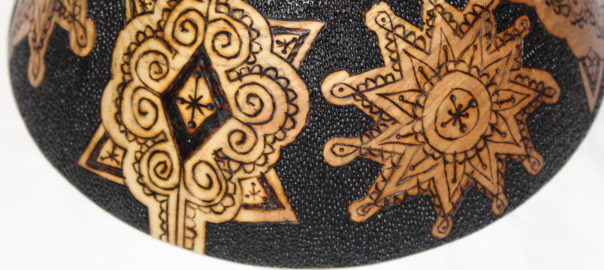
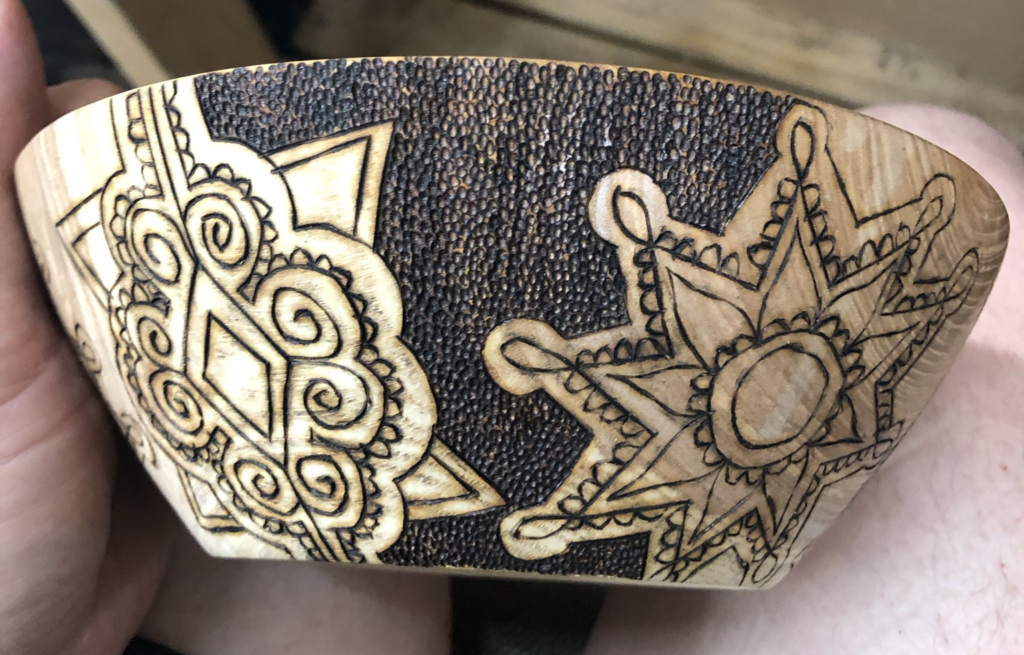
Then that old thought leapt out of the depths and I thought “I’ll get my daughter to doodle it up!” Since she was an “essential worker”, she didn’t have nearly as much down time as I had, so the project sat for awhile. The she finished, but I forgot again to pick it up and it sat for even more time. This month, nearly a year later, I got the bowl back and decided to wood burn her design into the bowl and see how it looked. MUCH better than when I took it off the lathe!
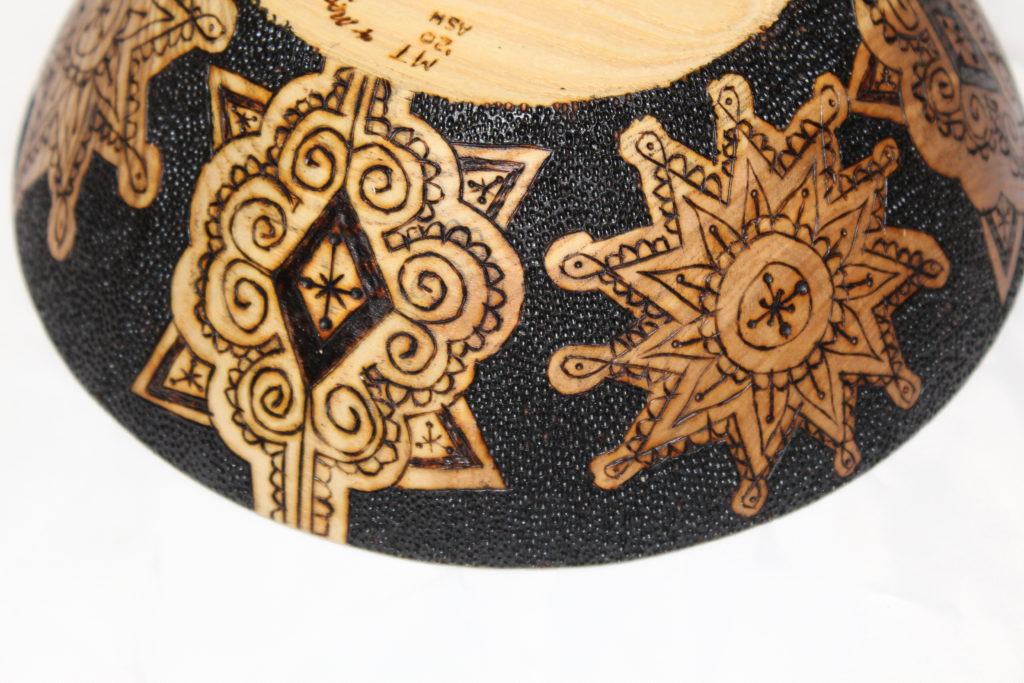
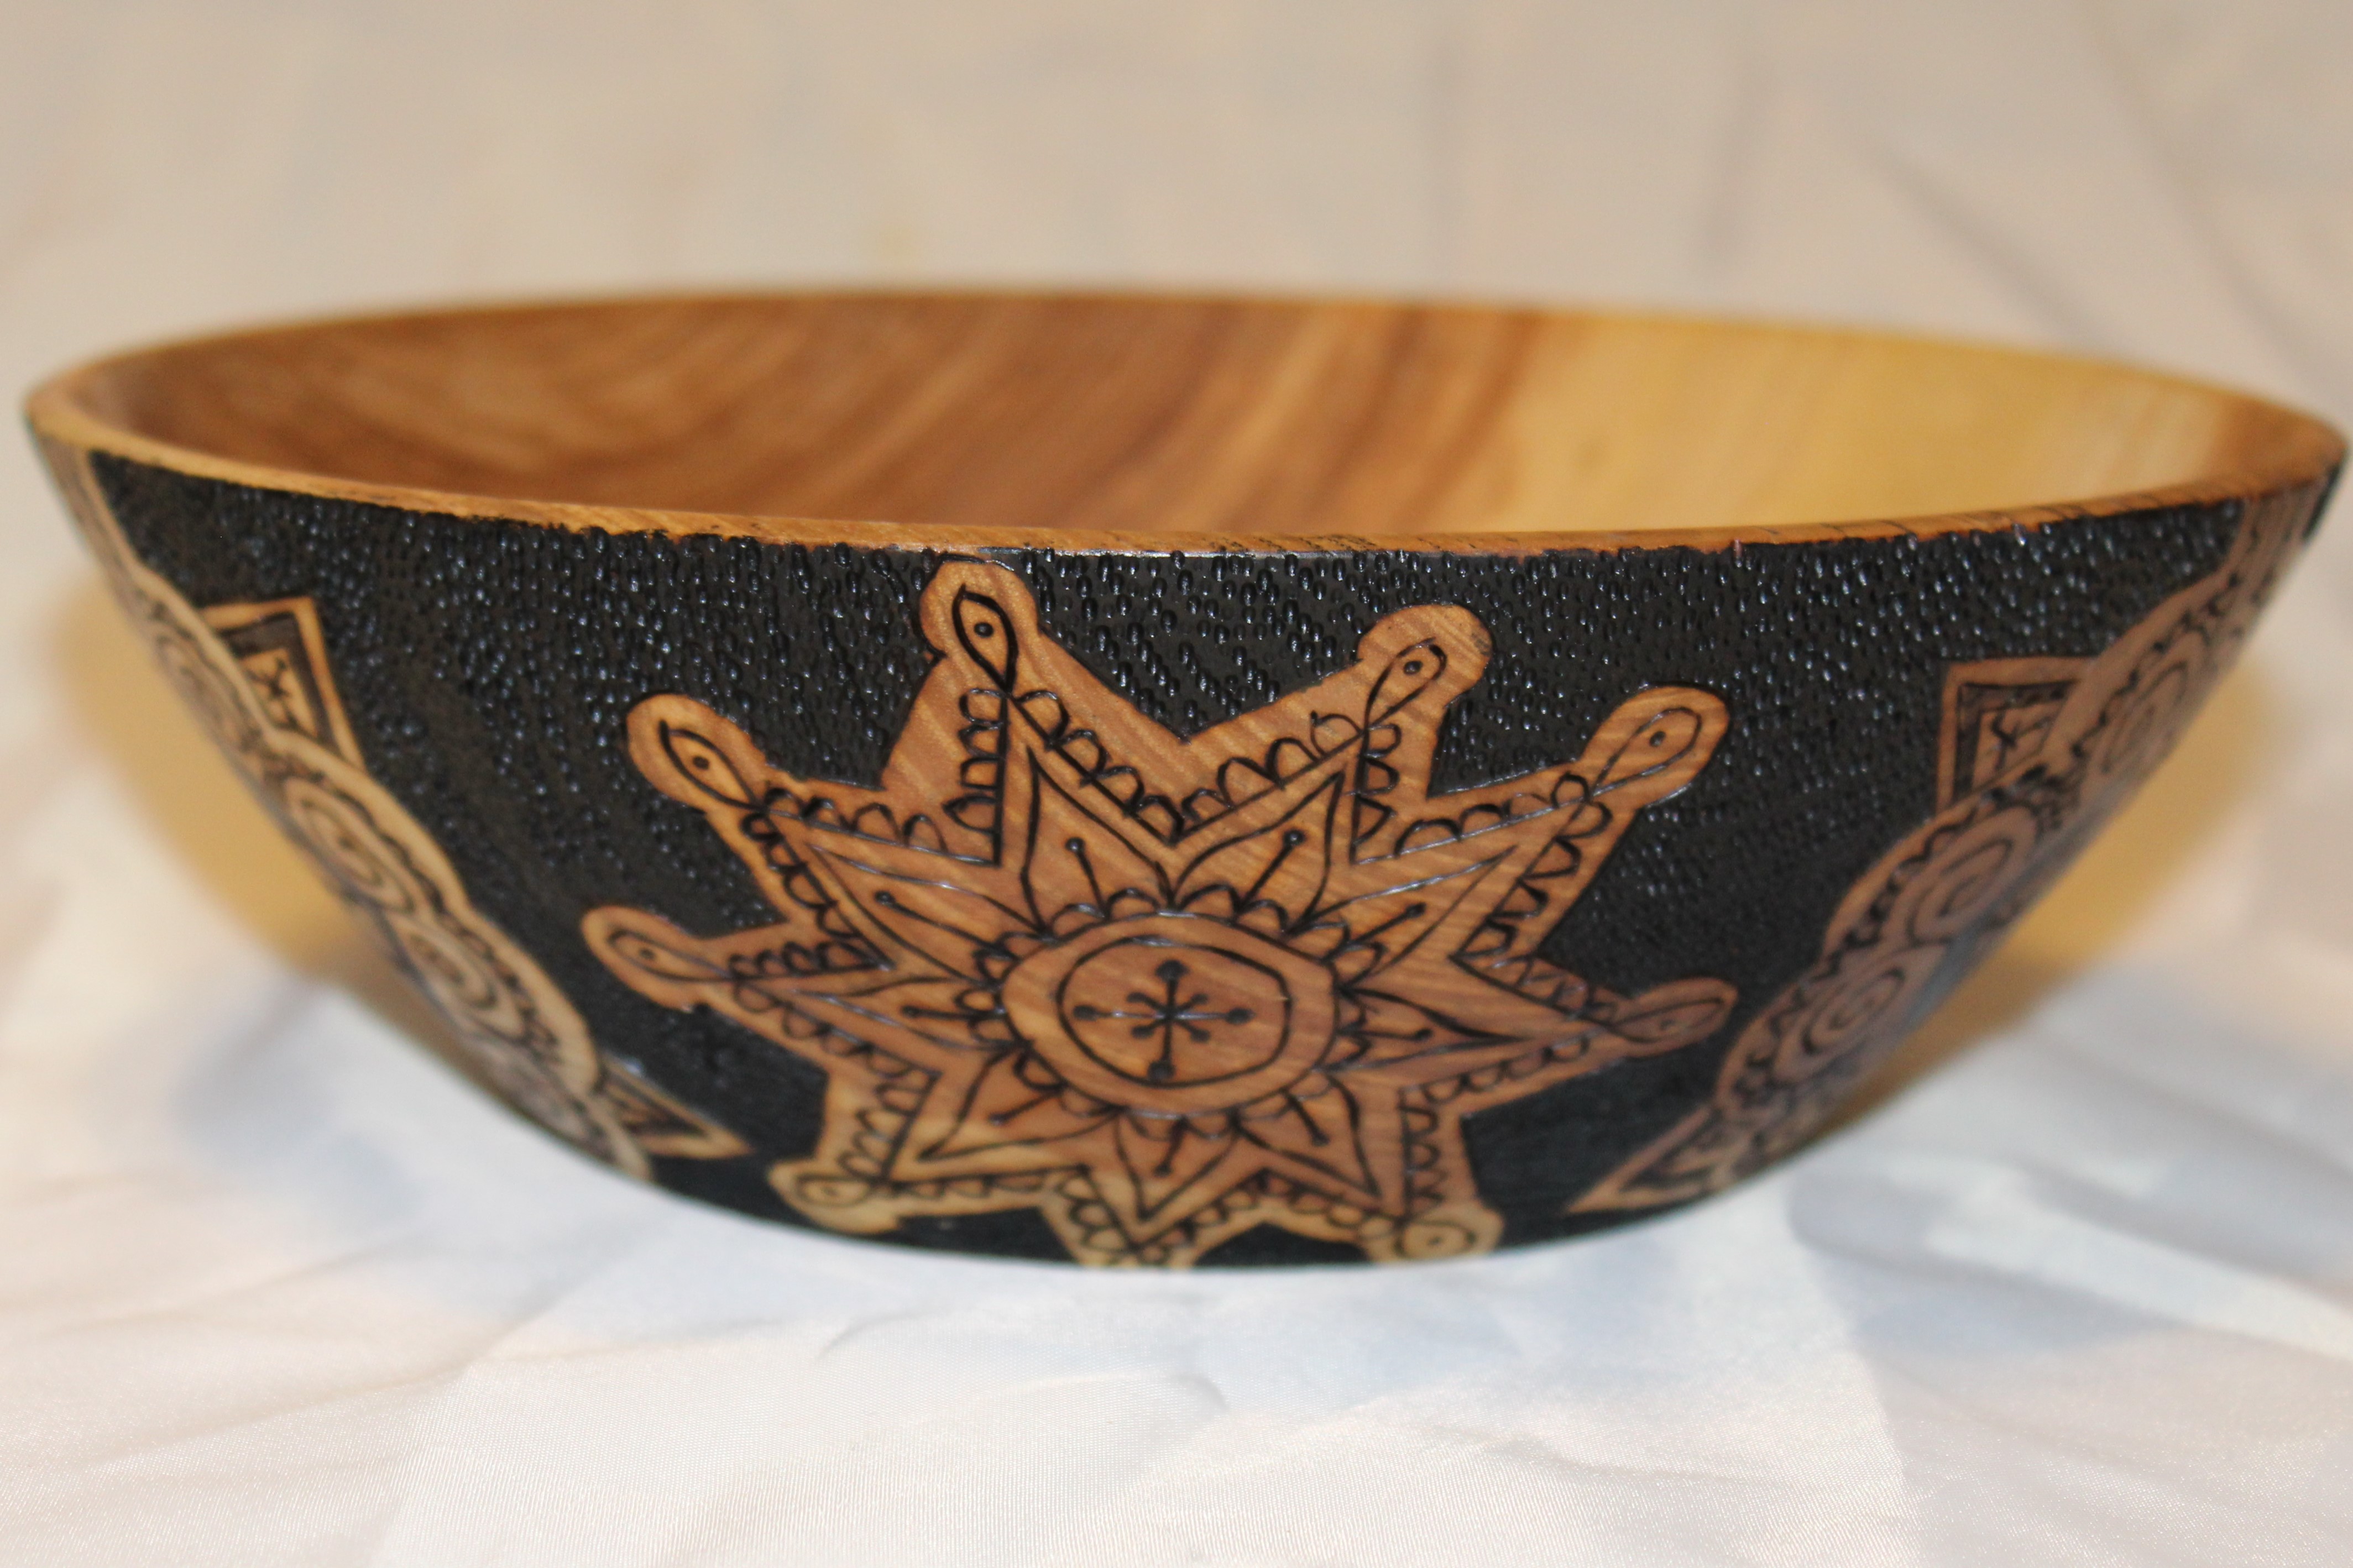
Burning in her design wasn’t that hard, but when I was done, it needed more. I decided to do a heavy texture over all the background, which improved the look dramatically! The more I looked at it, though, the more I realized that when burning the texture in, there was still speckles of the lighter, whiter, wood that showed through. To get rid of the splotchiness, I painted all of the texture with black india ink, which solved the problem. Looking at the design more, there were areas of blank space that didn’t stand out, until it was put on a black background. With my daughter’s permission, I added some designs to fill in the open spaces, and this became the final project. Matte finish was added to protect the wood without making it shiney, which actually makes the black blacker somehow.
Pretty proud of this collaboration! I love having creative children!
Here are some pics of the progress, along with some shots of the final result:
This clip was taken after all the burning of the design was done. Some of the pencil marks were mine and some were my daughter’s.
This is the start of the texturing process. Each one of those black dents was done with a wood burner, one touch after another, after another, after another…
This was taken after the initial texturing was done. The “blank spots” in the doodles can really be seen here.Here it is after there was something put in those blank spaces. The patchiness of the woodburning can be seen here, which is why black dye was added to the final project.
I’ve been working through a very large stash of maple bowl blanks and after awhile, maple gets to be pretty boring to work with, especially if it’s straight grained wood with no spalting. It’s easy to turn, but it’s about as generic as you can get. Think of it like eating ice cream any time you want, but it’s only vanilla with no sprinkles. That’s not a bad thing (some people may think that’s great), but for me, it doesn’t take long before I’m dreaming of being spoon deep in a half gallon of Moose Tracks.
So what do I do when things stat to get boring? Go find some sprinkles!
I was working on the smaller bowl later in the evening, when some real asshat neighbors started lighting off fireworks. Since I’ve lived here, it’s been pretty much a repeating indication of the season. Starting about the second week of June until some time about the middle of July, fireworks will be lit off just about every night. It’s usually only about 20 minutes or so between the first explosion and the last, but as the 4th approaches, it become longer with the time between explosions getting shorter. If the neighborhood is lucky, the “show” will be over by 10:00, but every once in awhile it’ll be more like midnight to 2:00. It makes me wonder just how much money they spend each year on something that’s illegal in this state and why the local police haven’t been able to figure out who is begging for a ticket. Sometimes it’s just bottle rockets or Roman candles, but there’s usually at least one, big, colorful, explosion that will light up the sky, shake the windows, and make every dog in the neighborhood bark, pee, or hide under a bed.
When I heard the window rattler go off, I started thinking about some creative way to add fireworks to a project, like some carving filled with glow in the dark powder in resin. Then, as my mine is prone to do, I started to drift. Maybe instead of fireworks ON the project, I could put fireworks IN the project. If I could find the horrible neighbors and pick up all the pink and red sticks from the arsenal of bottle rockets they’ve shelled the neighborhood with, I could cast them in resin somehow. As a bonus window rattler set the next door neighbor’s dogs howling, I thought to myself “what kind of person is that patriotic? It’s not like Captain America lives here”. That was the thought that stuck: Captain America.
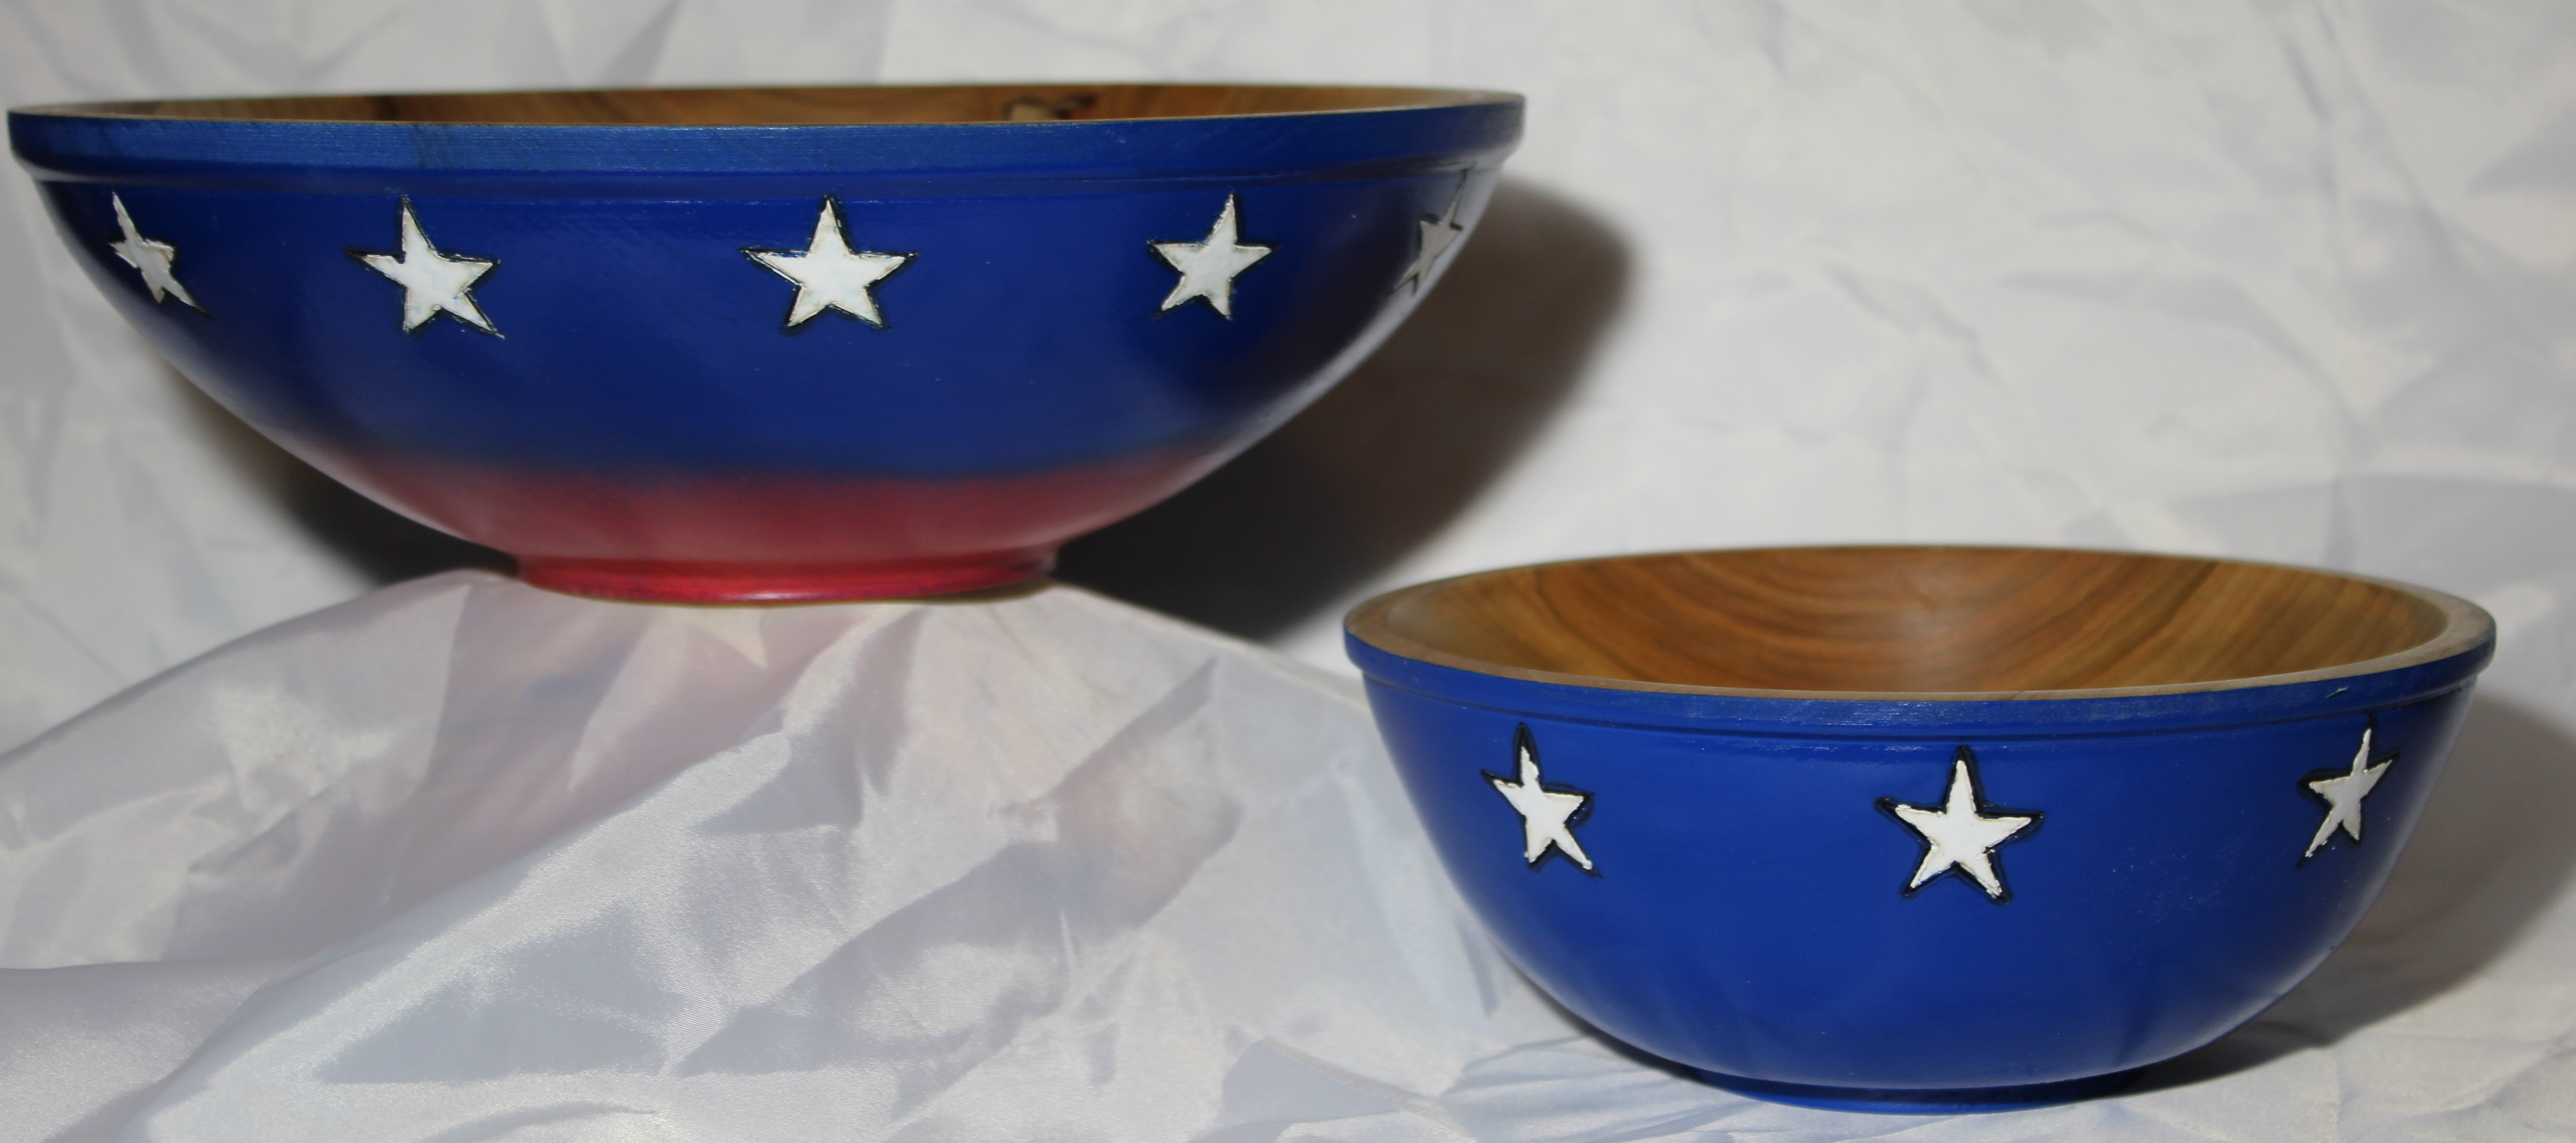
The first bowl was really just a proof of concept piece to plan out the steps. Turning the bowl was easy, then came adding the stars. I printed a pattern, then used the indexing function of my lathe to make sure they were aligned evenly, traced them on the bowl and used a wood burner to etch them into the side of the bowl. Blue spray paint was next, which covered the burnt part, but left an indented line where the starts needed to go. So far, so good! When the paint was dry, I went back to the woodburner to re-establish the hard line that would outline the while start. That’s where things started to go wrong. It turns out, if you burn through enamel spray paint, it melts, leaving a scorch mark in the wood flanked by two little mini-dams of paint. At first, I tried to paint the stars using acrylic paint, keeping the pain inside the burned part and thought the little mini-dams would help. They didn’t, the white paint went through the dams in some places, and into the burned part in others. It look really, really, bad. When the acrylic paint dried, I took the wood burner back down the now familiar path around the stars and discovered another issue. When the heat hit the wood, it melted the spray paint again and caused it to leach out into and under the white paint. Damn! I tried it again, only this time I switched to enamel paint. HIt it with the wood burner to clean up the lines and it was worse than the acrylic paint. I ended up going back to the acrylic paint, tried multiple coats and used a small dental pick to clean up as much of the “oops” places as I could. I decided to call this one done and move on to a second try.
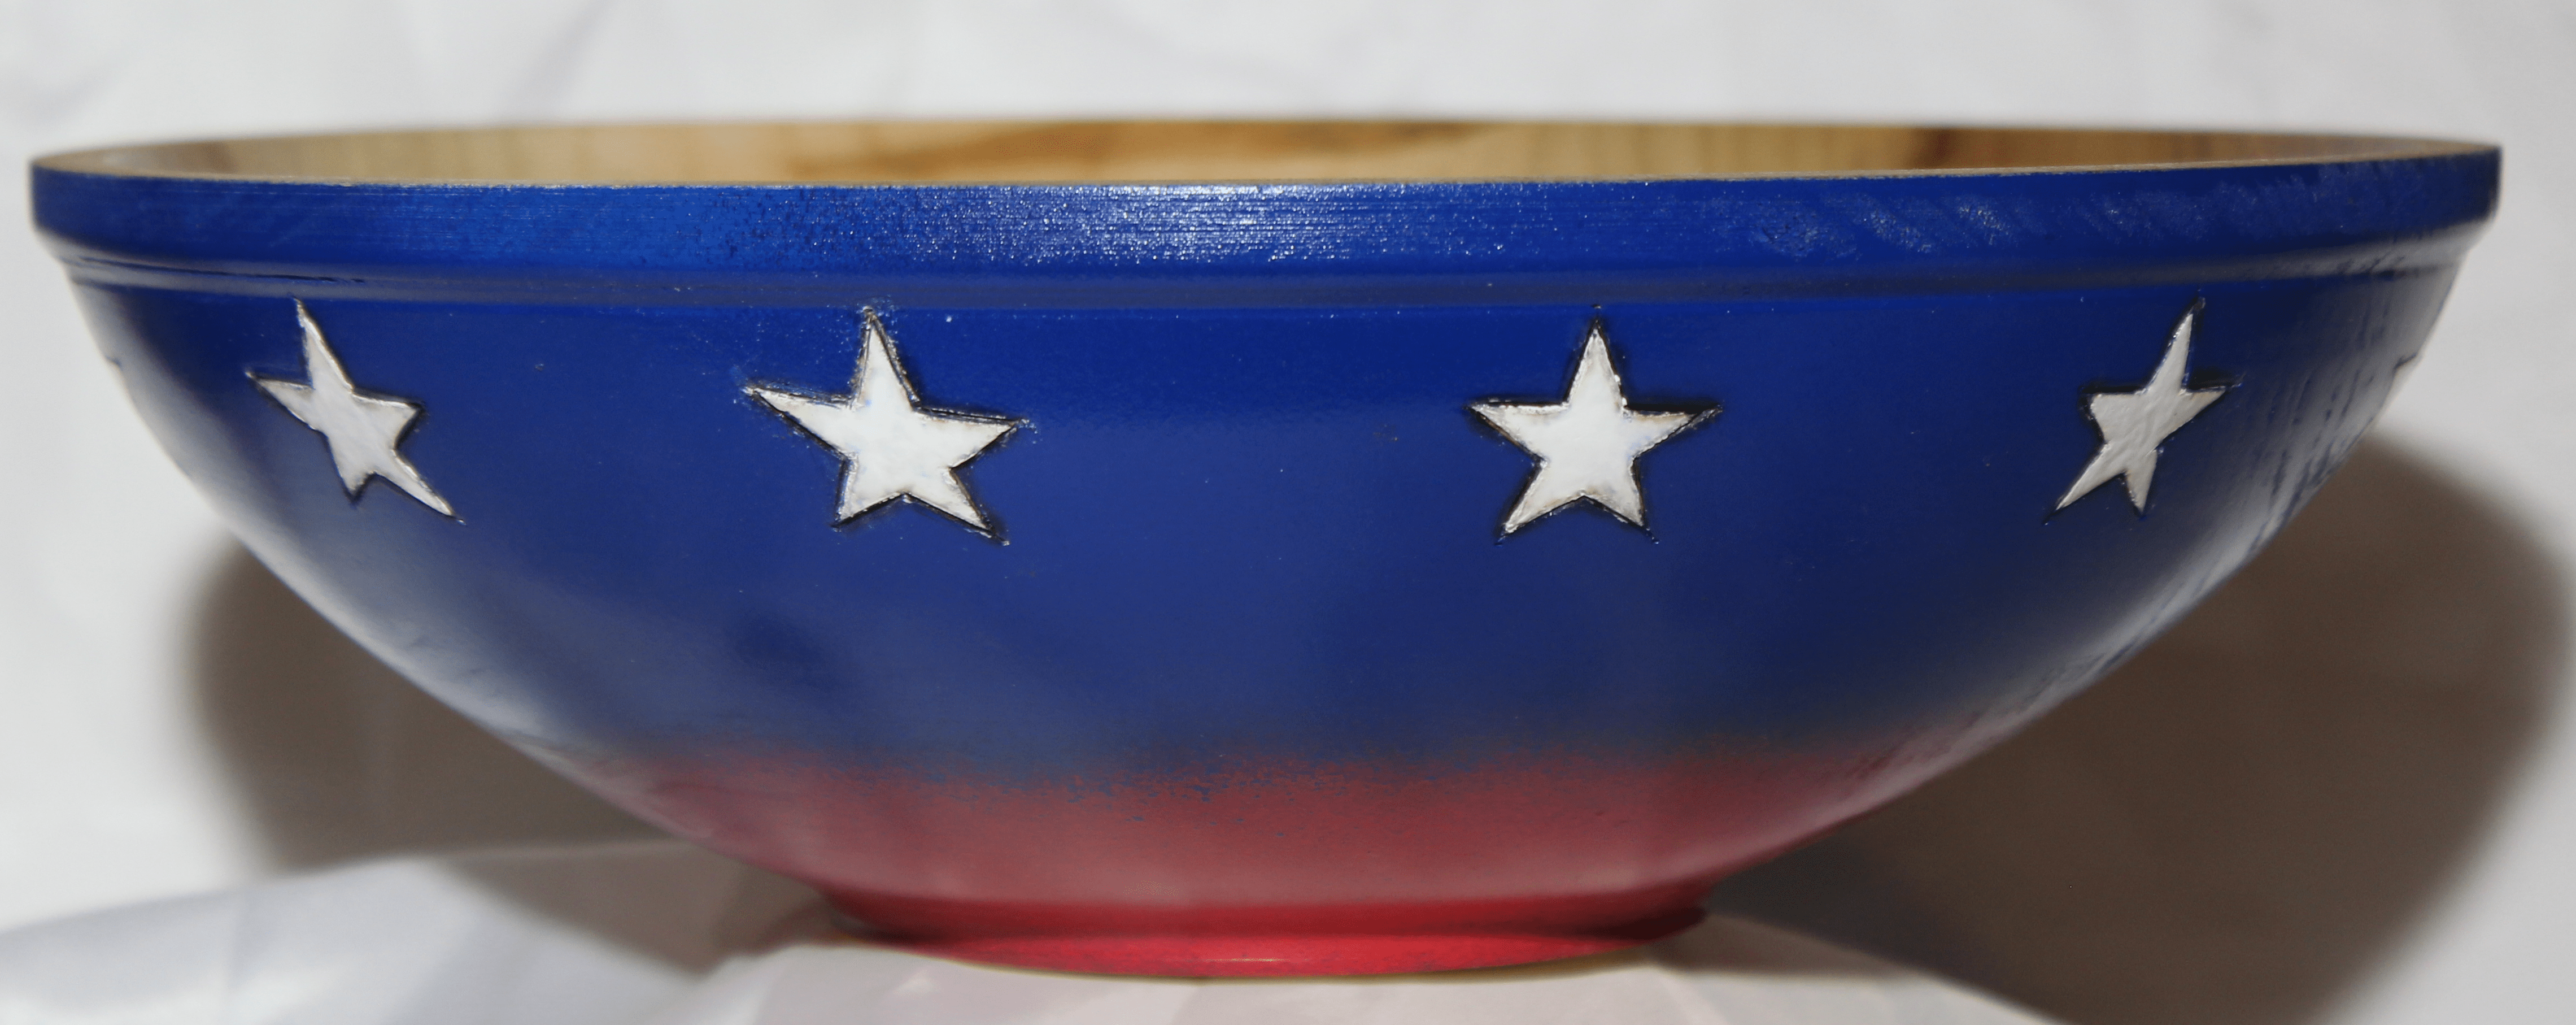
On the second bowl, I started with a wider, shorter bowl and replicated the same basic process. When the blue paint was drying, I looked at it and thought “that’s way too much blue, it needs something to break up the blueness”. I landed on red spray paint and tried to control the spray so that there was some kind of fading from blue to red. Then, it was on to the same exact battle I had had before on the first bowl. This time, I went straight to the acrylic paint and dental tools. It still looks a little sloppy to me, but from across the room it gets the aesthetic I was going for.
I’m already thinking about the next one and how I can get the blue confined to the band with the stars, then red and white stripes on the rest of the bowl. I think I’ve got the spacing figured out, but I don’t even start it until I can find a better solution for the sloppy stars.
There’s a woodturning podcast I listen to called “You Made That”. It’s hosted by three turners who are active in social media, the most “known” one being a woman named Rebecca DeGroot. Google this woman, she makes some amazingly creepy things! Anyway, they decided to hold a contest for their listeners. The rules were pretty simple, simple enough that any idiot could follow them. All that was required was to make a box that has two species of wood and something non-wooden – AND – send a picture of the materials you started with, a progress picture (or video) and a picture of the finished project.
Easy, eh?
I decided to start with these three items: Maple, walnut, and a cork from a bottle of moscotto.
My thought was to make a box that looked something like a wine cask out of the maple, turn a knob that looked like a wine glass out of the walnut, and carve the cork to make a bung for the cask. This was one of those projects where I could see what the whole project was going to look like before I even started.
The turning part went really quick (soft maple turns like a dream) but the burning took three separate 3 hour sessions to complete. Not sure when I’ll get feeling back in my index finger from all the heat, but it was actually pretty fun. The walnut goblet knob only took about 15 minutes to turn and sand, so all that was left was the cork.
If you’ve never tried to carve cork, let me give you a little piece of advice: Nature does not want, nor did it ever intend, cork to be carved! It will fight you. It will crumble. It will allow the knife you’re using to wander anywhere it wants. After awhile, I realized that nature was no match for a power sander with a very low grit. What you can’t carve, actually sanded pretty well.
Once all the pieces were done, the final project was assembled. I looked at it for awhile and just smiled, pretty confident that I would do well in the contest. Here’s the finished piece:
When I went to post the pictures on the FB group, cold, cruel, reality set in. In all of my excitement for getting to the finish line, I forgot to take a progress picture. Missing one of the requirements means this one can’t be entered. So while I like the finished project, as a contest entry, it’s an epic fail!
I saw a guy making these spindle bird houses on one of the wood turning groups that I’m in. I’d give him credit, but I honestly don’t remember the guy’s name. Some may remember the post I did last year for a collaboration piece I participated in with two friends from my turning club. If not, here’s a link.
Anyway, I’ve made more of these from time to time since then. The turning part doesn’t take all that long to complete, but the part I really like is all the different options for painting, burning, or dying them. No two of these will ever look the same. One day, when I was in my craft room working on a different project, I looked up and saw a line of completed spindle bird houses just setting there. I remembered finishing them and chose to use the same base colors on all of them to try to pull them together as a set. Still, they just looked kinda plain. Like they were missing something.
Each time I went to the desk to work, I’d see them and think “one of these days, I should figure out a way to fix them”.
Yesterday, an idea hit me that I thought was funny, so now I consider them “fixed”. I don’t usually name projects, but if I did, this one would be titled “there goes the neighborhood”!
There is some kind of tree that drops these small, spiky balls every fall and they are a complete mystery to me. Where I grew up, these things didn’t exist, but now, they seem to be all over Blo/No. I found out they’re called Sweet Gum trees and they’re common just about everywhere throughout the mid-west. For being so common, I’m still struggling to figure out why they drop out so many of those spiky balls. I swear they don’t EVER break down. They cover the ground every fall, yet the tree seems to keep a bunch in reserve, stuck in their branches until spring , just in case they feel like being vicious at some point in the future. When the snow melts, those pointy land minds are the first thing that can be seen. Weird thing, is they’re still hard and pointy, even after the snow melts and the spring rains come. I’m sure the biologists have a very scientific explanation for their function, but I think it’s pretty obvious they only exist to keep people from walking barefoot in the yard. I have resigned myself to accepting that this is yet another example that god has a sick sense of humor. Like putting the knees on the wrong side of a flamingo’s legs, or making the duck billed platypus from a bunch of left over animal parts, I’m pretty sure god decided to cross a tree’s seed pod with a sea urchin, then sit back just to see what happens.
There’s one of these enigmas growing in my daughter’s front yard. True to it’s design, it diligently drops it’s little care packages from hell all over the yard, the front walk, the street, cars, small animals, and anything else it can locate. A couple of years ago, I picked up a couple handfuls of these little marvels and packed them away for a “someday” project, not knowing what that project would be.
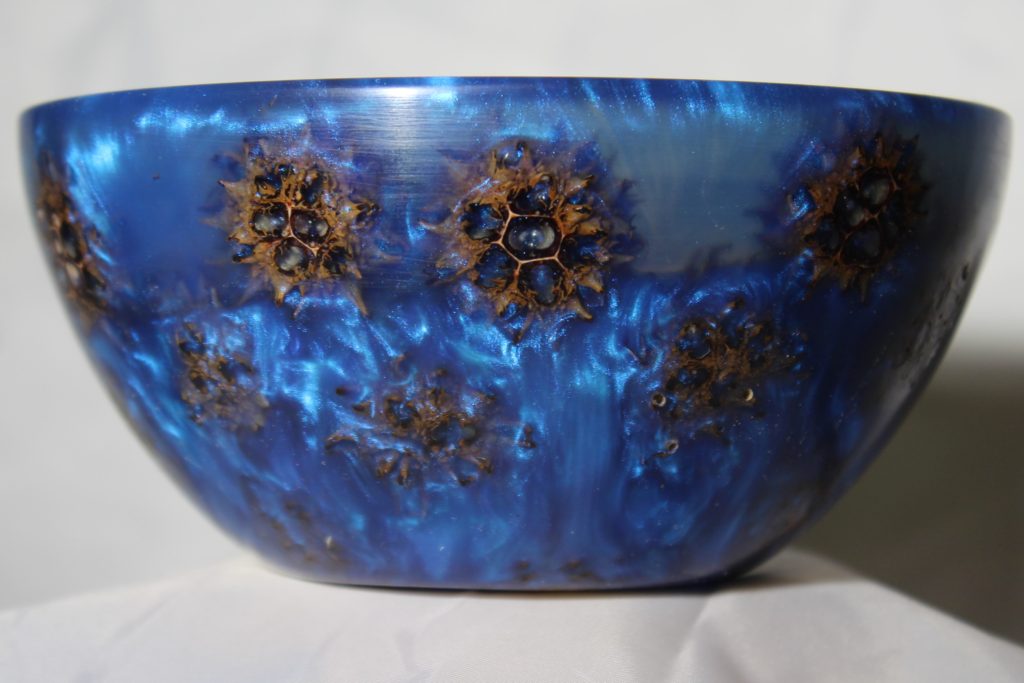
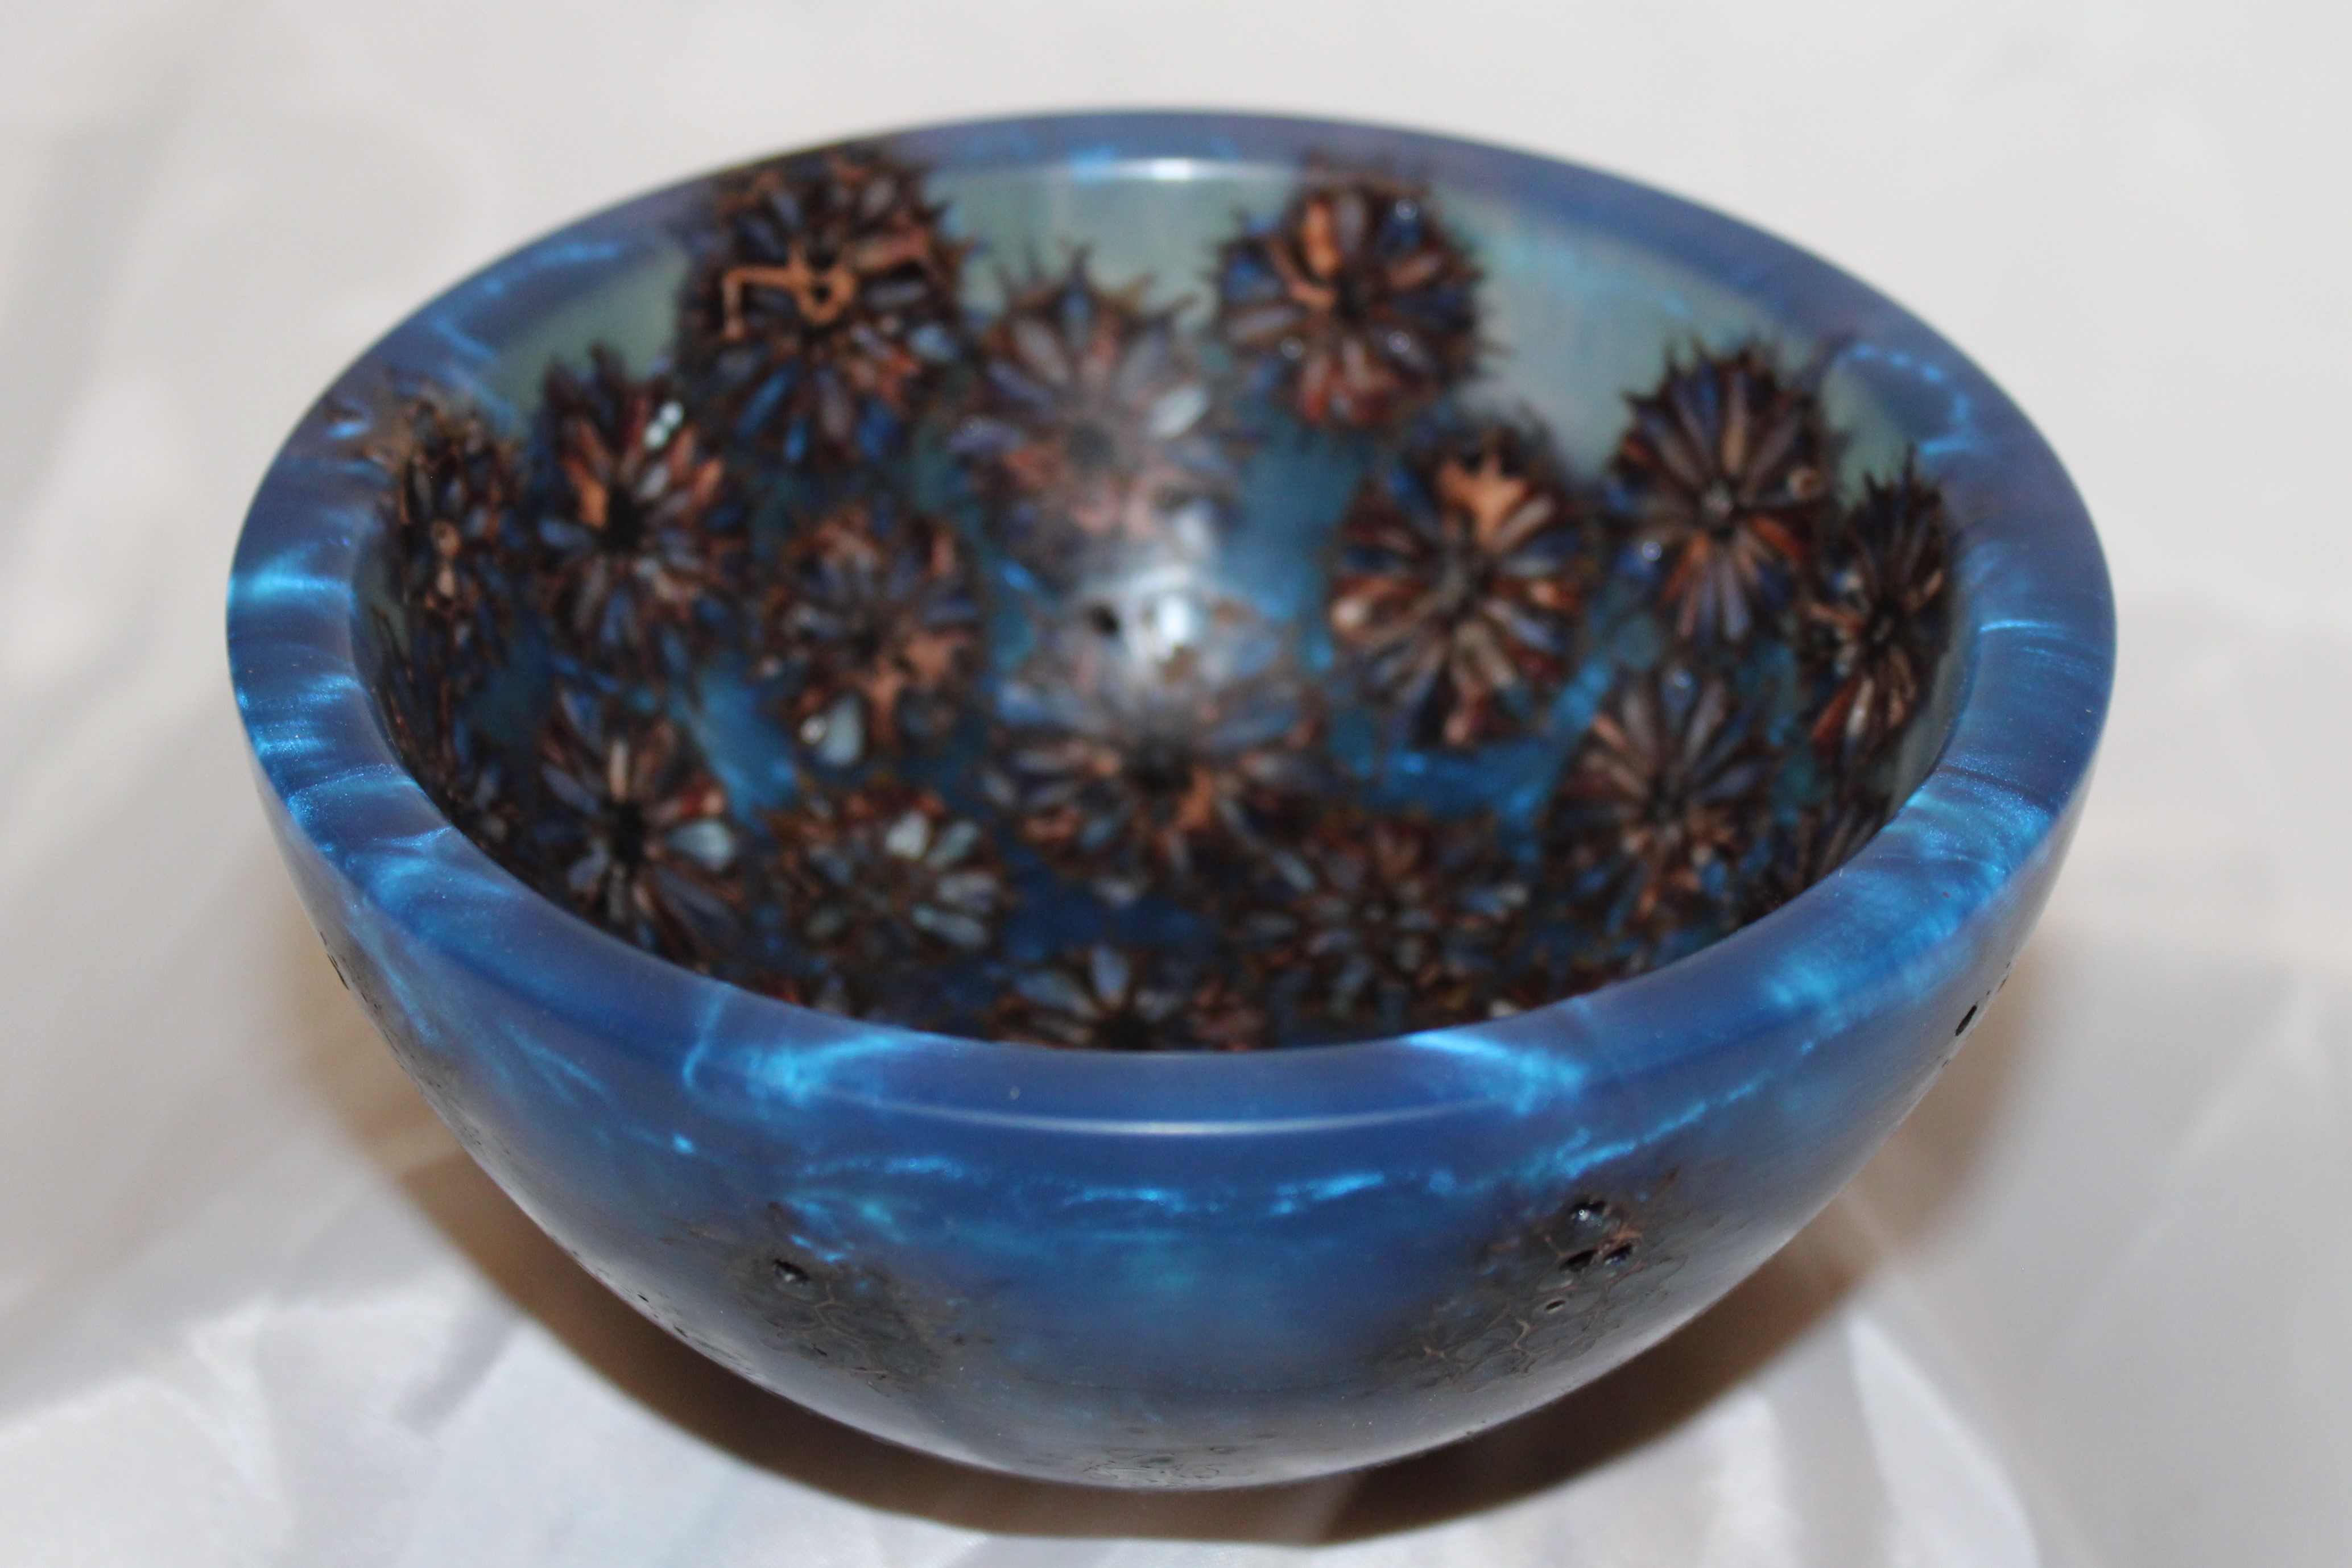
Flash forward to this past week, I was in the garage, looking for something when I stumbled across the now forgotten package and decided today is someday. I unwrapped the spike balls and to absolutely no one’s surprise, they were dry and still spiky and sharp. I decided if these little mysteries of nature had such an aversion to following the whole “ashes to ashes, dust to dust” mandate, I’d just help them out and immortalize them in resin. Initially, I was going to set them in red resin, thinking blood red would be a good color, but opted for an iridescent deep blue instead. An old, cheap, cereal bowl for a mold, some creative stacking of old bits of wood to keep the spike balls pushed to the edges, a pressure pot, and 12 hours of patience and my blank was ready for turning.
The turning was surprisingly easy, since the shape of the cereal bowl was just about perfect. Turning epoxy is a horribly messy task, but the new dust collector did a pretty decent job keeping up with the spider web like strands that come off the blank. 30 minutes of turning gave way to at least 45 minutes of sanding, but the final result was definitely worth all the effort!
I LOVE the way the iridescence comes through in the resin.
From the top, the cross section of the spiky balls can be seen.