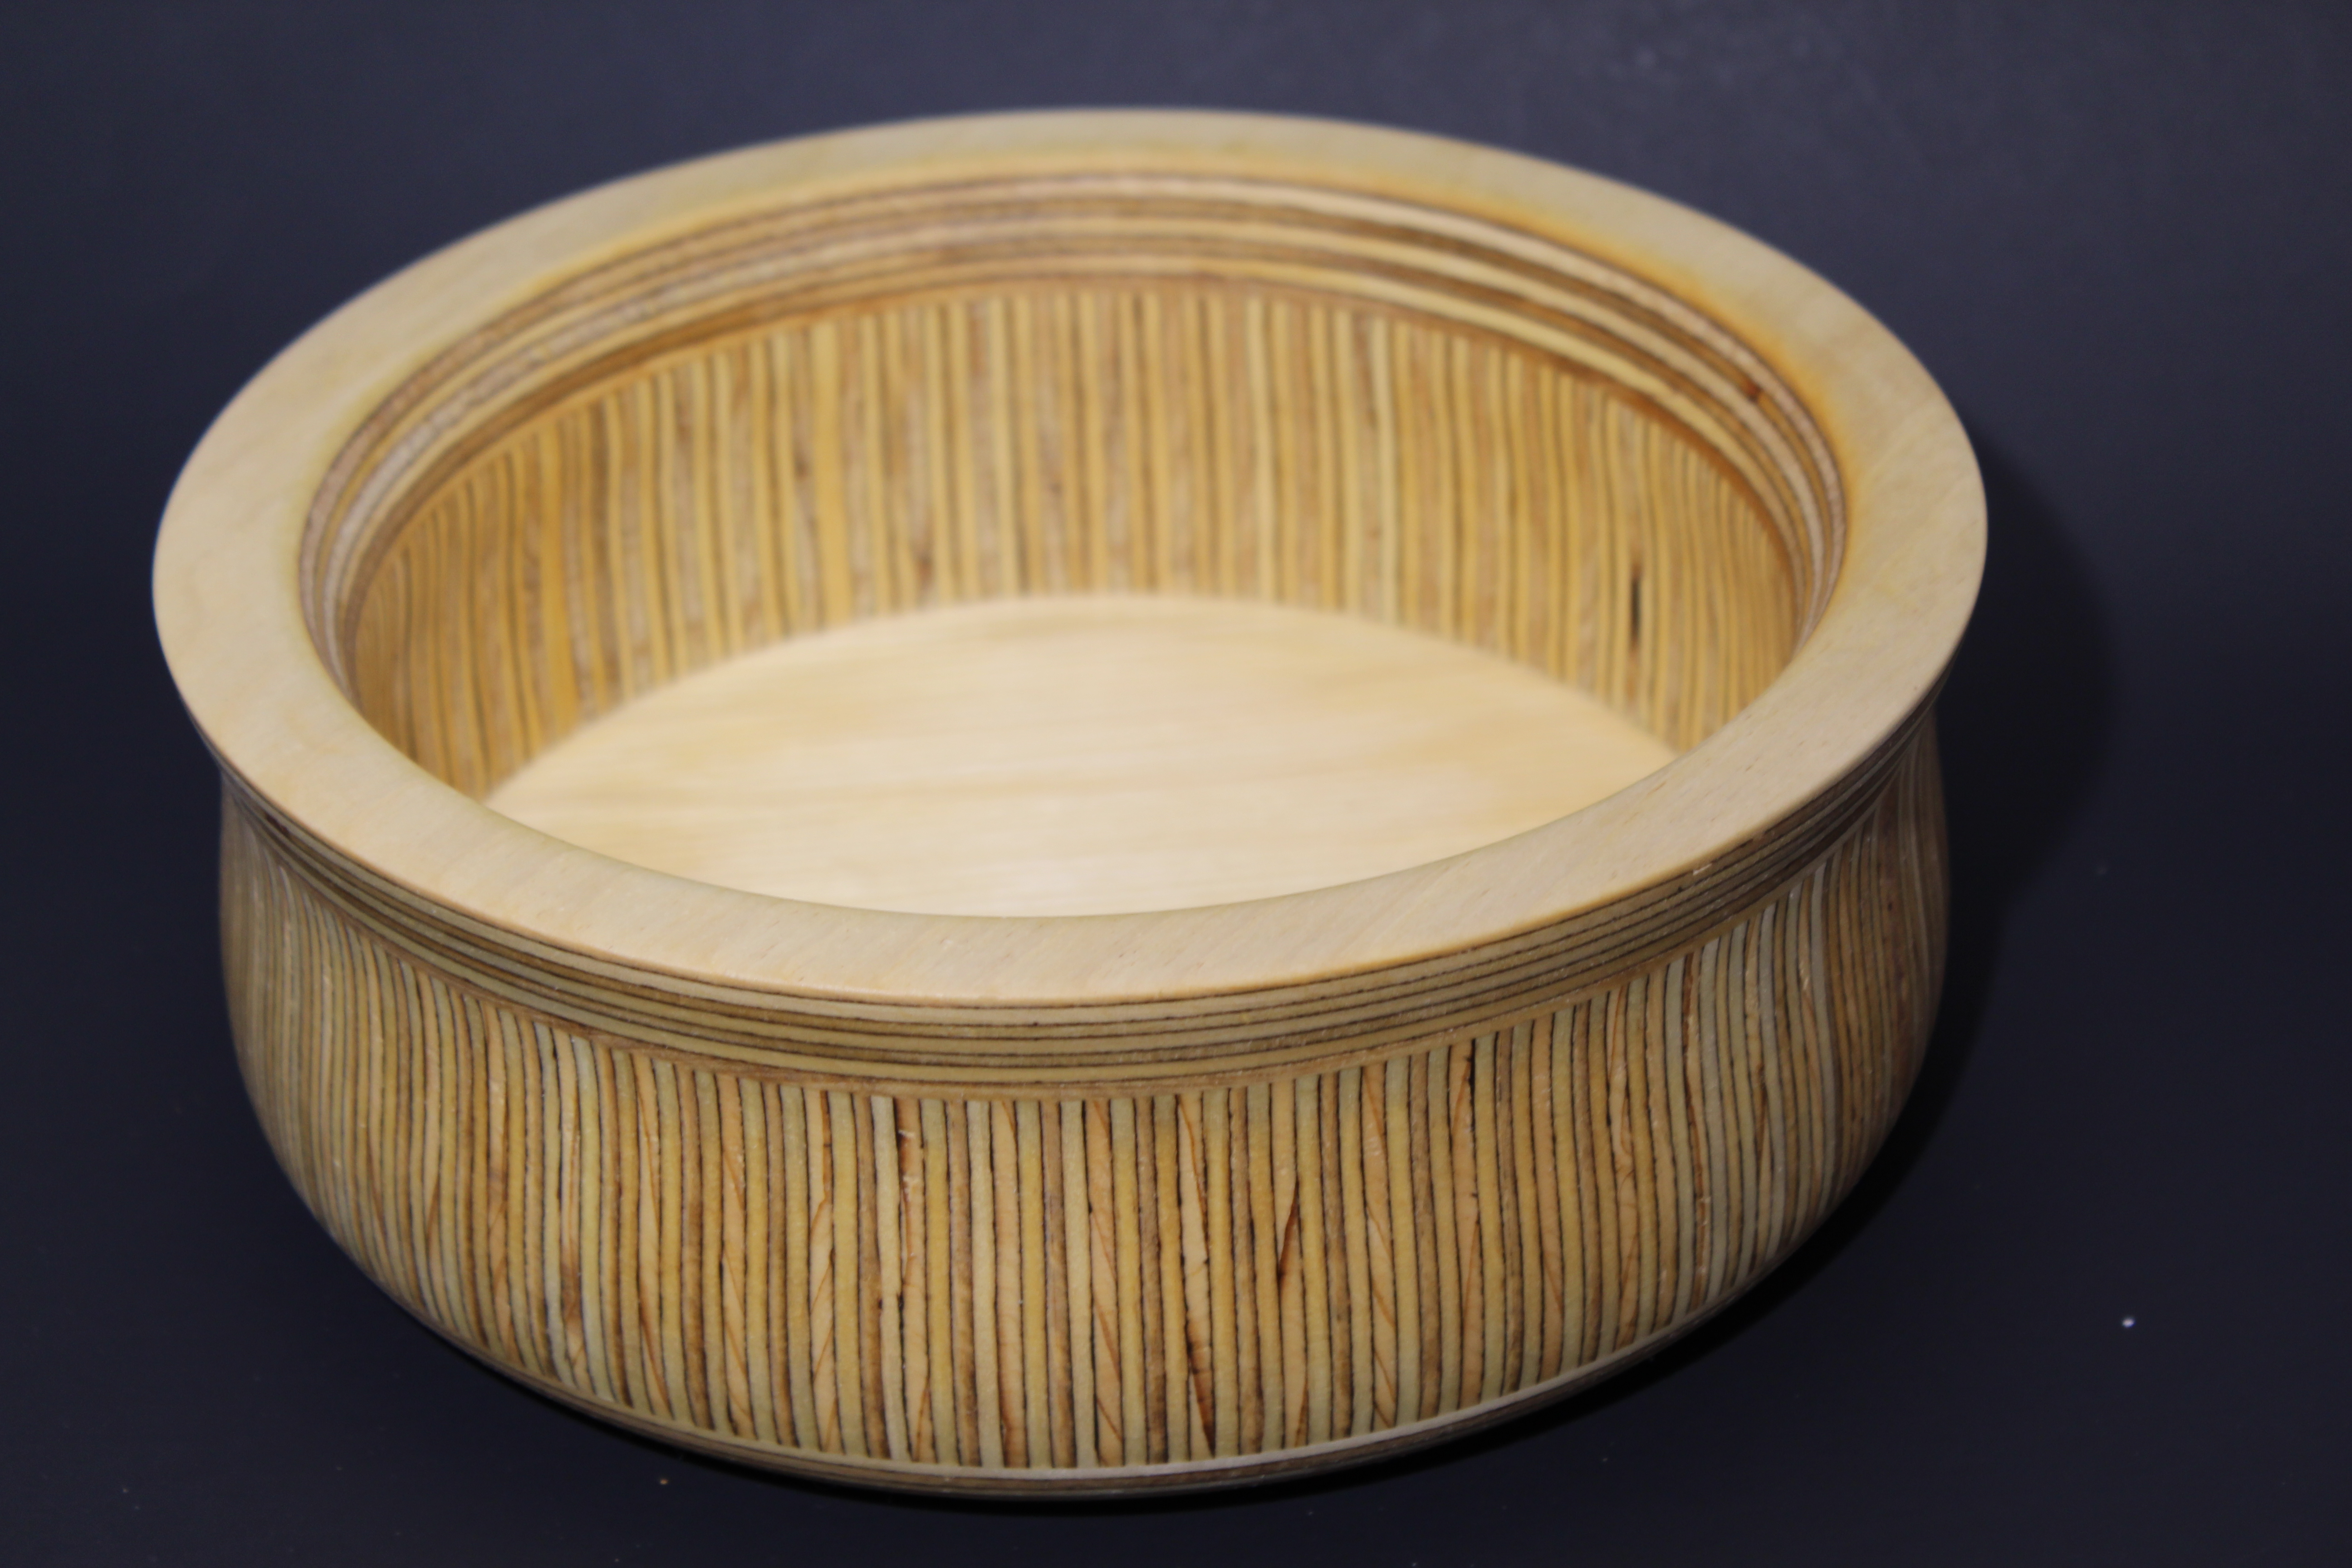
After making the last two things from plywood, I still had plywood left over, so I figured I’d make something that was a combination of the last two projects. From the first effort, I took a bowl shape, but decided to make is more shallow and smaller. From the second effort, I took the (dangerous) cutting of the plywood to make the vertical stripes. Put those two together and this is the final product. About 13″ across, 4 inches tall, finished with two coats of Danish Oil to make the color a warm, soft, brown and two coats of Wipe on Poly for a little protection.
I figured I was done playing around with plywood, but as I was cleaning up the garage this weekend, I found some 1/8″ plywood over in a corner. Hum… If I wanted 90 segments, that would be a two degree bevel…
Cutting that many thin strips of plywood with a slight bevel on each edge to make the circle is not for the faint of heart!
About halfway through working on the basket bowl, I started thinking about “what if”… One of the ideas, was to make a bowl where the plywood was all vertical. I thought if I did it right, I could make something that looked like the inside of a grass hut. Kind of a Gilligan’s Island looking thing. Once I got the first experimental plywood blank glued up, I switched gears to making this one. To start, I thought I’d use thinner plywood to keep the size from creeping up as the pieces were assembled. This one is made from 1/4″ plywood.
Not to get in the weeds, but to make a circle, each piece of wood has to be cut to a very specific angle, so when they’re reassembled, they form a circle. The formula is pretty easy to understand. 360 divided by the number of segments divided by 2. If you want to make a 10 segment ring, it would be 360/10/2 or 18, so each piece of wood would be cut at 18 degree angles. For this project, I figured I’d need at least 30 segments to make a ring big enough, since each vertical piece was only going to be 1/4 inch at their widest point. So do the math and that comes down to a 6 degree angle. I looked at the 1/4″ wide plywood, looked at the table saw, and suddenly realized this was going to be the most dangerous thing I’ve attempted. The danger comes in when you try to take a piece of wood only a quarter of an inch think through a table saw, with the blade set at 6 degrees. Not a lot of room between the table saw fence and the blade. To make it at least a little better, I cut the angles at 12 degrees, which for this project, wouldn’t be noticeable. Still only 1/4” “safety” between the fence and the blade.
Took me a bit to get up the nerve, but I was finally able to make strips of plywood, with the appropriate angle, that I could cut into pieces. Initially, I was thinking it would make a bowl, but the 1/4″ only came out with a circle about 4-5 inches across. Not really big enough for a useful bowl. Add in a couple simple circles of plywood, and the blank became perfect for a small box. If I do another one of these, I think I’ll use the 3/4″ plywood, then glue the strips together before making the beveled cut. This will give me an inch and a half thick piece of wood to run through the table saw and mean I won’t need as many piece to make the circle. Maybe that won’t give me the heebie jeebies as bad.
Here’s the final product, with two coats of walnut oil, followed by two coats of wipe on poly.
I went out to YouTube and fell into the rabbit hole, where one video leads to another and another and another until two hours have passed and you’re so far away from what you were initially looking at that all you can do is shut down the computer and look around to make sure no one noticed. At some point, I stumbled across a series of videos where people were making bowls out of plywood. I had never really thought of plywood as being a viable turning material, let alone pretty, but I have to admit that some of the creations actually looked kinda cool.
The next day, I went to Mendard’s and picked up a 3/4″ piece of birch plywood and decided I should try to make something. What started out as a simple, stacked, segmented bowl, quickly started going off the rails. First, I messed up the measurements (again) and ended up making the pieces for a bowl that was so big, it would barely fit on my little lathe. Since I figured I’d have to use a friend’s lathe to safely turn the thing anyway, I decided to change the simple, stacked design into a wide, shallow, platter with a little bit of a basket weave look. When I messed up the measurements on the second ring, I realized that a shallow platter was out and I was going to have to end up making a HUGE bowl. After several days of cutting, sanding, gluing, and clamping, I finally had a bowl blank that was ready to turn.
If you’ve ever cut plywood with a saw, then you’re familiar with just how much sawdust is generated by a single cut. Now imagine doing that same cut with the wood spinning at several hundred RPM. It’s messy. Very, very, messy! Once done, however the final shape looked pretty good – EXCEPT – for all the damned holes! At some point, the people who make plywood decided they could save a extra penny by using really crappy waste wood for the inner layers of the plywood and if there were gaps, they could save two pennies. Normally, no one would ever know, but when the plywood is turned, all of those little gaps end up being holes in the side of the bowl. It took about an hour to fill all the holes with sawdust and CA glue, then about three hours of hand sanding to smooth over all the patches and make the bowl look like the patches never happened. Three coats of spray lacquer later (that all but disappeared into the extremely dry wood) I decided it was done. Now, I’m starting to ask myself what would happen if I dyed the vertical pieces a different color, or the horizontal pieces a different color. This is how it starts! Stay tuned, because I have a 1/4″ piece of plywood in the garage already…
This is what I came out with. 13″ wide at the top and about 6″ tall. I really like the finished product, but realize that if I ever had to sell the thing, I’d end up working for about .50 an hour!
The basket pattern, made by the simple process of adding a strip of plywood, actually turns out looking really good!From the top, hopefully you can get a sense for how big this one turned out.
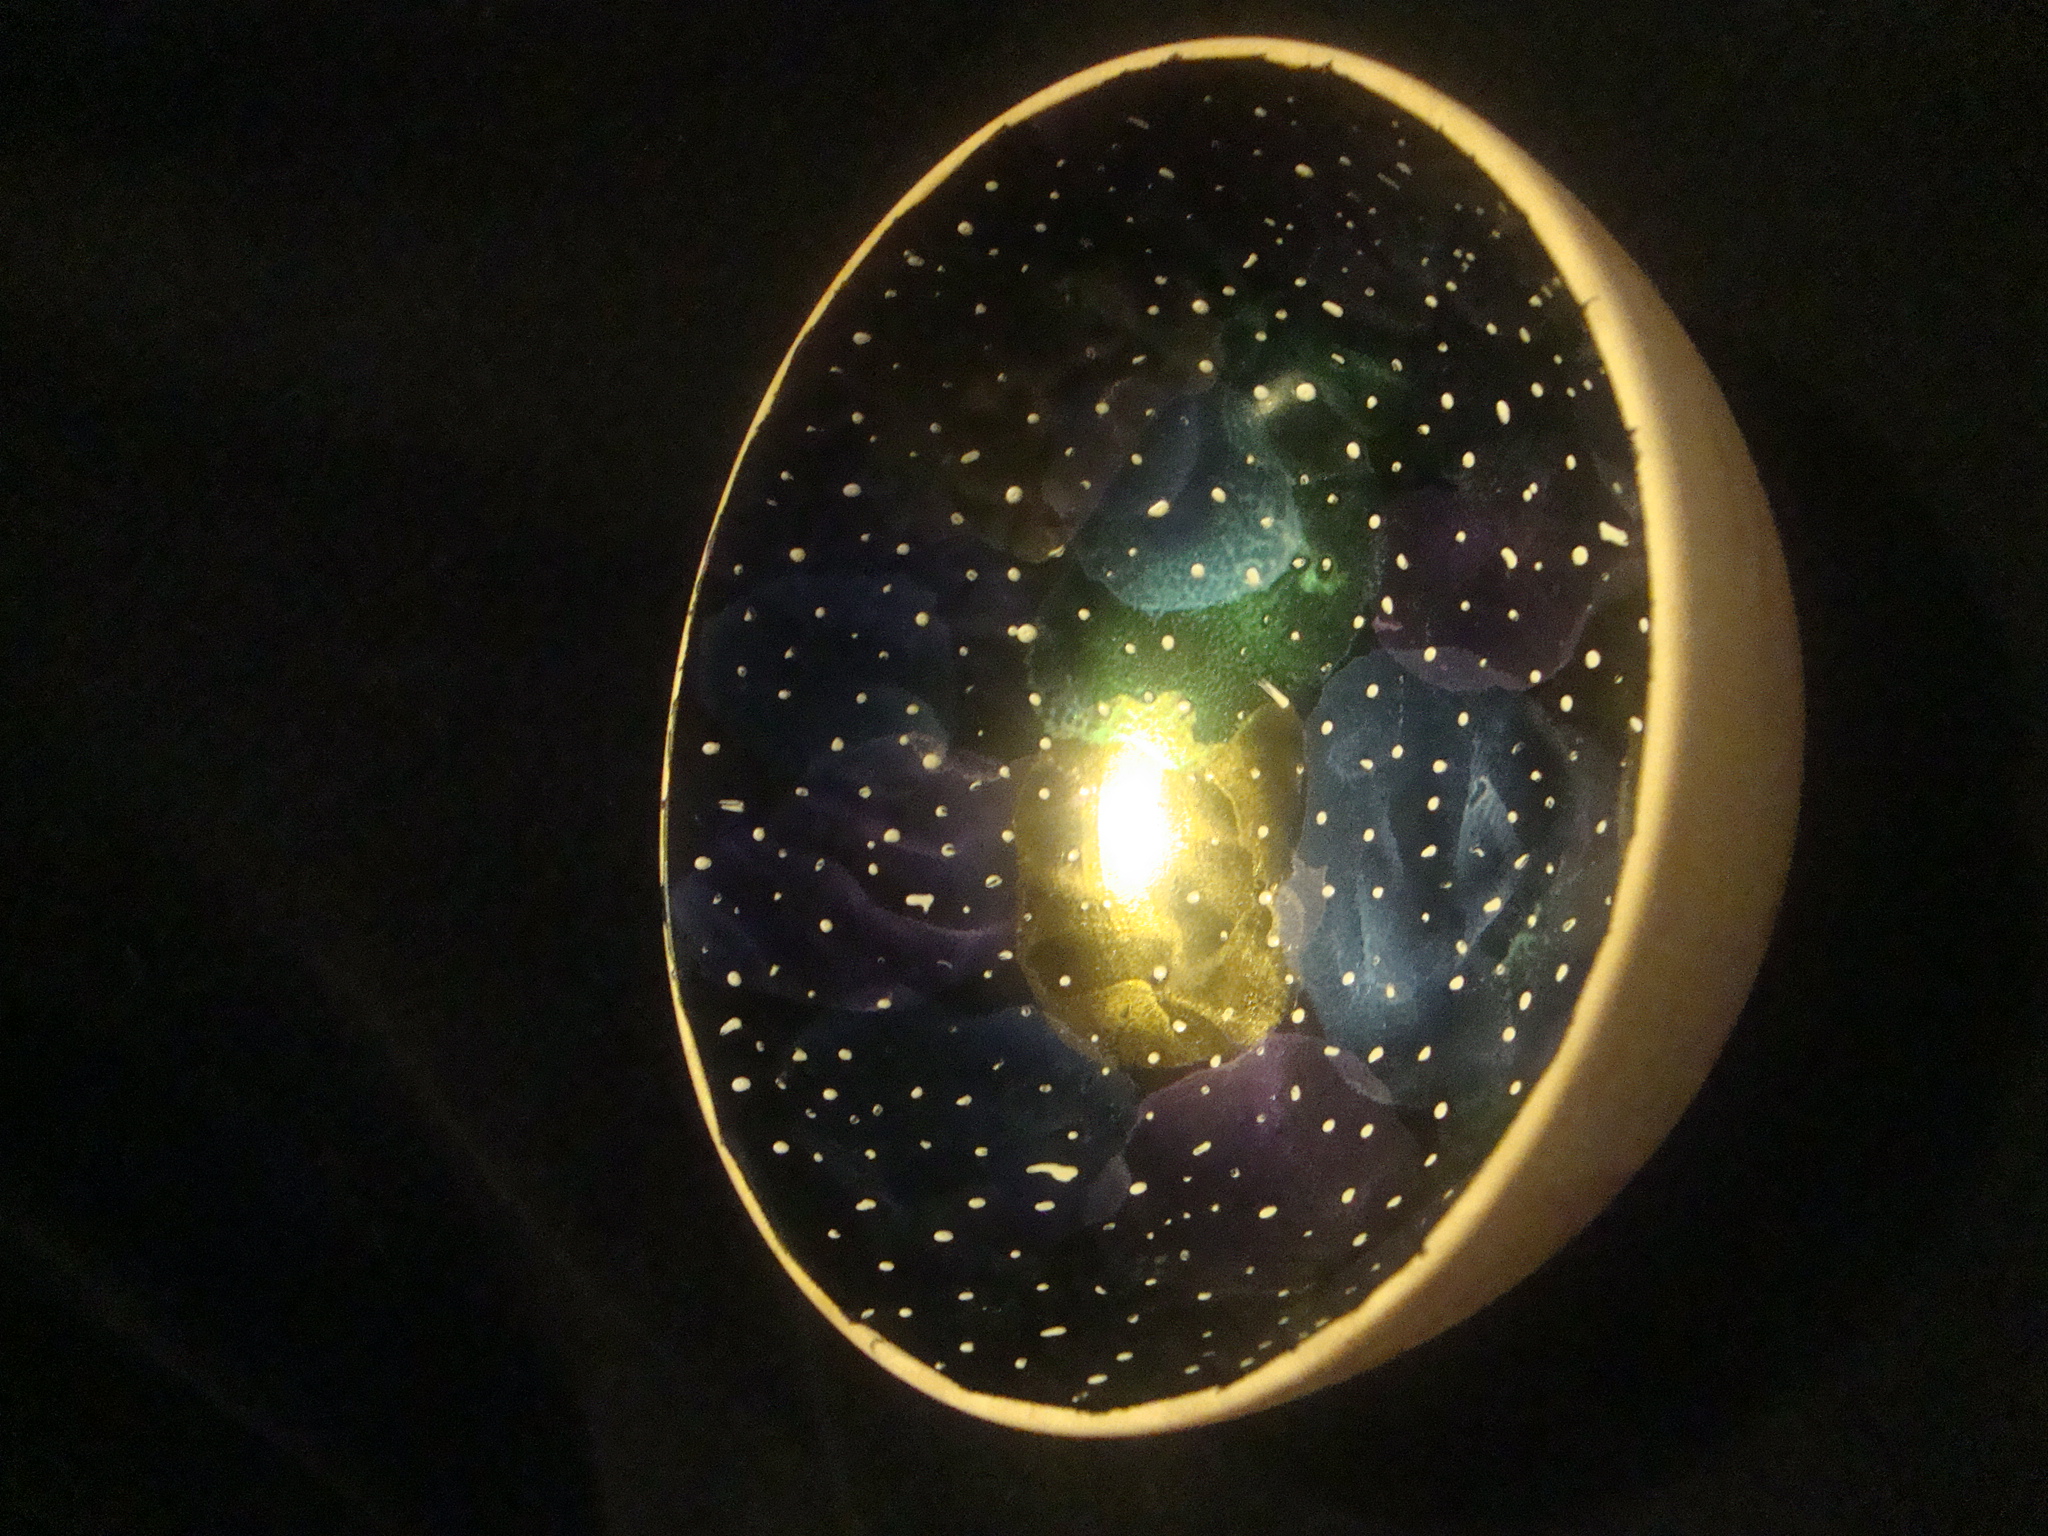
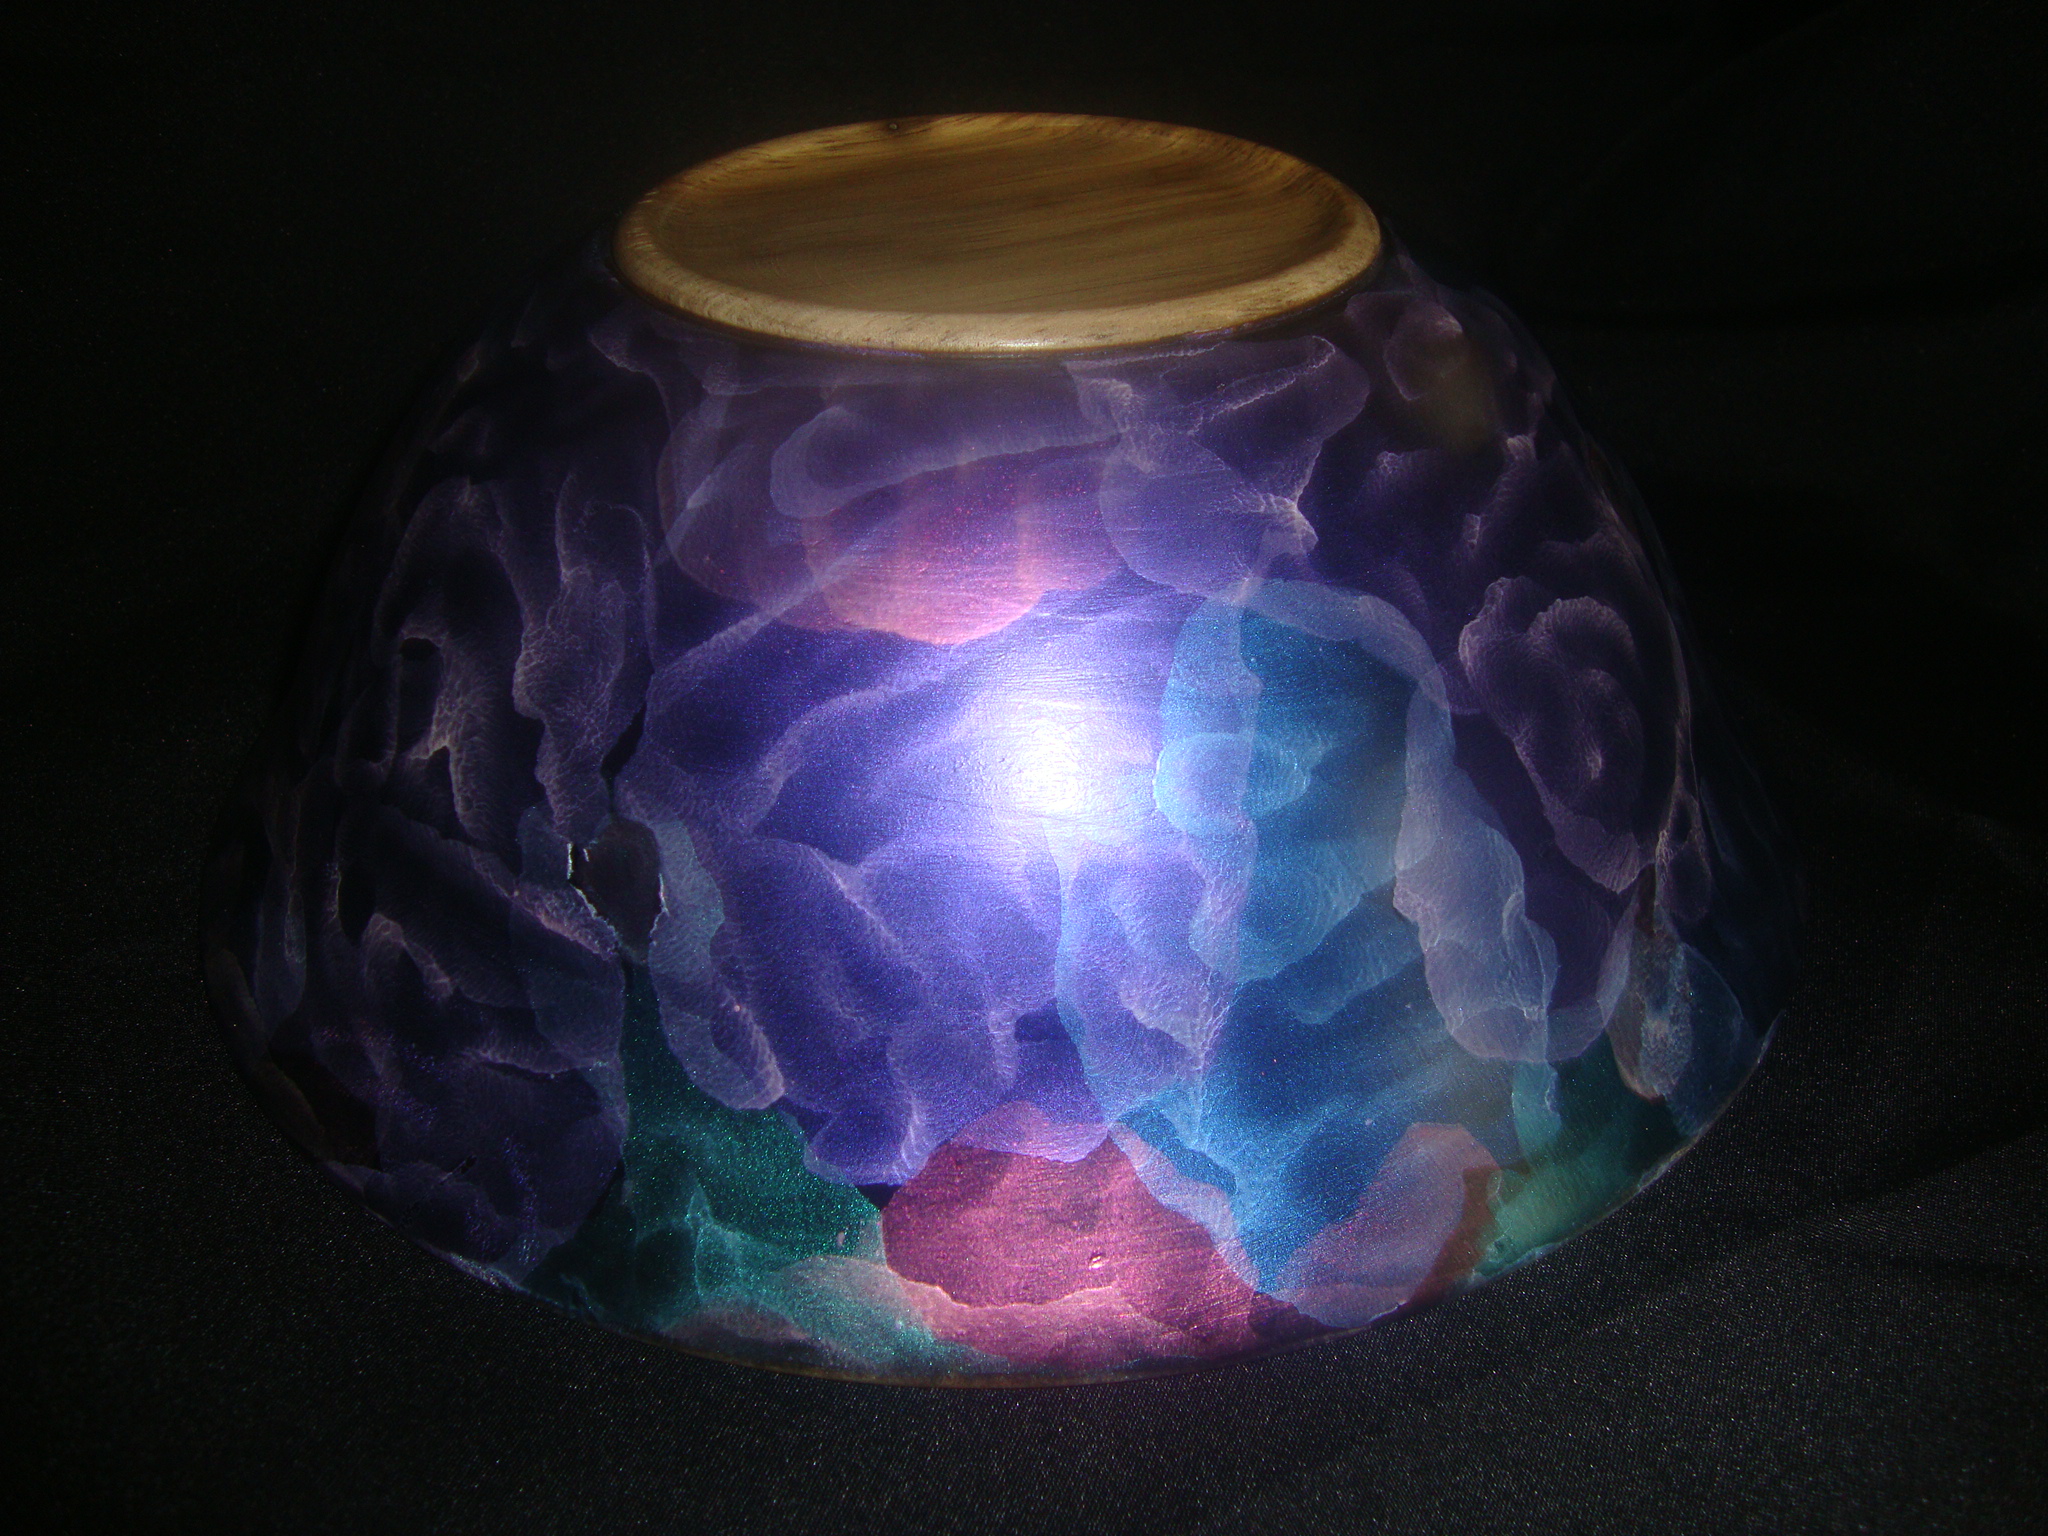
Awhile back, I turned a simple bowl out of willow that was about as basic as you can get. bland, no real grain in the wood, and the inside was nothing but a horrible collection of torn up end grain that simply couldn’t be sanded away. After about an hour of sanding, with little progress to show, I decided to toss it in the heap and forget about it. Since I’ve been experimenting with color lately, I was looking for something that I could practice on, without having to waste a “good” piece of wood. Enter the crappy willow mistake…
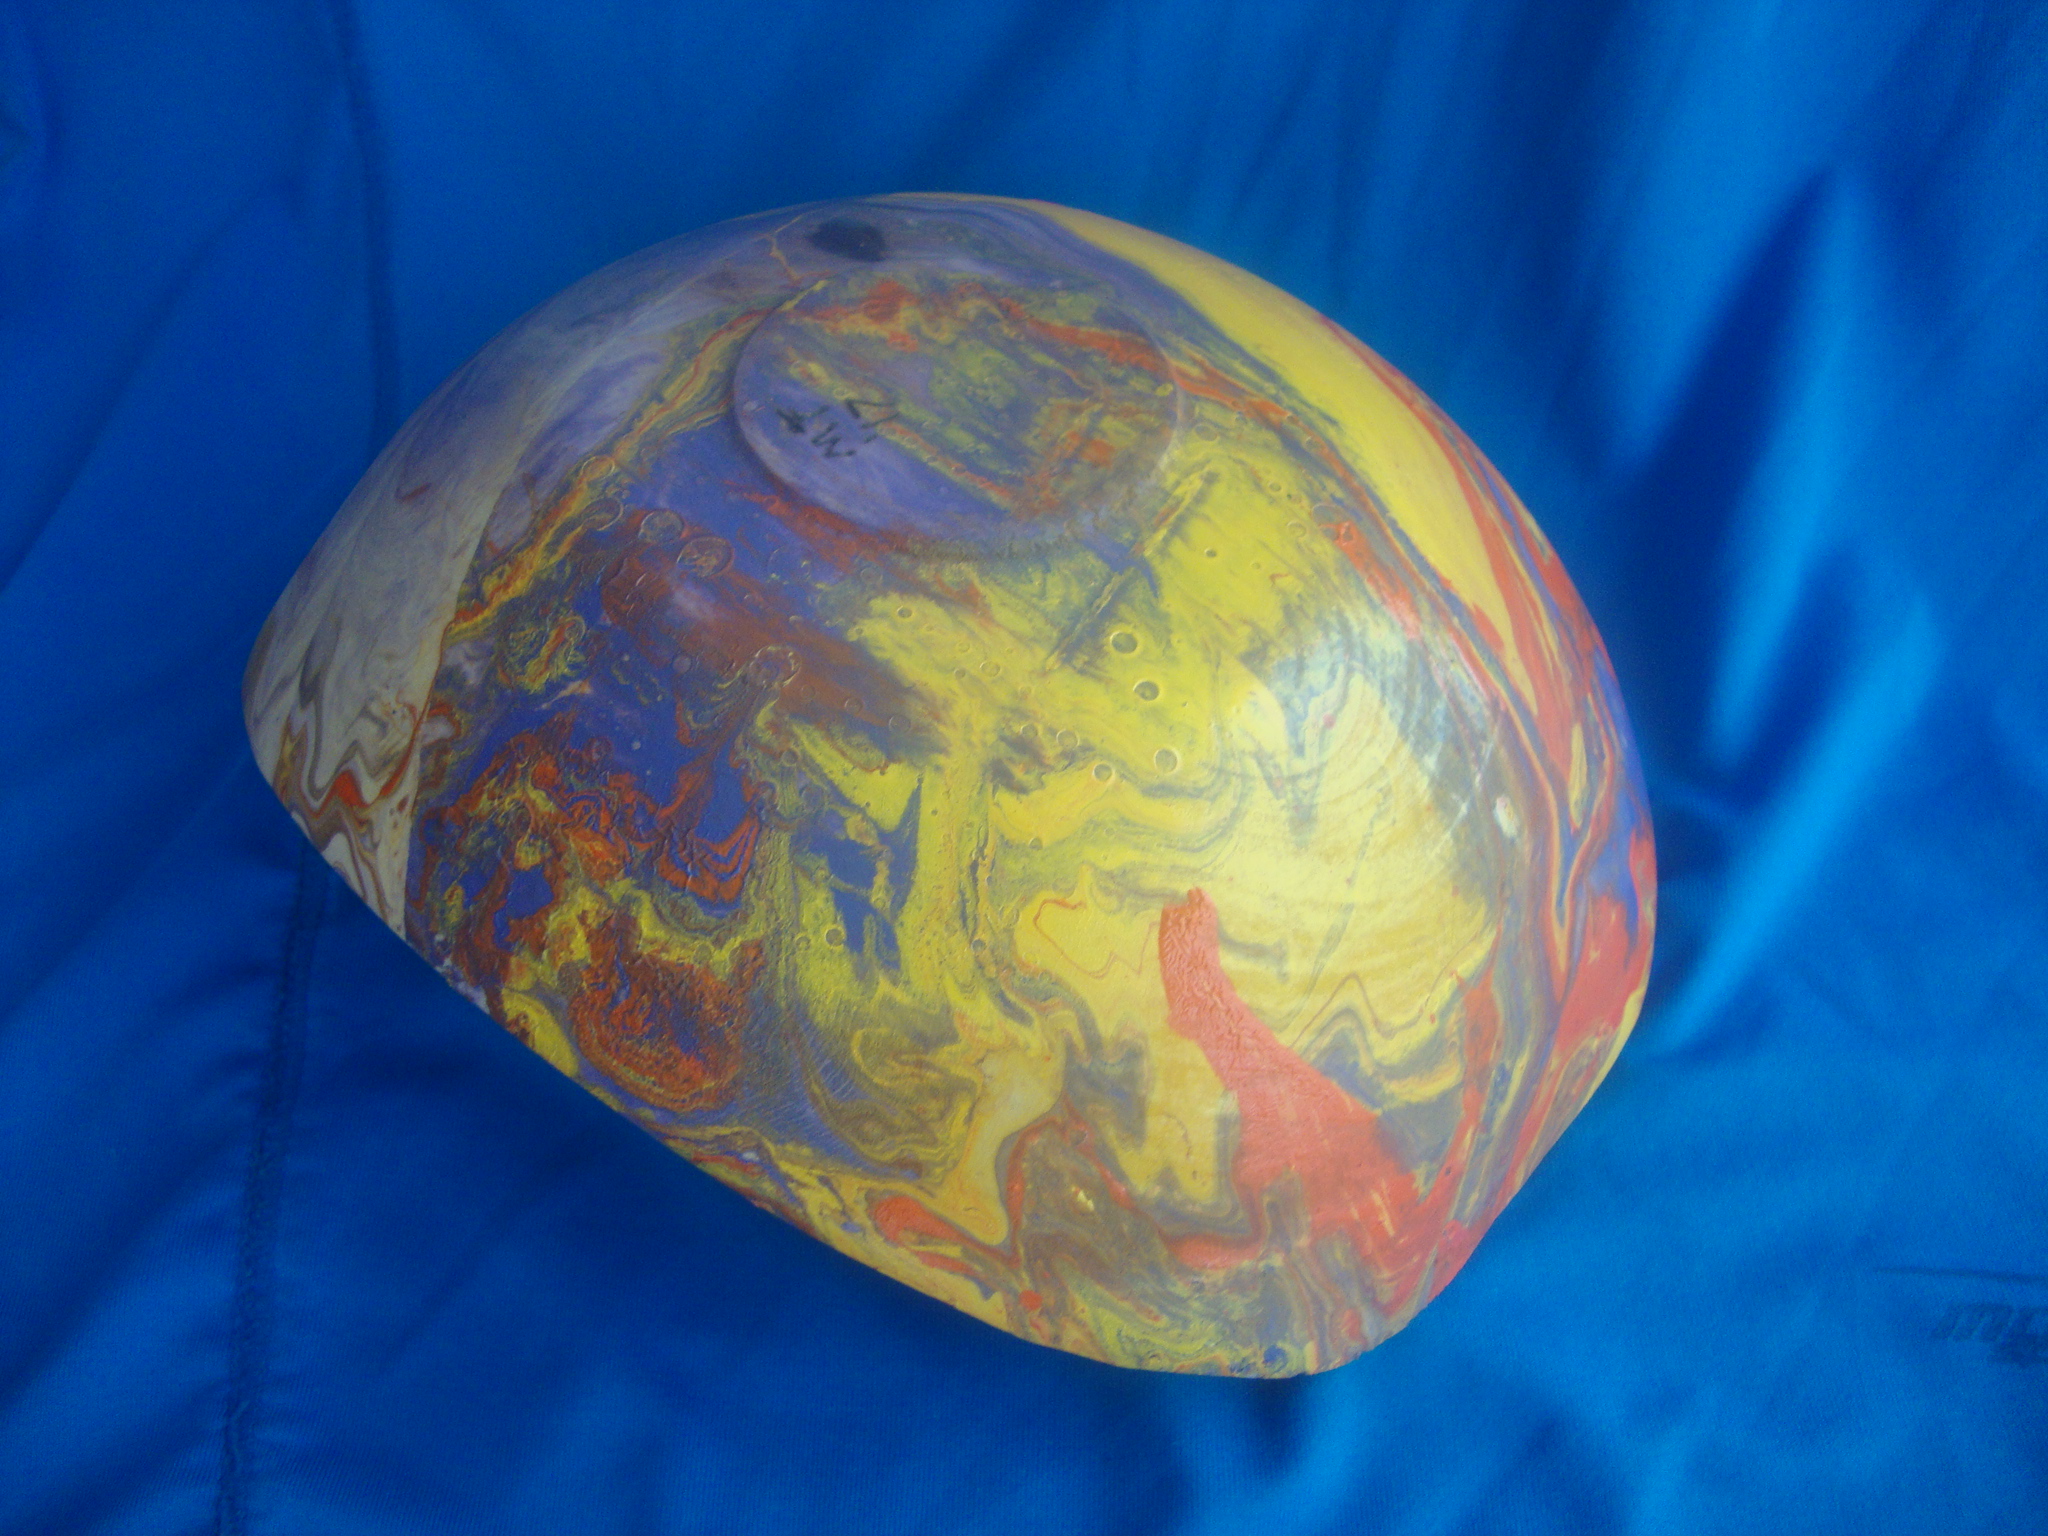
I decided to play around with the iridescent paint again, only this time see if straight acrylic paint would show through the colors. Since the coloring technique is called “cosmic cloud”, I figured why not try to make a nebula inside the bowl? Gotta say, this one turned out WAY better than I ever expected.
Here are the before and after shots:
Here’s the under side of the bowl. Nothing really to look at and the inside looked the same, except for the damage done to the end grain while turning.
Here’s what the inside looks like, after applying the paints.
Space bowl #1 – after. There is still some work to do around the rim to clean up the errant paint that got under the tape, but it is exactly the effect I was going for.
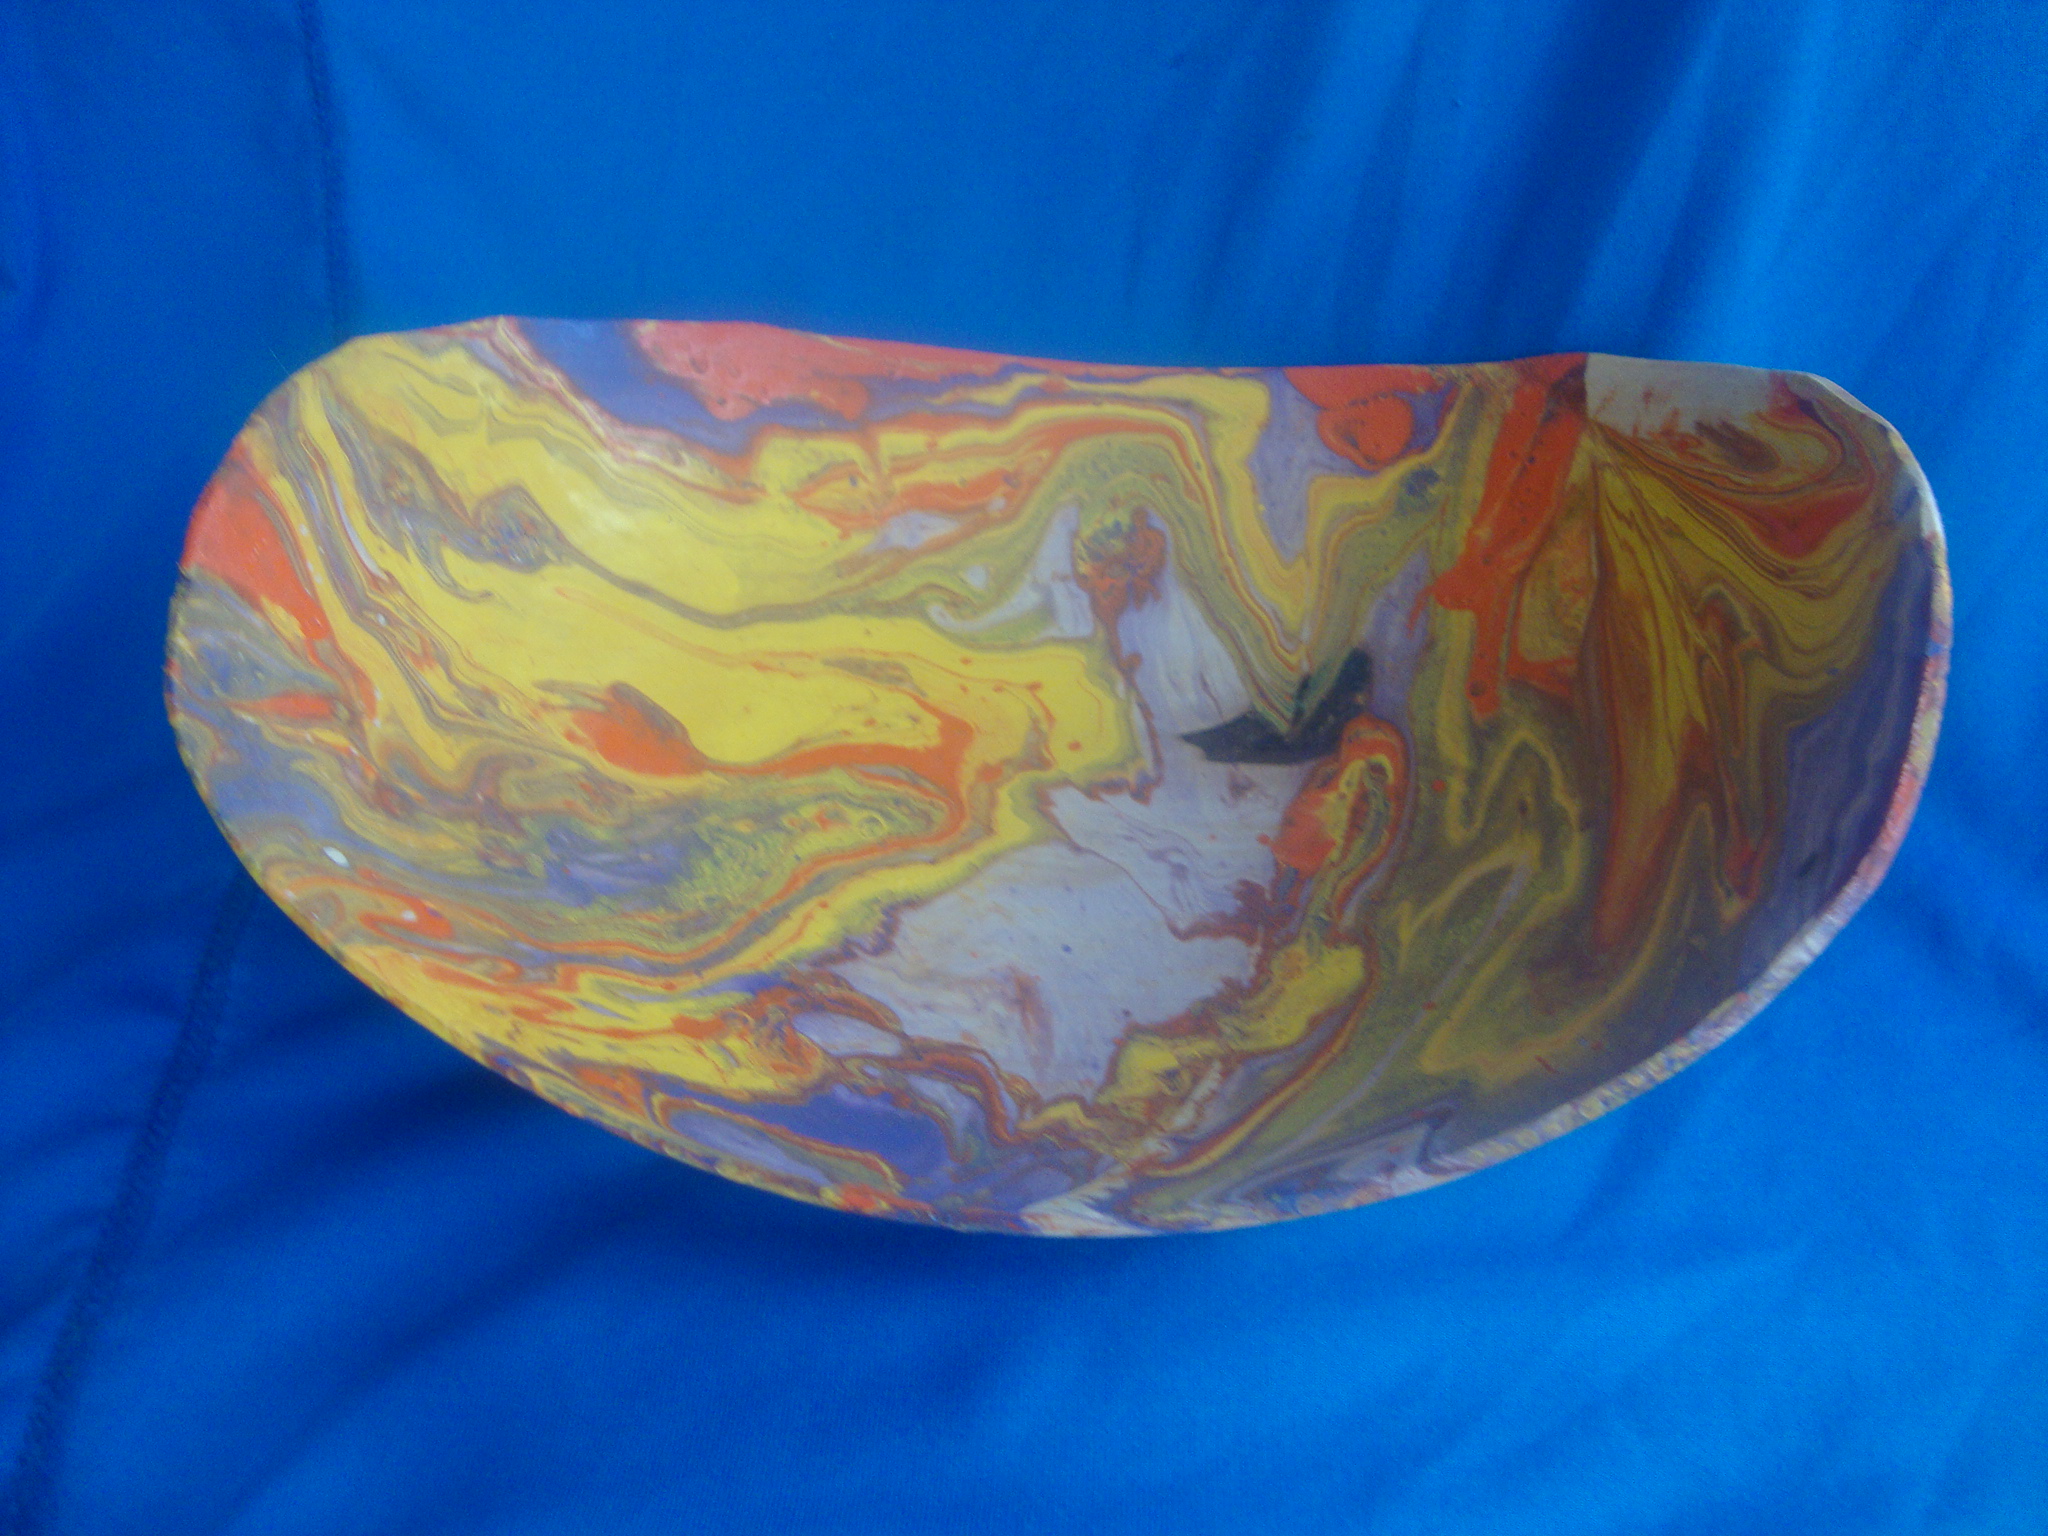
Earlier this month, I made a shallow dish, but thought it looked plain. To fix that little issue, I decided to try a paint dipping technique, courtesy of a couple thousand You Tube videos. If done right, it will make some really cool swirls on the item being dipped. If done wrong, it will make a gloppy, sticky mess! For a first attempt, there was much in the way of learning lessons to be taken away:
DON’T put any finish on the piece before you dip it, because the paint may not stick.
DON’T put too much of any one color in/on the water, or you’ll get a piece fully dominated by that color.
DON’T use a container for dipping that you ever want to use for anything else, because it will be completely ruined – OR – make sure you put some kind of liner in before you fill it with water.
DON’T use a container with a small surface area to save paint. You’ll end up with a splotchy spot because there won’t be enough paint on the water surface to cover the whole project.
DON’T save time by using cold tap water, the paint won’t disperse enough if you do.
DO wear gloves of some kind, or you’ll get spray paint all over your hands.
DO keep a supply of mineral spirits readily available to clean up your hands because you stupidly think your hands won’t get dirty. They will. Almost instantly!
DO figure out a way to attach some kind of handle to your piece. It’ll keep your fingers out of the way of the paint and avoid a blank spot on the final product where your fingers were clamped on.
DO wear some kind of breathing protection, because when spray paint hit water, it will quickly become breathable. No coroner wants to see Technicolor lungs when you get to their table…
Here’s the final product. I’m thinking the next wig stand that I make for the cancer patients will have a much different visual appearance.
Top view. Kinda like the randomness of the colors.bottom view. Not the lack of paint on the left hand side. It’s actually a dull purple.
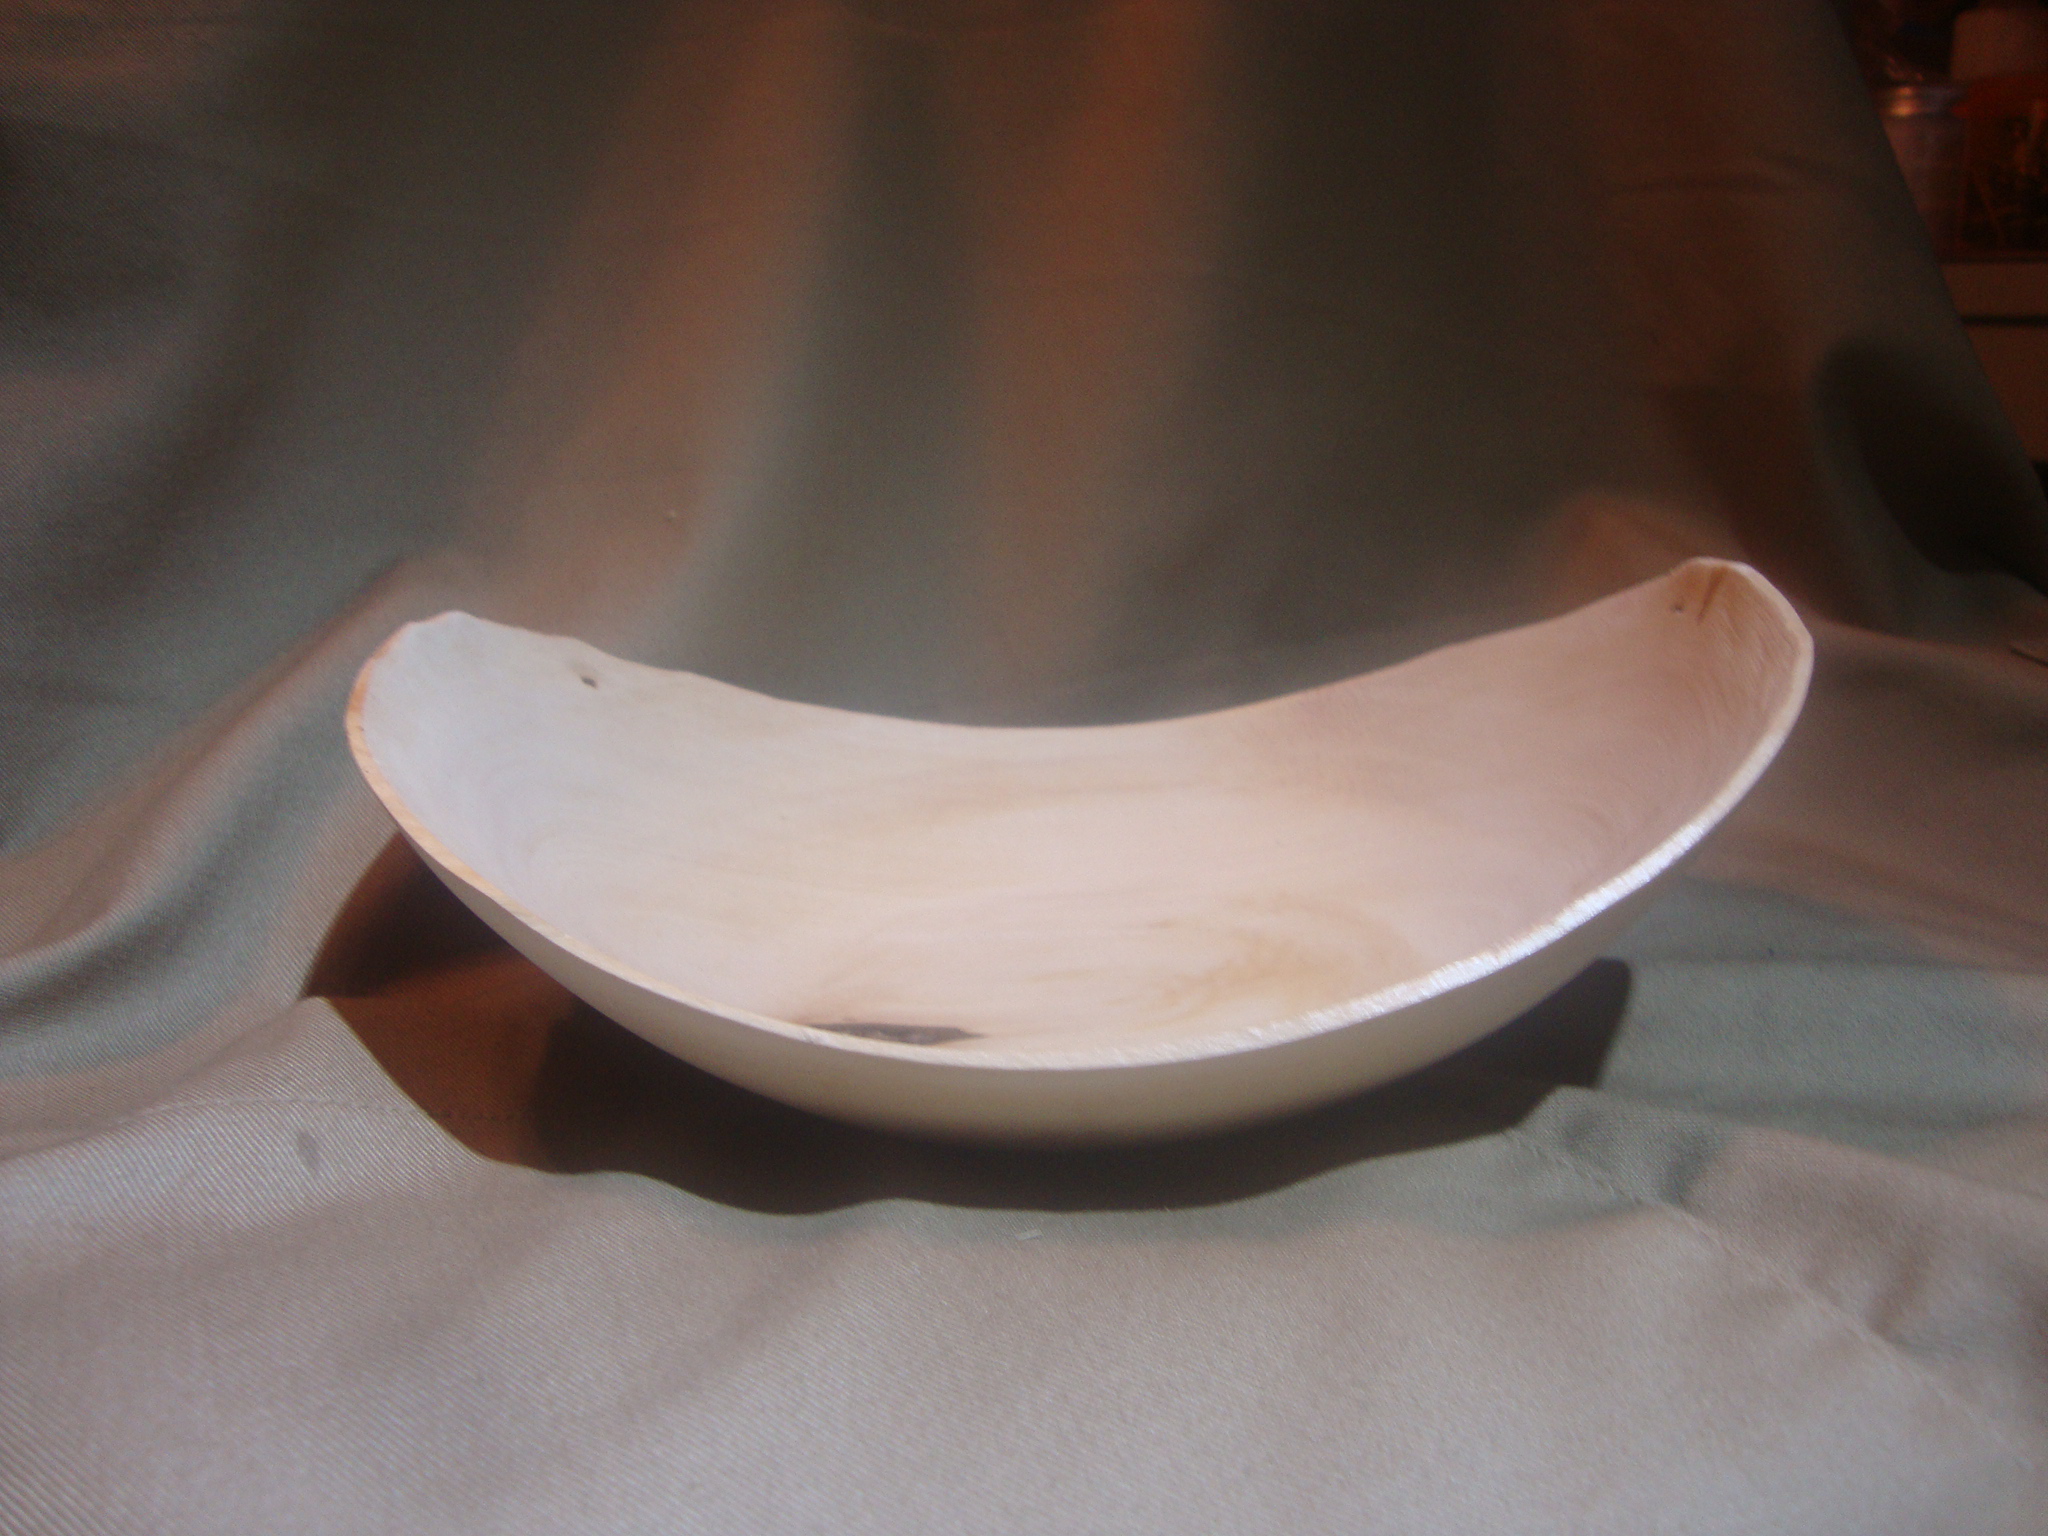
I found a natural edge bowl that I had started and set aside. I think it is willow. I remember turning it when it was very wet and setting it aside to let it finish drying. To my surprise, it barely warped and only had a teeny tiny crack in one part that was easily fixed. The final thickness ended up being about 1/8″. Not too bad!
The more I look at it, though, it looks awful white and awful plain. Perhaps it needs a little color. Hum… what to do with it now…
This is really thin! Not quite to the point where light will show through it, but very, very close.
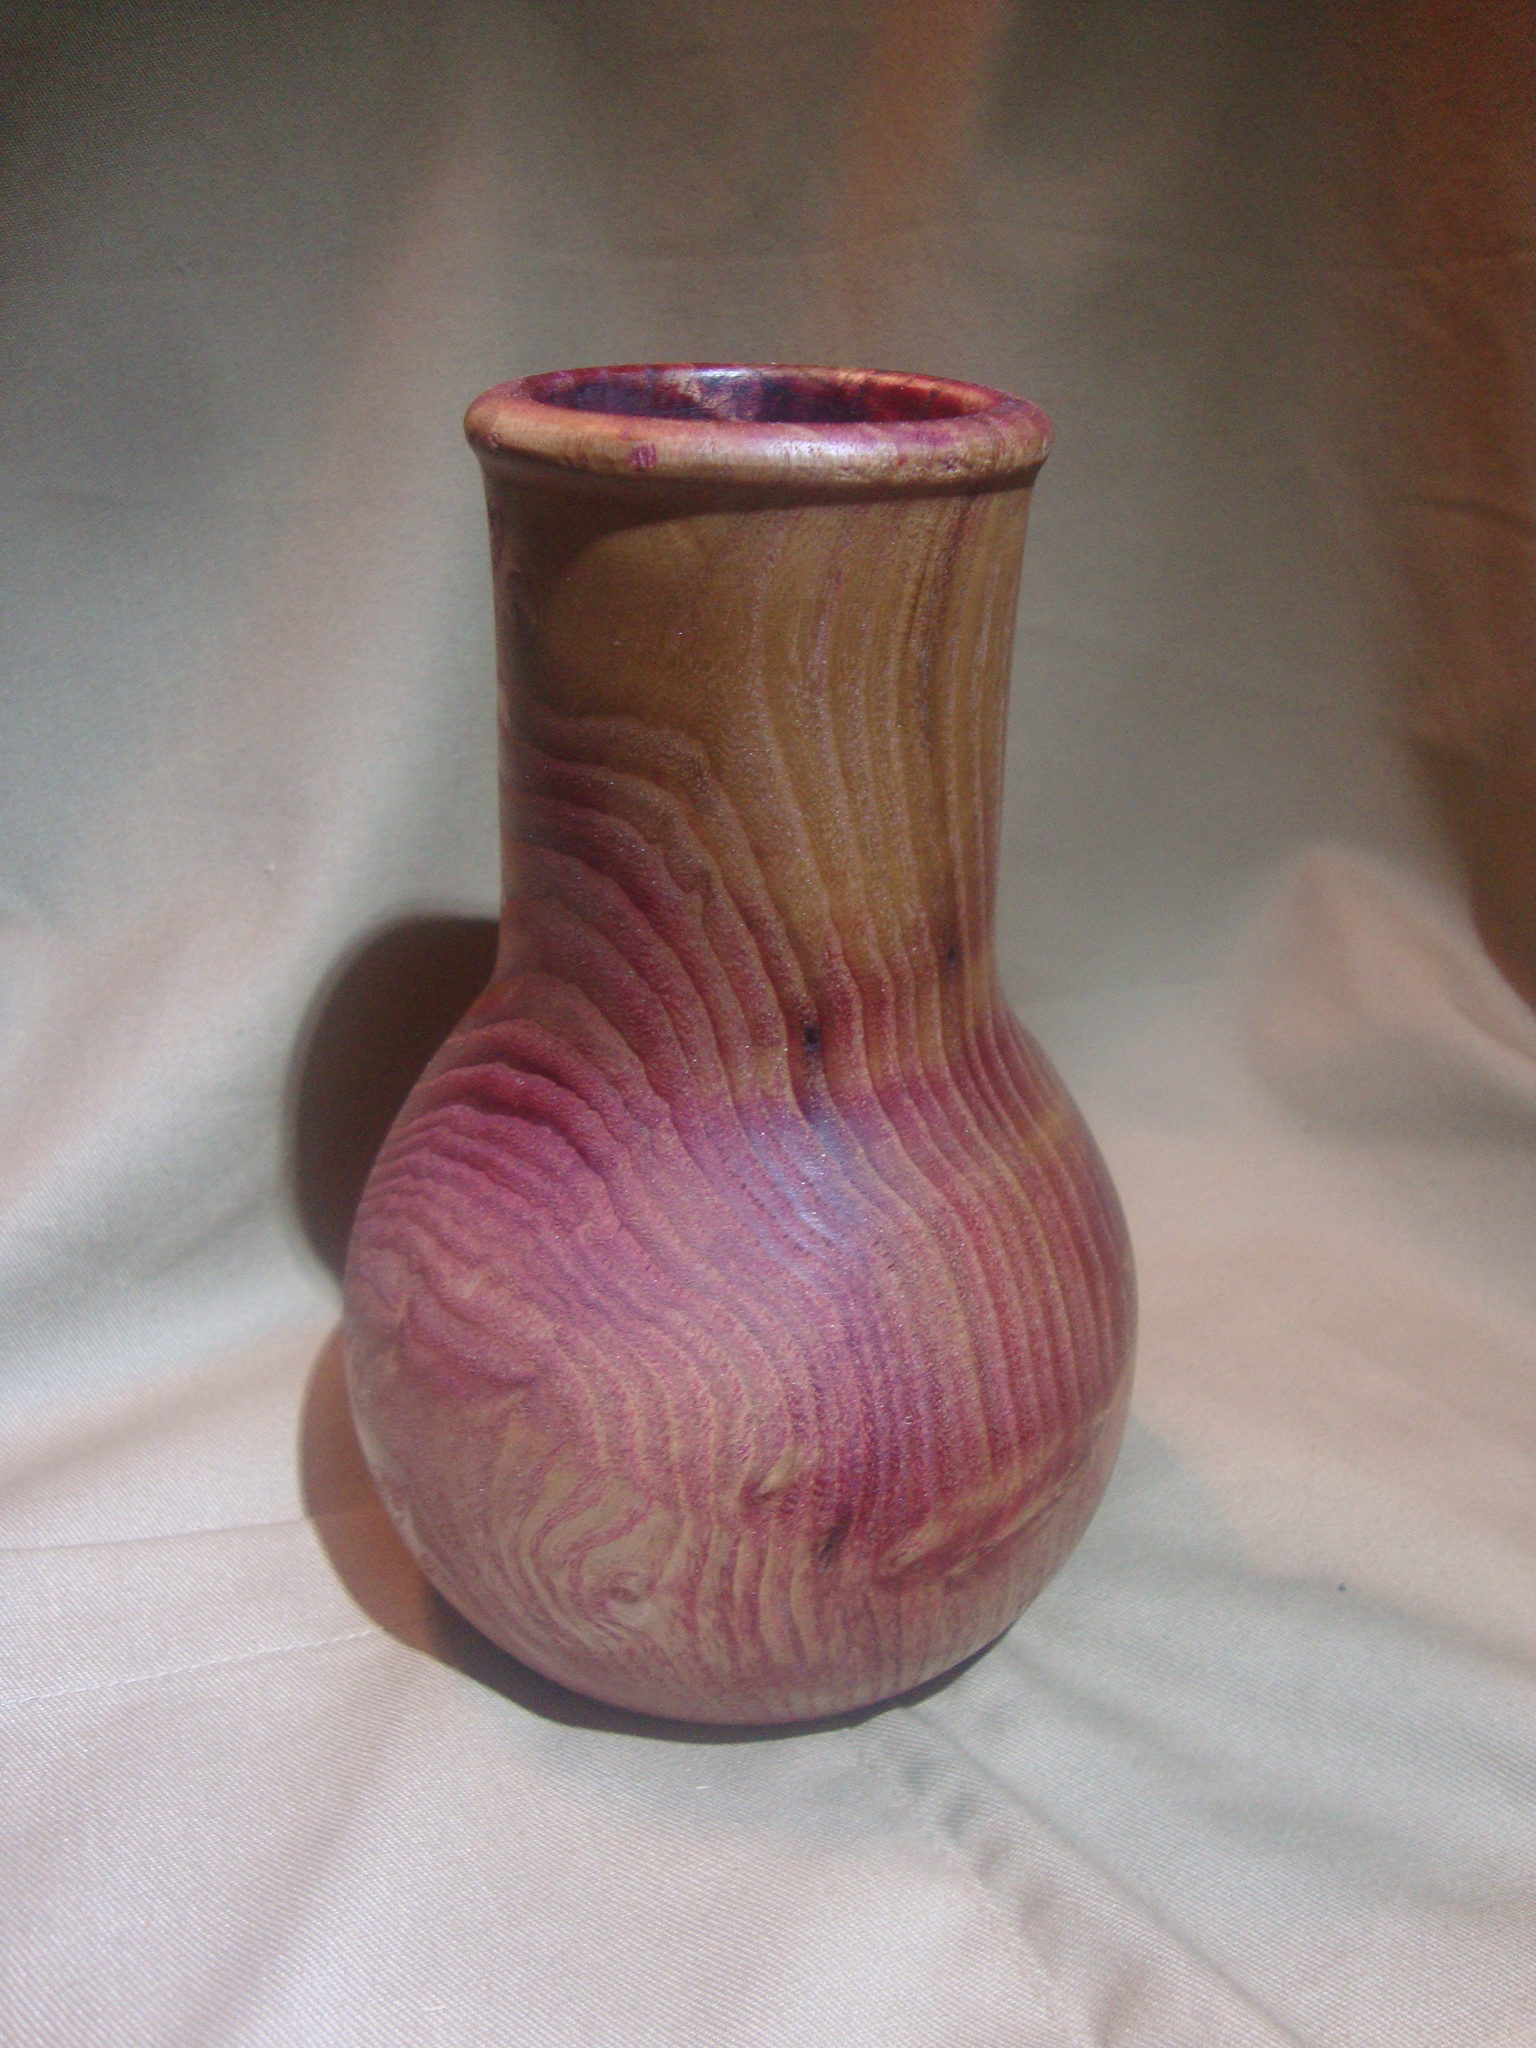
Many months ago, I had an odd shaped piece of red oak and decided to see what I could make out of it. It turned (no pun intended) into a vase. Oak is not my favorite wood to turn, but I was pleased with the shape, so I kept it out of the burn pile, set it aside, and figured at some point I’d finish it.
A Month or so ago, I decided to add some color to it. Since it was red oak, I thought I’d dye it red and see what I got. I filled the vacuum chamber with red dye and left it under pressure for three or four days. When I pulled it out, it looked like a really dark red. PERFECT! I let it dry for a couple days, then put it back on the lathe and figured I’d sand it smooth, since the dye raised the grain. After a couple minutes sanding, it became clear that the dye barely went into the wood. Back to the drawing board…
Since the vacuum chamber was a bust, I decided to see what the pressure pot would do. I filled the inside of the vase with dye, then put it under pressure. After the first day, the dye level was down about an inch, so I figured I’d just keep it under pressure until I could see the dye coming through the outside of the vase. Each day for a week, I checked the dye level and topped it off. After a full week, I took it out of the pressure pot and let it dry.
Below is what I ended with after another round of sanding. I was hoping that the dye would have been more “stripey”, only coming through between the growth rings, but I think I like the way this turned out. Makes me wonder what I could get with a lighter wood like maple or sycamore. Hum…
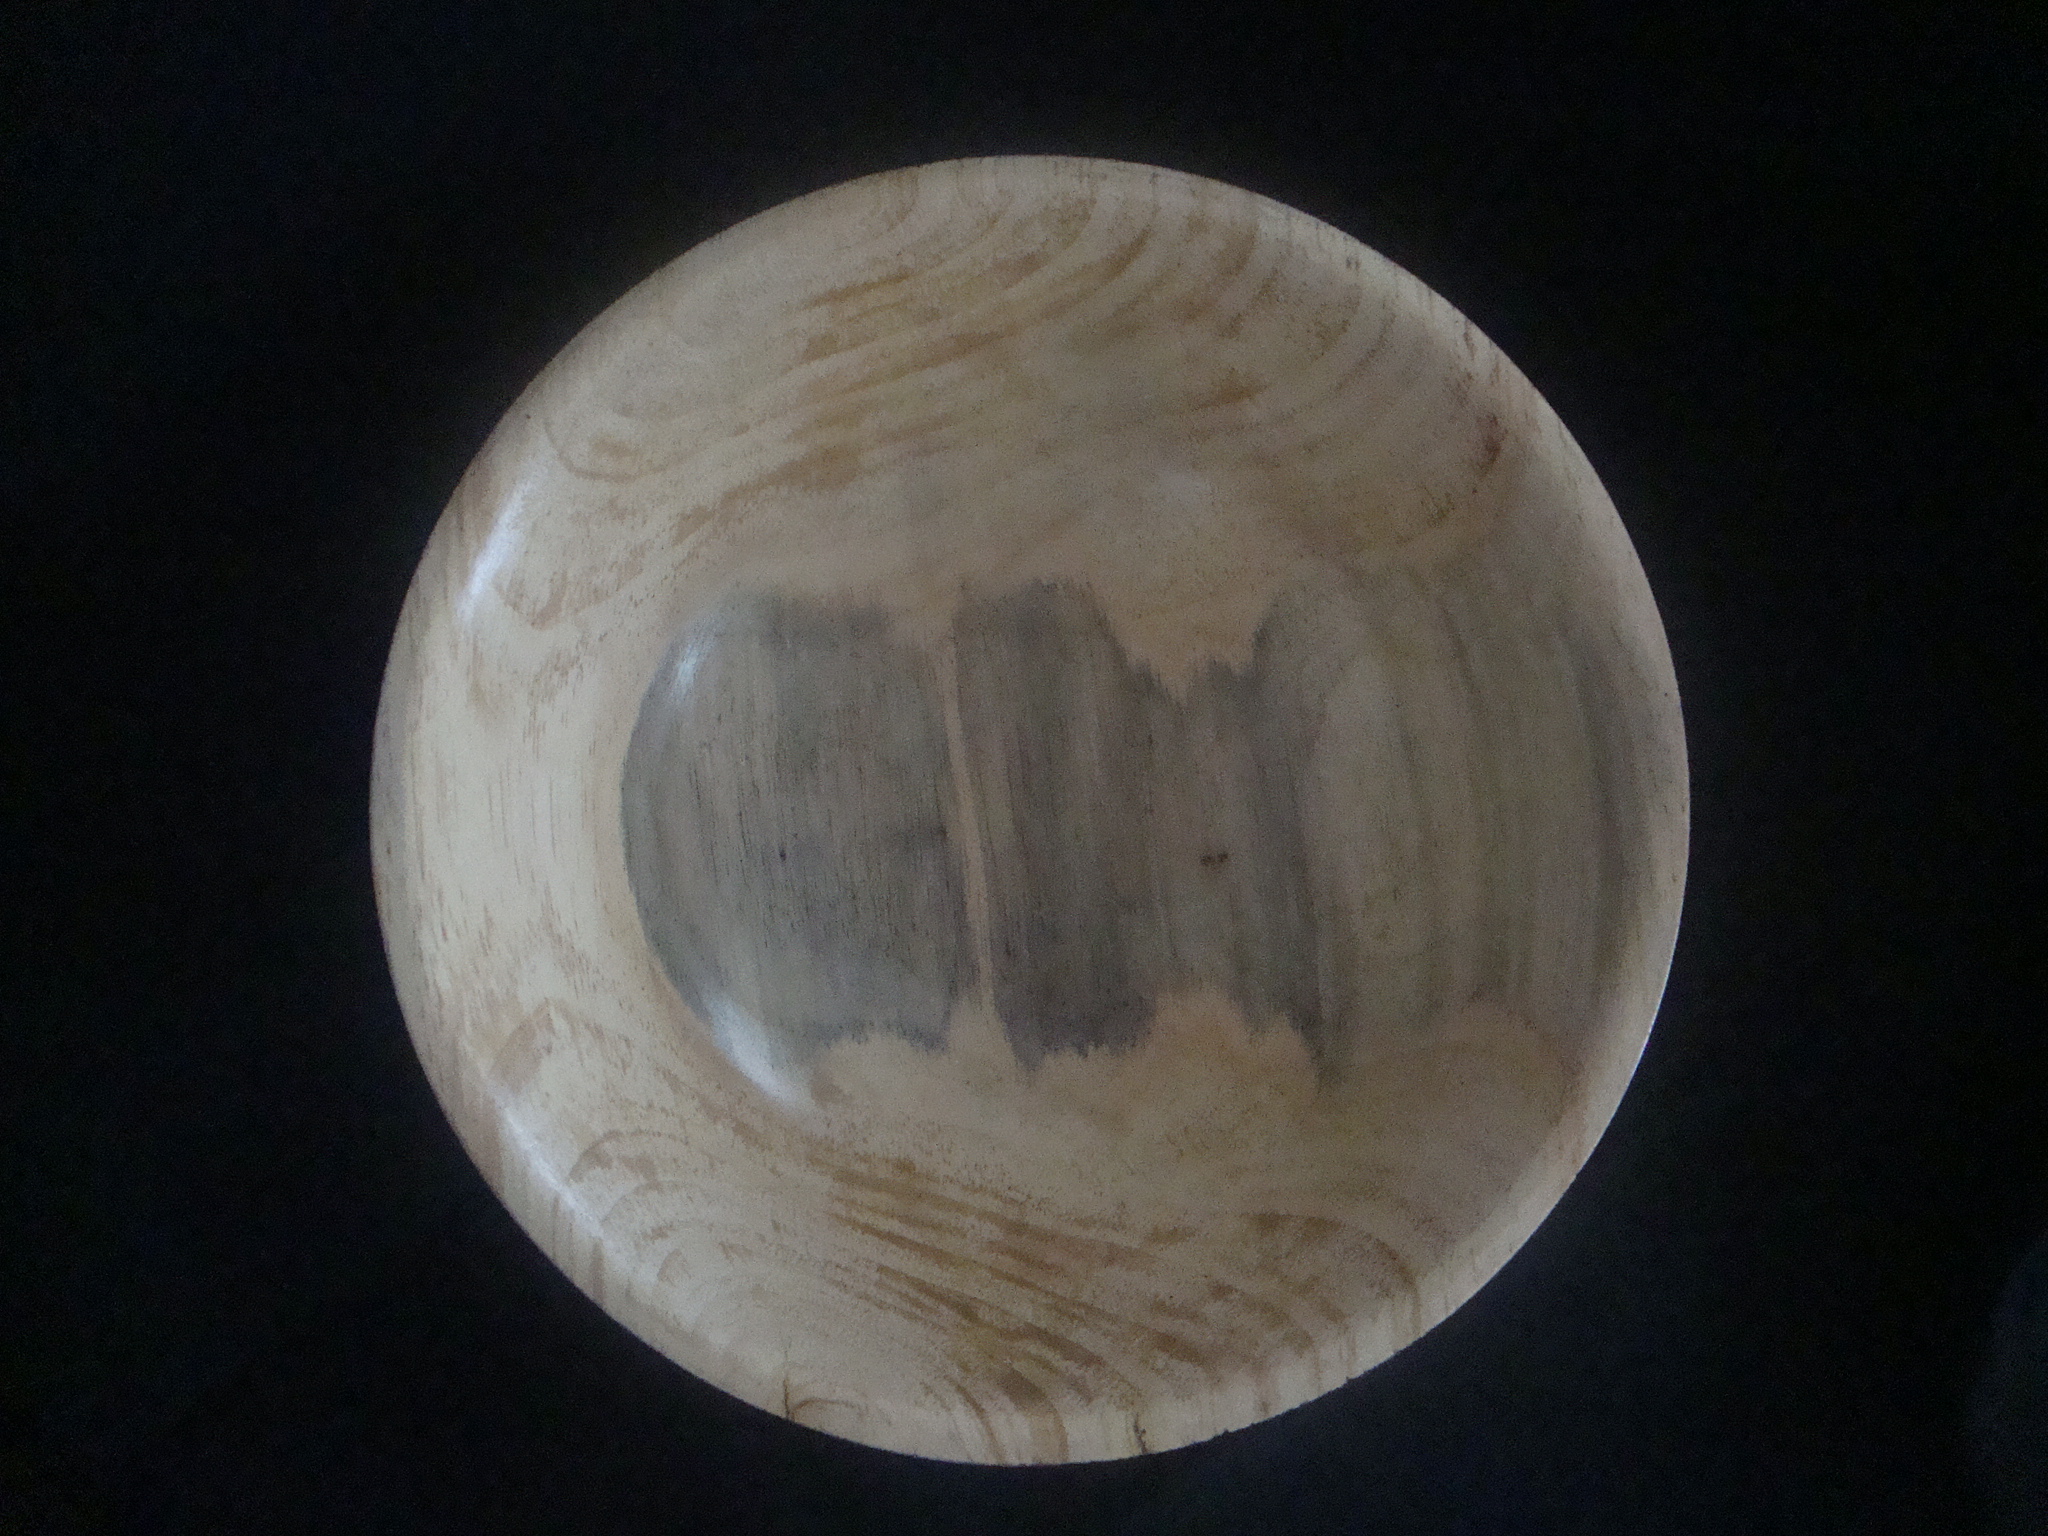
I really hate turning pine! It’s right up there with using public port-a-potties in August, dealing with car salesmen on a trade in, and every single interaction I’ve ever had with the family court system. Yeah, things may turn out OK in the end, but the process you have to go through is absolute misery. If pine is kiln dried, the heat will dry up the pine and it’s not too bad to work with . For woodturning, the wood is air dried so it’s not as hard, which means that the resin in the pine is still fairly fluid. “fairly fluid” = sticky mess! It sticks to your tools, it gums up your hands, cakes sandpaper almost instantly, and leaves a huge mess on the lathe to clean up. Yeah, it makes the shop smell like someone just committed a homicide on a Christmas tree, but the wood itself is horrible to work with. The end grain is prone to tearing, so you have to constantly sharpen the tools, take really small cuts, and keep the lathe spinning at a very fast speed. Usually, once you finish a project, the grain pattern is really, really bland! I’m convinced this is why it’s used for construction lumber, so it can be covered up and never seen again by anyone.
My former boss gave me some big chunks of pine as a bonus to some walnut he had to get rid of. Here’s a picture of what it started out looking like. All that greasy looking white stuff is the pine resin that seeped out when I split the wood, then dried.
ICK!!!
After a full afternoon of swearing, I managed to turn a bowl out of this stuff that really wasn’t that bad in terms of size and shape. The pine had discolored for some reason, so it was less bland than I had expected, especially on the inside of the bowl. Still, there were some rough spots on the outside of the bowl where the wood grain just refused to cooperate with the gouge, so I needed to do something to hide what I couldn’t correct. I decided to fill all of the tear outs with CA glue and sawdust, then sand it down to be smooth. Then, I painted the whole outside black to cover the patch job and applied the “cosmic cloud” colors. All things considered, this one turned out pretty good! I’m still getting the hang of the coloring process, but I think I’ve finally found something that makes the painful process of turning pine worth it.
Top view: From this angle, there’s not a whole lot to look at, other than the discoloration at the bottom from where the heartwood was nearing the sapwood.Side view, showing the color and finish that I was able to get. Really, REALLY, like this one!!!
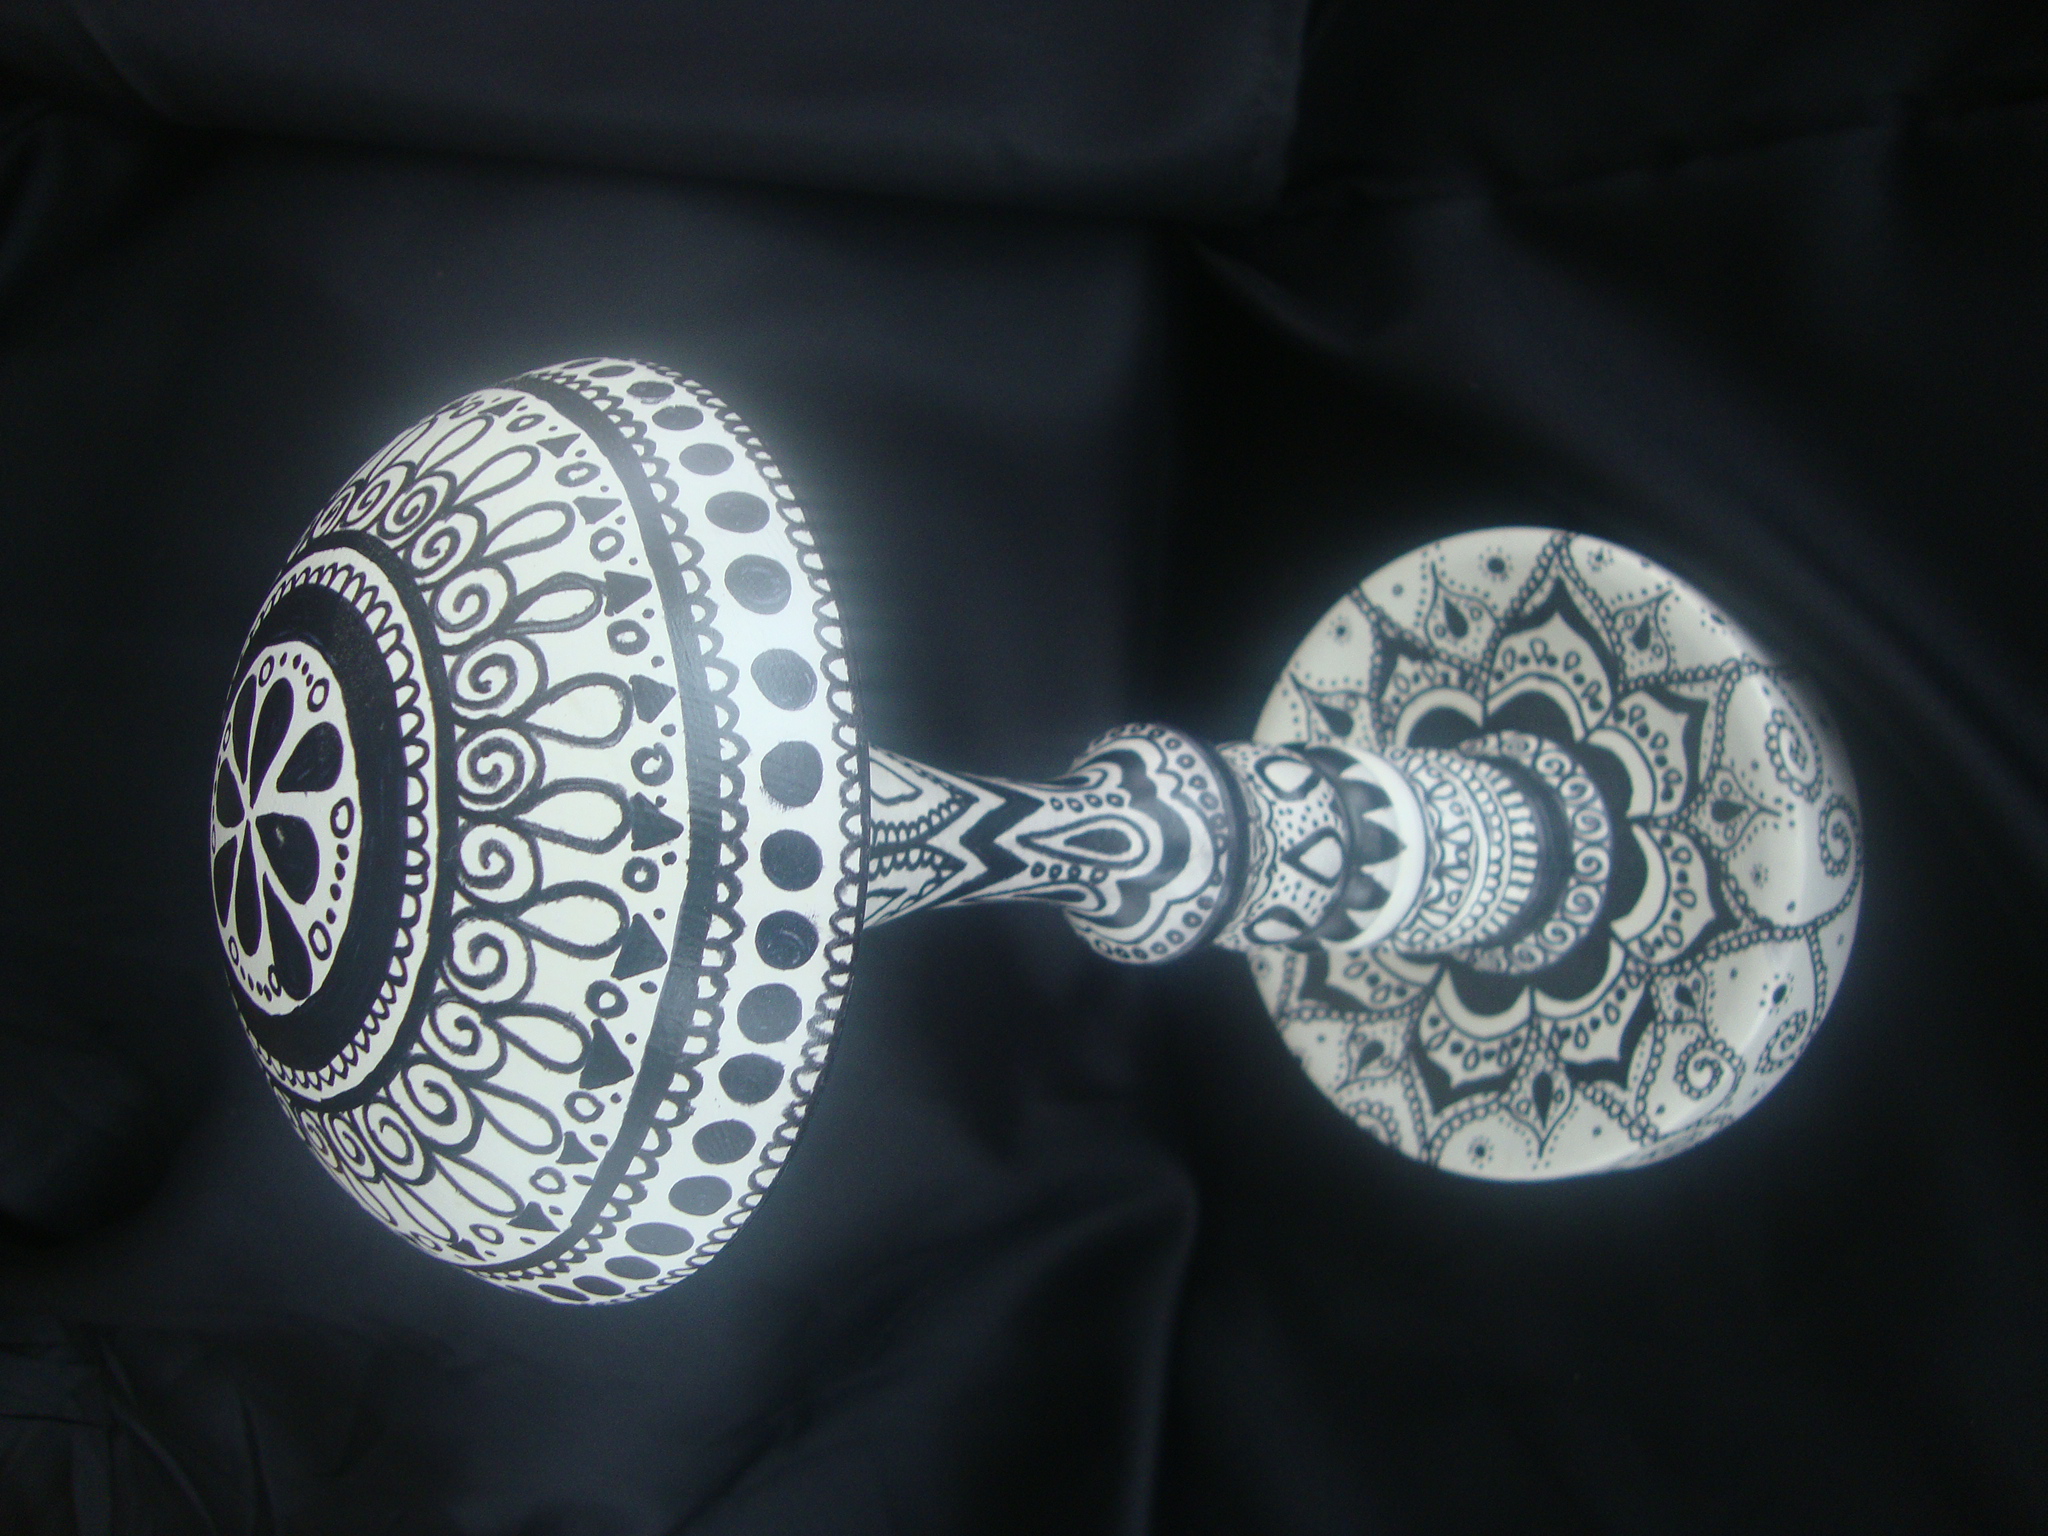
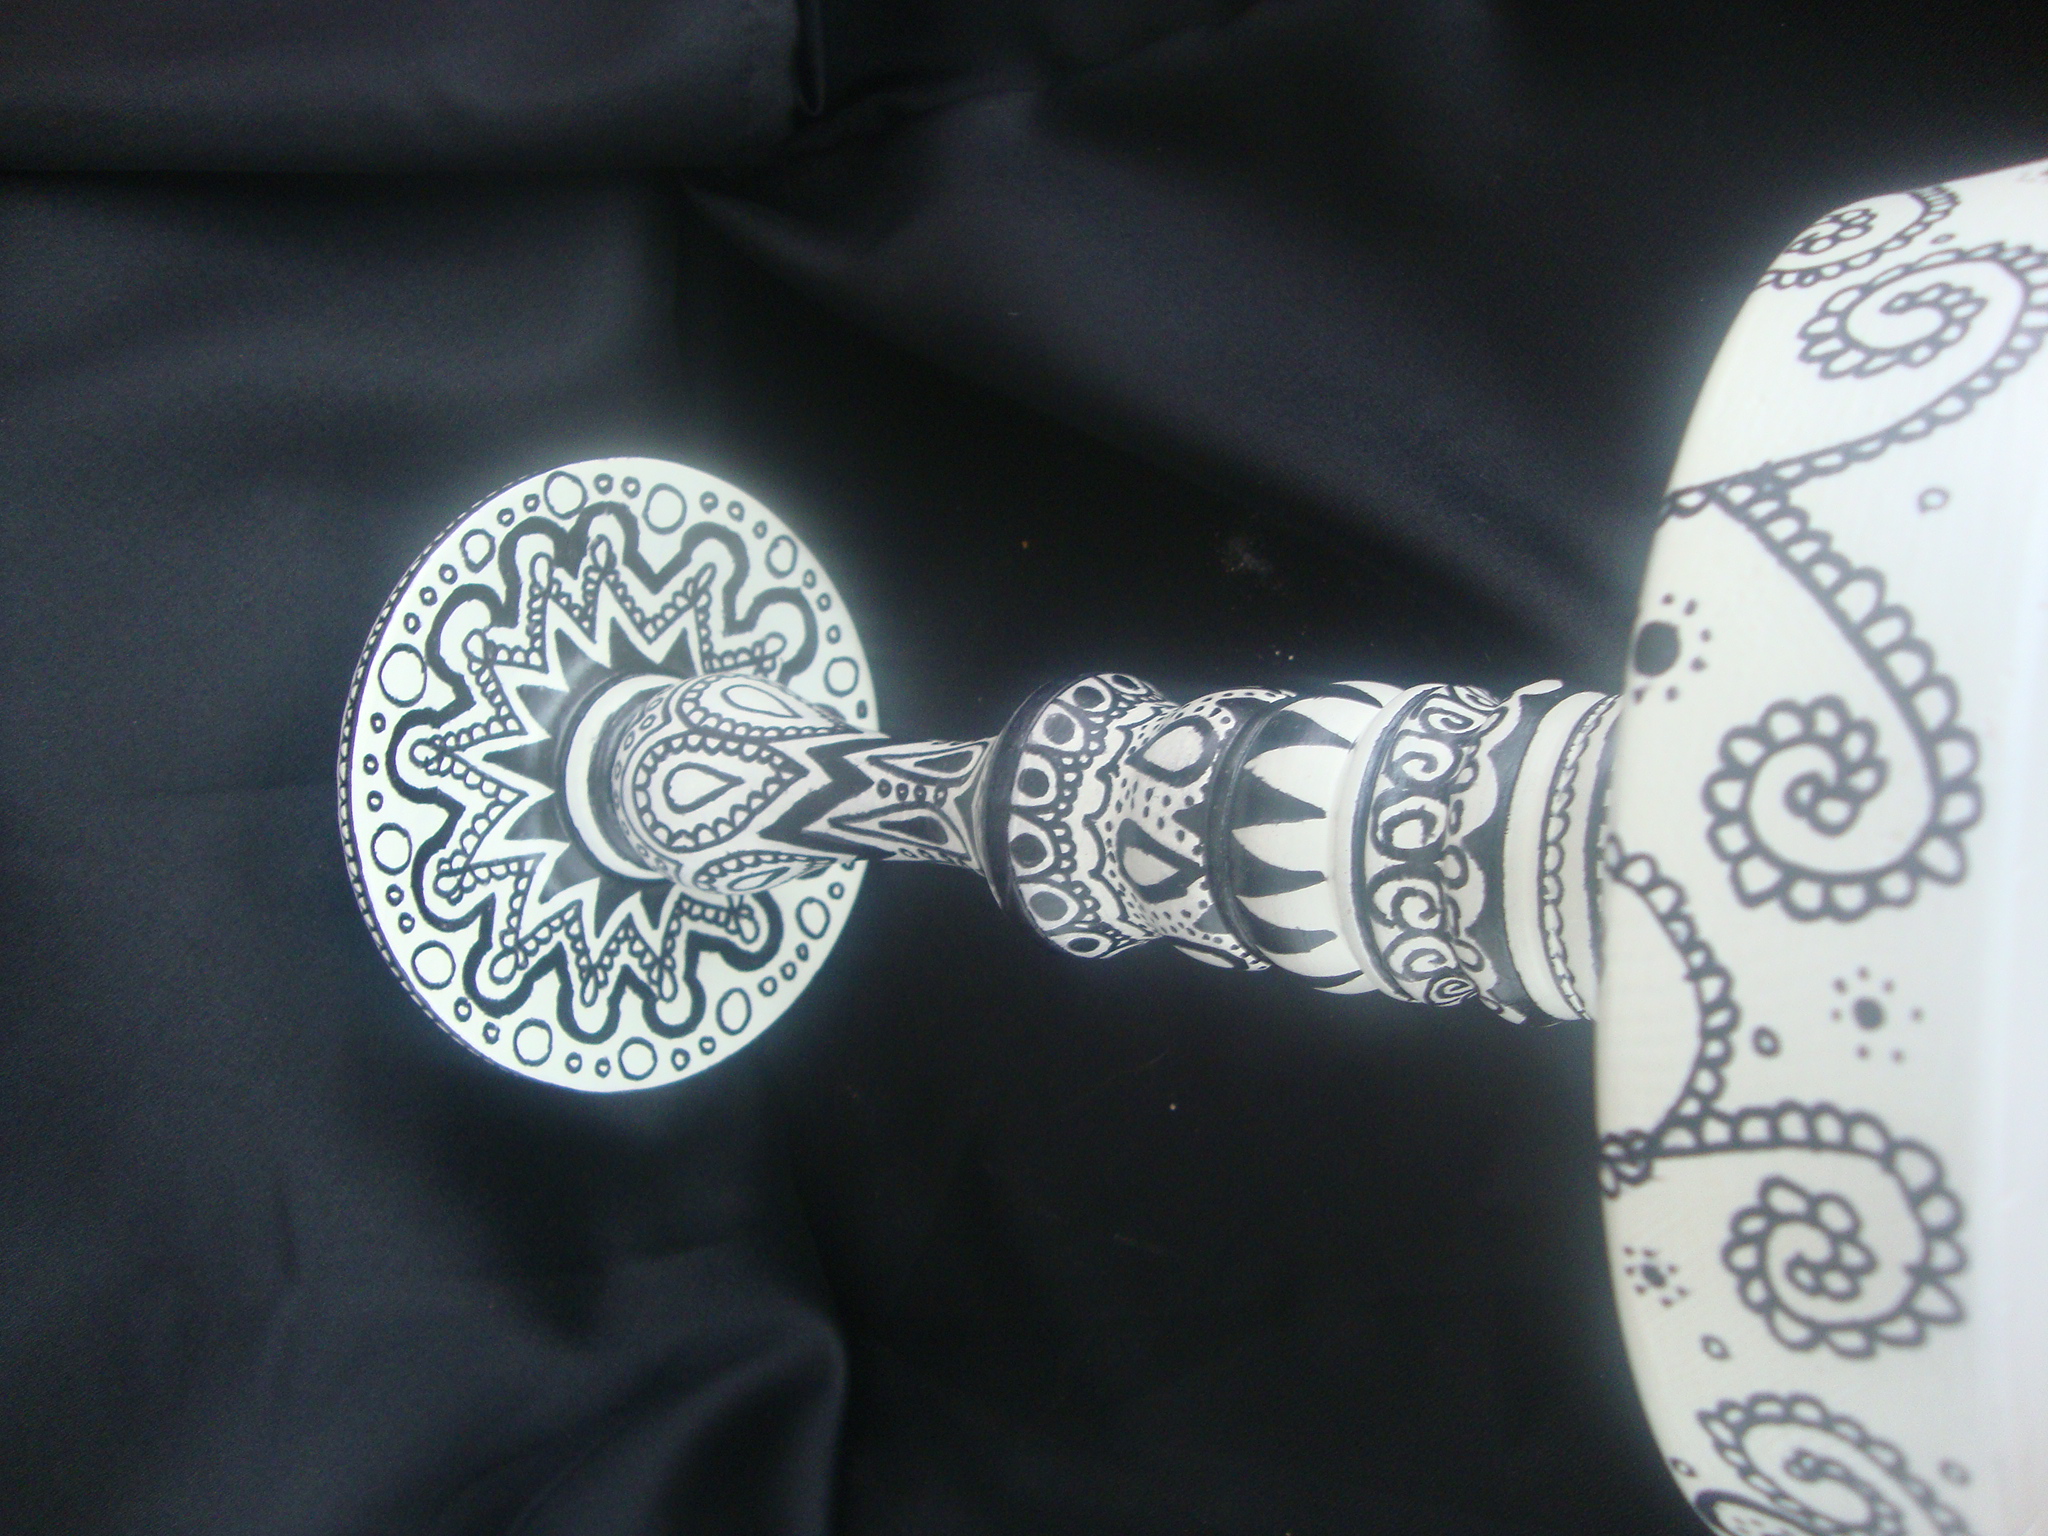
The woodturning club that I belong to has an ongoing charitable effort going on to make wig stands that can be given to cancer patients. I’ve posted a couple of posts showing ones that I’ve made already, but don’t intend to post every single one. That would get as boring to look at as it will become making them over and over and over… This one is different. I turned a wig stand out of douglas fir, which I had never used before. When it was done, it looked ok, but there really wasn’t anything about the wood that was worth looking at. Straight grain, no inclusions, nothing. One step above looking at a 2×4. The only thing I could think of to make it look less boring was paint. Lots and lots of paint!
I remembered my daughter Megan and her history (compulsion?) of doodling on herself. Since junior high school, if she has a ball point pen, some time, and a sense of boredom, she’ll start coloring. Usually up her arm, across her hand, or if she had a pair of jeans on that looked like they needed embellishment, across her pants. We would always yell at her and tell her to stop, but I have to admit that some of the stuff she came up with was pretty cool looking! Kinda looked like Indian henna designs, but with a different flare.
I asked her if she’d like to do one of her doodles on a wig stand and she agreed. Below is the final product that she came up with. WOW! Megan did a FANTASTIC job!
I’m sure the person who gets it will appreciate the artwork. What was even cooler to me, was that my daughter and I collaborated on making something that actually turned out very nice! Hopefully, this is the first of many to come…
Imagine coming home from work and finding your daughter spent all of study hall making her arm look eerily similar to this! Looks fantastic on a wig stand, not so much on an arm…She even did under the top.
When my oldest daughter had her baby shower, she needed a bowl to hold envelopes. The theme of her shower was “Chevrons” so I made a bowl with a segmented chevron pattern around the rim. Since we already knew she was having a boy, I carved his name in the bottom of the bowl and inlaid it with ebonized walnut. Then, on the bottom next to where I signed it, I wood burned a greeting for him. My intention was to make something nice for the shower that my daughter would appreciate. When my second daughter had her baby, she asked me in the hospital when Kenlee would be getting her bowl. That’s how it started! Now that my third daughter has had a grandchild, I need to get a bowl made for her.
I decided to make a segmented bowl, out of Brazilian Mesquite with the feature ring of Purple Heart and maple. To try to add some thing different, I decided to use a different number of segments and every other ring, that way it didn’t look like a brick wall pattern. Apparently, I should’ve paid better attention in geometry class in high school, because as I changed the number of segments with each ring, the ending shape when I stacked them all altogether just looked wrong! To fix it, I went to 12 segments per ring and set the eight segment rings aside. I also had some 12 segment rings that were the wrong side, so I sat them aside as well. By the time I got done gluing up all the outcast rings, I ended up with enough material to make three bowls. This is the first one I finished. I really like the way it turned out!
Now the dilemma, do I give Olivia all of the bowls since two of them will be a matching set, or do I give her this one and save the two outcast bowls for me. If I give her more than one, I’m sure I’ll have to take a second for the other two grandchildren – and any future grandchildren – to realize they need a matching set as well. If I keep it for myself, well… That doesn’t seem very grandfatherly.
From the side, it almost looks like different pieces of wood.From this angle, the variance in the coloration of the wood is apparent.