Somewhere along the line, I picked up a piece of catalpa that had some burl and a “damaged” spot in it. In all honesty, I don’t remember where I got it (most likely someone gave it to me) but I do remember cutting the piece of wood in half and thinking I could make two bowls out of it. I also remember mixing and pouring the resin into each of the two blanks. One of the blanks, I remember starting to turn and the other I took to a friend’s house to turn, but then we made other projects and it sat. Covid hit, and it was left untouched for over a year.
As I was moving some things around in the shop, I found the first of the two bowls stashed in a box. What was odd, was it was completely turned, had been fully sanded, but it still had the tenon on, which is the last step in finishing a bowl. Weird! I kept looking at the bowl, trying to remember why I hadn’t taken that last step, but kept coming up blank. Was I going to burn something on it? No, that would conflict with the epoxy. Was there a spot that needed “fixed” before removing the tenon? No, I looked it all over and everything looked fine. I sat it on a table next to my lathe, so every time I went to turn, I had to looks at it. I figured it would either jolt my mind back to the initial reason, or it would force me to make a different decision on how to proceed.
After having this bowl taunt me for about 6 months, I finally gave up on whatever my initial thought may have been and decided to forget the past and start over. I decided that it was too thick, so I put it on the lathe, reduced all surfaces by at least half, sanded everything again, and took off the tenon before I could talk myself into doing anything more with it.
All things considered, this is a pretty nice bowl! Catalpa is a very soft wood and this blank was completely dry, so this thing weighs next to nothing. There was also VERY little distortion since the first turning was done, so doing the finishing work was really, really easy.
Here’s the finished product. Now to start work on the other piece of that blank. It’ll be coming, soon…
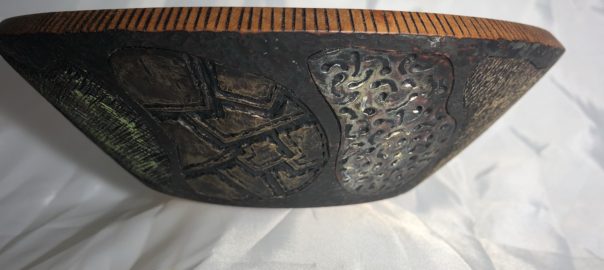
Top view, showing the damaged chunk that was filled with resin.
Some time in the earlier part of the pandemic, I was talking to my daughter, who told me her husband’s sister had a tree in their front yard that was damaged in a storm and needed to come down. To a woodturner, that’s like telling a crack addict there’s a new dealer in town and they’re giving away free samples. I sent her a note and made “the standard offer”. For those who haven’t been around me, the standard deal is if you give me a tree trunk you’re taking down, I’ll make you a piece out of it, but keep the rest. Seems like a good deal and everyone seems to win.
After seeing a picture of the tree, I also offered to cut the remaining pieces down for them, so on a hot summer day, my son and I went over to start the process. The good news is it took less than an hour to have the tree on the ground, the parts I didn’t want on the curb and the parts I did want in the back of the car.
I’m not sure what kind of tree it is, but it’s a softer wood like a linden or some kind of ornamental tree. That means that two things are likely to happen. First, it means that the wood is going to be incredibly wet and as it dries, it’s going to move a LOT. Sometimes, it moves so much as it’s drying it can’t be turned round again. Second, whenever wood moves that much while drying, there is a huge chance the bowl will split itself in half.
I was able to rough out two bowls from the wood I swiped, but when they were dry enough to finish turn, I realized I’d BOTH of the problems on the both of the blanks.
The blank on the left is actually so oval shaped at this point, I don’t believe it’s possible to make anything round out of it. It will become firewood. The blank on the right has some fairly severe cracking going on (which prevented it from going oval, too) and although the picture here doesn’t show it, there’s a huge chunk out of the side.
I decided to start on the blank to the right, so the first thing to do was fix the cracks and the missing chunk on the outside. For the missing chunk, I chose a blue iridescent mica powder and used casting resin. For the cracks, using resin wasn’t practical, so I used Gorilla Glue’s two part epoxy, also with the blue iridescent powder.
One quick turn later and it was ready for sanding. This is where the third issue with turning softwood comes in. If the tree had been damaged in the past, the likelihood of the wood having some kind of structural change is also very high. In this case, the wood closest to the damage had started to turn a darker color, but it hadn’t yet started to rot. While notaenough to make me back out of the project, it did require about twice the amount of sanding to get the end grain to lay down correctly. Three hours of sanding and 4 coats of polyurethane later, and it’s finished.
Kinda like this one! The blue really seems to “pop” and the size (~10″ across) is a nice size. Hope she likes it!
For my birthday this year, I treated myself to a 5 day, 100% online, woodturning symposium. It was put on by a group called Woodturners Worldwide and it was awesome! There were live demonstrations, delivered via a Zoom-like application, prerecorded demos followed by live Q&A from the presenters over the Zoom-like interface, self led small group discussions, something close to speed dating where members could talk to each other (at random) for small amounts of time, and one whole day of short, prerecorded demonstrations. As far as birthday presents you give yourself, this was right up there with the best!
One of the prerecorded demos was only 6 minutes long. It was a guy named Richard Kennedy, who took a bowl, carved a tree into the side of it, leaving it to sit on it’s side and become something MUCH prettier than just a common bowl. This is the piece that he made in the demo:
Somewhere in the 6 minute video, he mentioned that there was a LOT of repetition that he skipped. I also remember him saying something about having to carve both the front and the back, even though he only showed steps to make the back and there was a blurb dropped almost like an afterthought about specific bits that he used for the different parts.
I figured I’d give it a try and made a quick cherry bowl that looked like it was roughly the same size and shape as they one he had. I figured all that “stuff” he cut out of the video couldn’t be much time, because the bowl was pretty small.
Five hours into the project, as my hand was cramping from all the power carving I’d been doing on the outside of the bowl, and I started to think some really nasty things about Mr. Kennedy! When I took a break to let my hand return to functioning status, I looked the piece over and realized that carving the inside of the bowl was going to be at least twice as difficult, because the curvature of the bowl made it nearly impossible to get the carving tool to the wood at an angle that would work. I stopped thinking about Mr. Kennedy and openly cursed him. Repeatedly! I should have thrown the bowl into the fire pit right there and then, but I already had too many hours into the piece to quit. I decided to put everything away for the day and open a cold beer. Strictly a medicinal move, since the cold would be good for my hand. After day 1, it looked like this, at least on the outside.
The next day, I started in again, once the sun had come up and and I was sure the neighbors wouldn’t complain about something sounding like a dental drill coming from next door. This time, though, I made sure to listen to a podcast that had hour long episodes to keep my mind from straying past my hatred of Mr. Kennedy and going straight to his parents who had spawned this devil. It worked, but 6 hours later my son came to see if I was ok and to see what his options were for lunch. I was more than ok, I was done!
Since I realized that my offering was going to be a “practice piece” at best, I decided to see if I could salvage it by adding color. Seemed like a good idea at the time, but in hindsight, it was a huge mistake. I used india inks, thinking they would soak into the newly carved, open grain, filling in all the inside edges of the piercings. Well, they don’t, and getting the insides of all those little tiny holes colored so they don’t stand out took a lot more time than I thought. I used multiple shades of green to try to break it up, but I’m not sure that was effective and the overall look really wasn’t any batter than had I just left it alone. The colors were WAY too bright for what I was going for and gave it an almost cartoon look. I reasoned the colors would dull when I put a finish on, but then I started to wonder how to put a finish on a piece like this? By the time you got a can to spray inside all those little holes, there’d be globs of finish running all over the rest of the piece. Mr. Kennedy hadn’t covered that in the 6 minute video. My answer was to dip the entire piece in boiled lindseed oil, like we did with wood carvings back before I took up turning. Sure, it would add a week to the overall process to let the BLO fully cure, but at least there would be complete coverage.
As I looked over my finished piece, I had a series of realizations. I realized the reason Mr. Kennedy didn’t tell everyone how much actual time and effort it took to make one of these was because if he did, no one would ever start the project. I also realized that Mr. Kennedy is so skilled in how he does the power carving, that even in a 6 minute video, he was able to do the right things, in the right way, with the right tools and get the desired result the first time. Eventually, coupled with the level of pain in my hand decreasing, I realized that the work Richard had done really was something to aspire to and I was being unrealistic to think I could come anywhere near his final product on my first shot. Things don’t look easy because they are, things look easy because of the skill of the person doing it.
Here’s the result of my final effort. Not the worst thing to come out of the shop by far, but certainly not something that’s going to be a favorite piece.
One of the President’s Challenges I set for my woodturning club, was a collaboration piece that was worked on by two or more members of the club. While that may sound like a fairly straight forward challenge, there were actually some ulterior motives. Woodturning is usually a solitary activity, so something about sharing that creative space with another person who shares a similar interest felt like it could be really fun. I was also hoping it would enable people to try to make something that wasn’t what they usually did. I figured if it turned out bad, they could all point to the other guy as the reason and no one would have any hurt feelings. The main reason, though, was to try to “force” more interaction between club members. The vast majority of the members are creatures of habit. They make the same things they’ve always made, they talk with the same people they’ve always talked to, and they are incredibly comfortable with the status quo. I suspect the pandemic has put a major crimp on my plans, but we can’t stay locked down forever!
For my entry, Two friends of mine from the club, Bob and Jeff, agreed to make something with me. The idea was to make little bird houses that sat on top of a finial. We decided to use standard 2×2 pine lumber from the big box stores, since it would be cheap and all of our pieces would match in terms of overall thickness. Then, each of us would make two pieces for a total of 6, with each of those 6 pieces being two inches shorter than the one next to it. The goal was to make something that looked kinda like the baseball world series trophy, only much cuter.
If I’m being honest, my first effort was definitely in the “playing it safe” range. I went with a very simple, straightforward shape, and figured I could add a little color if it needed it. When I was done dying the roof and the house, well, things started happening. I painted the stem white, just to offset the bright colors from the house and roof. Then the white looked too plain, so I decided to put some vines climbing up the stem. Then the vines looked kinda plain, so I decided to paint some flowers, which also looked plain. As I was looking at the different colors of paint, I found some “puff paint”, so I switched to that so the flowers would stick out and add some texture. The black in the middle, also puff paint, ended up making a hard, sharp, point, so it’s almost like the flowers have thorns.
If we’re still being honest, my second effort is a little over the top. My initial thought was to make the birdhouse be in the shape of a hot air balloon, but I scrapped that, because I didn’t want to make one that was completely different than the others. I decided to go with the hot air balloon idea, but have it be tethered to the top of the birdhouse. It took a bit to figure out how to get it to to look like it was floating, but thanks to Bob’s input, I ended up using a stiff piece of wire with a blue corded string glued around it, with really thin copper wire to make the basket harness. By the time I got finished with the bright dyes and the woodburning, this looked surprisingly like what I had in my head when I started out.
With my pieces done, it was time to assemble all 6 and see what we came up with, at least that was the plan. COVID, however, had different ideas. These all sat in their respective houses while we waited and waited and waited for a time where we could get back together and assemble the final piece. Eventually, we were able to reunite the 2×2 we had cut into pieces and I have to say I was quite pleased with the final result. Now the only thing left to do it figure out which member of the collaboration gets to claim ownership of the piece.
Sometimes, things just happen. You don’t really plan them to, you don’t really even know it’s happening, but one thing just leads to another until you’re done.
That was the case with this one. It started as a small mulberry bowl blank that came from a tree I took down at my daughter’s house. As I was cleaning out old projects, I found the chunk of wood and since it was dry, I started spinning it. What came out when I turned the lathe off, was a small, mulberry bowl. While the grain was centered very well, there’s still only so much “excitement” that comes from mulberry. As I was looking at it, I thought “this needs some help”. I took it off the lathe and set it on the workbench. It sat there for at least a week, waiting some kind of inspiration to strike.
There’s a podcast I listen to that just got sponsored by Sabertooth burrs. As I was listening to the impromptu commercial the hosts were doing, I looked at the bowl and though “I otta carve something”. had a vague idea of making ridges and valleys, thinking it would eventually become something work looking at. Just in case you’re planning on playing along at home, it’s always a good idea to KNOW what you’re going to carve, before you pick up the tool and start carving. For this project, I got about a 5″ section done and realized that mulberry isn’t that good of wood to use for carving. Not to get all wood nerd, but the growth rings are a LOT softer than the surrounding wood, so the surface gets real uneven, real quick. I decided it was a practice piece that would end up in the burn pile, so I kept going.
After about half the bowl was done, I decided that was enough fun, that this was enough of a learning lesson, and I was done. Here’s what it looked like when I called a truce. I posted a picture on my club’s Facebook group and people said it either looked like the bowl’s brains or intestines were showing.
The inconsistency of the difference in wood hardness could really be seen.
After a week or so, I decided that I had nothing to lose, so I turned on the wood burner and decided to play around with adding some textures. This was actually kind of fun and the heat not only put in the textures, it also evened out the peaks and valleys. When it was done, to get the color of the burned part of the world to be consistent, I dyed all the burnt part black with India ink.
After sitting it aside for more time, I finally decided that the color of the mulberry was too yellow, so I added Danish Oil to all the non-burnt portion. That dropped the color to a much warmer brown. After it dried, seeing nothing to lose, I decided to practice with the colored gilder’s paste, picking a unique color for each texture.
This is the final outcome. Not too bad for something that was destined to be pitched!
From the top, this looks like a normal bowl, with the grain matched pretty well.From the side, the gilder’s paste really brought out the different textures.
Not sure what the fate of this one will be. It’s currently sitting on a counter so I can see it when I walk by. I figure in a week or so, I’ll know if it’s staying or going!
Awhile back, I wrote about picking up some cherry logs off of the curb, then anonymously leaving a bowl from the wood on the porch of the owner. As I was shuffling things around in the shop, I found another one of the bowl blanks that I had roughed out from that wood. I remembered roughing it out, mostly because of how wet the wood was and how much of it just didn’t look right when I got done. I remember lying to myself at the time that the uncharacteristically dark part was just water and it would look OK when it dried. Well, it was dry, but it wasn’t OK.
The reason half of the bowl blank was so dark and so wet when it was roughed is because the wood was starting to rot. The dark part wasn’t quite to the point where the wood turns to a crumbly paper like consistence, but it was really, really close. Some kind of bug or rot had moved in so as the wood dried and hardened (to some degree) it left a lot of holes behind. I thought I could “turn past” the bad spot, but as the bowl got deeper, the damage got worse. When I was done, I was left with a bowl with damage on at least half of it.
I should have just thrown it away, but I’m afflicted by some disease or mental illness that makes me think I can fix it, whatever “it” is. Because it was already in it’s (near) final shape, using liquid epoxy wasn’t a cost effective option. I decided to try using epoxy putty to fill the holes, thinking I could squish it into the damaged parts well enough to stick in the holes. THAT part, went pretty smoothly. When I got done, about half of the bowl had lumps of red epoxy putty on it, but it looked like it would be a really straightforward fix.
The turning part was where things went wrong. I knew at the start, it would take a little while, because I’d have to “sneak up” on the wood by taking very light cuts to take off just the highest part of the putty and gradually work by way down to the wood. As I got closer and closer, something started to feel weird. Instead of the epoxy putty coming off the tool in long, messy ribbons of what is essentially plastic, I could feel sharp chips hitting my hand. I stopped the lathe to look and quickly realized that I had a problem. The epoxy putty was stronger than the wood it was adhered to, so as the tool started cutting, it would gradually lessen the structural integrity of the surrounding wood to the point where chunks would break off, leaving a new hole in the wood.
Had I stopped, added more putty, let it cure, and tried again, I would have had the same problem until there was no bowl left to turn. After some time thinking, I decided to put away the turning tools, and smooth out the rest of the bowl with sand paper. That worked quite well! The end result was the holes that were still filled had been smoothed out, which was good. The bad side is the good wood that didn’t get a portion of it sanded away is slightly thicker than the rest, which can’t really be seen, but can be felt.
At the end of the day, I decided to put some finish on it and set it aside for awhile, so I can look at it. If it doesn’t get better looking over time, it’ll end up being what holds the tinder at the bottom of the next fire I start.
The wig stand from the second video was also a plain piece of poplar. As I was turning the spindle for this one, I was thinking about the last wood burning project I’d just completed, and wanted to do more. One of the demos that I’d seen showed a guy who had made his own tips for the soldering gun style out of extra brass tips. I took one, hollowed it out so it made a half dome, and waded into the next project. I wanted to burn a whole bunch of individual flowers, using this new tip to make the center of the flowers, but I wanted them to look like they were stacked, some on top of the other, and some standing alone. After the first three hours, I started to think that I’d chosen a MUCH too ambitious project. At the 5 hour mark, I was pretty sure the feeling that my fingers were on fire was going to be permanent. After a total of about 10 hours of burning, I had accomplished what I’d set out to do and was feeling pretty proud of myself. Here’s what it looked like after the burning was done.
The coloring process went much, much smoother! Using three different india inks, I tried to “stack” the colors so it looked kinda like each layer of flowers that had dropped were from a different plant. Overall, I really, REALLY hope whoever gets this one can at least appreciate the amount of work it took to make this one.
I had a couple of cherry blanks that I’d put in the dessicant to dry, then forgot about them. As I was shuffling stuff around, I came across them and decided that there’s no time like the present to do the final turning. When I was finished, I was left with a basic cherry bowl, about 7″ across. It was pretty, but it was just your basic bowl. I decided that it would be a good canvas to practice some wood burning techniques to make texture. I wasn’t looking at making any “finished project, just looking at logging some practice hours. When I got done with the practice, this is what I was left with:
The texturing work was ok, but there was no overall design, so it just looked like a bunch of random stuff, thrown on the side of the bowl. I accepted it, since it was a practice piece bound for the fire, but the next morning, I decided to see if I could salvage it.
The first order of business was to get rid of the plain wood that was surrounding all the texture bubbles. That was done easily enough by using a shading bit on the wood burner, turned up about as high as it would go. About two hours later, it was done. That helped, since now the entire outside of the bowl was at least a consistent dark color.
Next, I remembered a demonstration I’d watched from a guy in France who was using gilder’s paste on top of wood burnt surfaces to accentuate the textures. I’d bought some to try to use as colored liming wax and figured at this point I had nothing to lose. This technique is basically dry brushing a TINY bit of this past over the very tops of the textured surface using your finger. When I got done, this was the final result. It ended up looking a LOT better than I’d ever expected it to! All things considered, it was a pretty productive time span spent in the shop! I learned a ton AND I got something that was good enough to escape the flames.
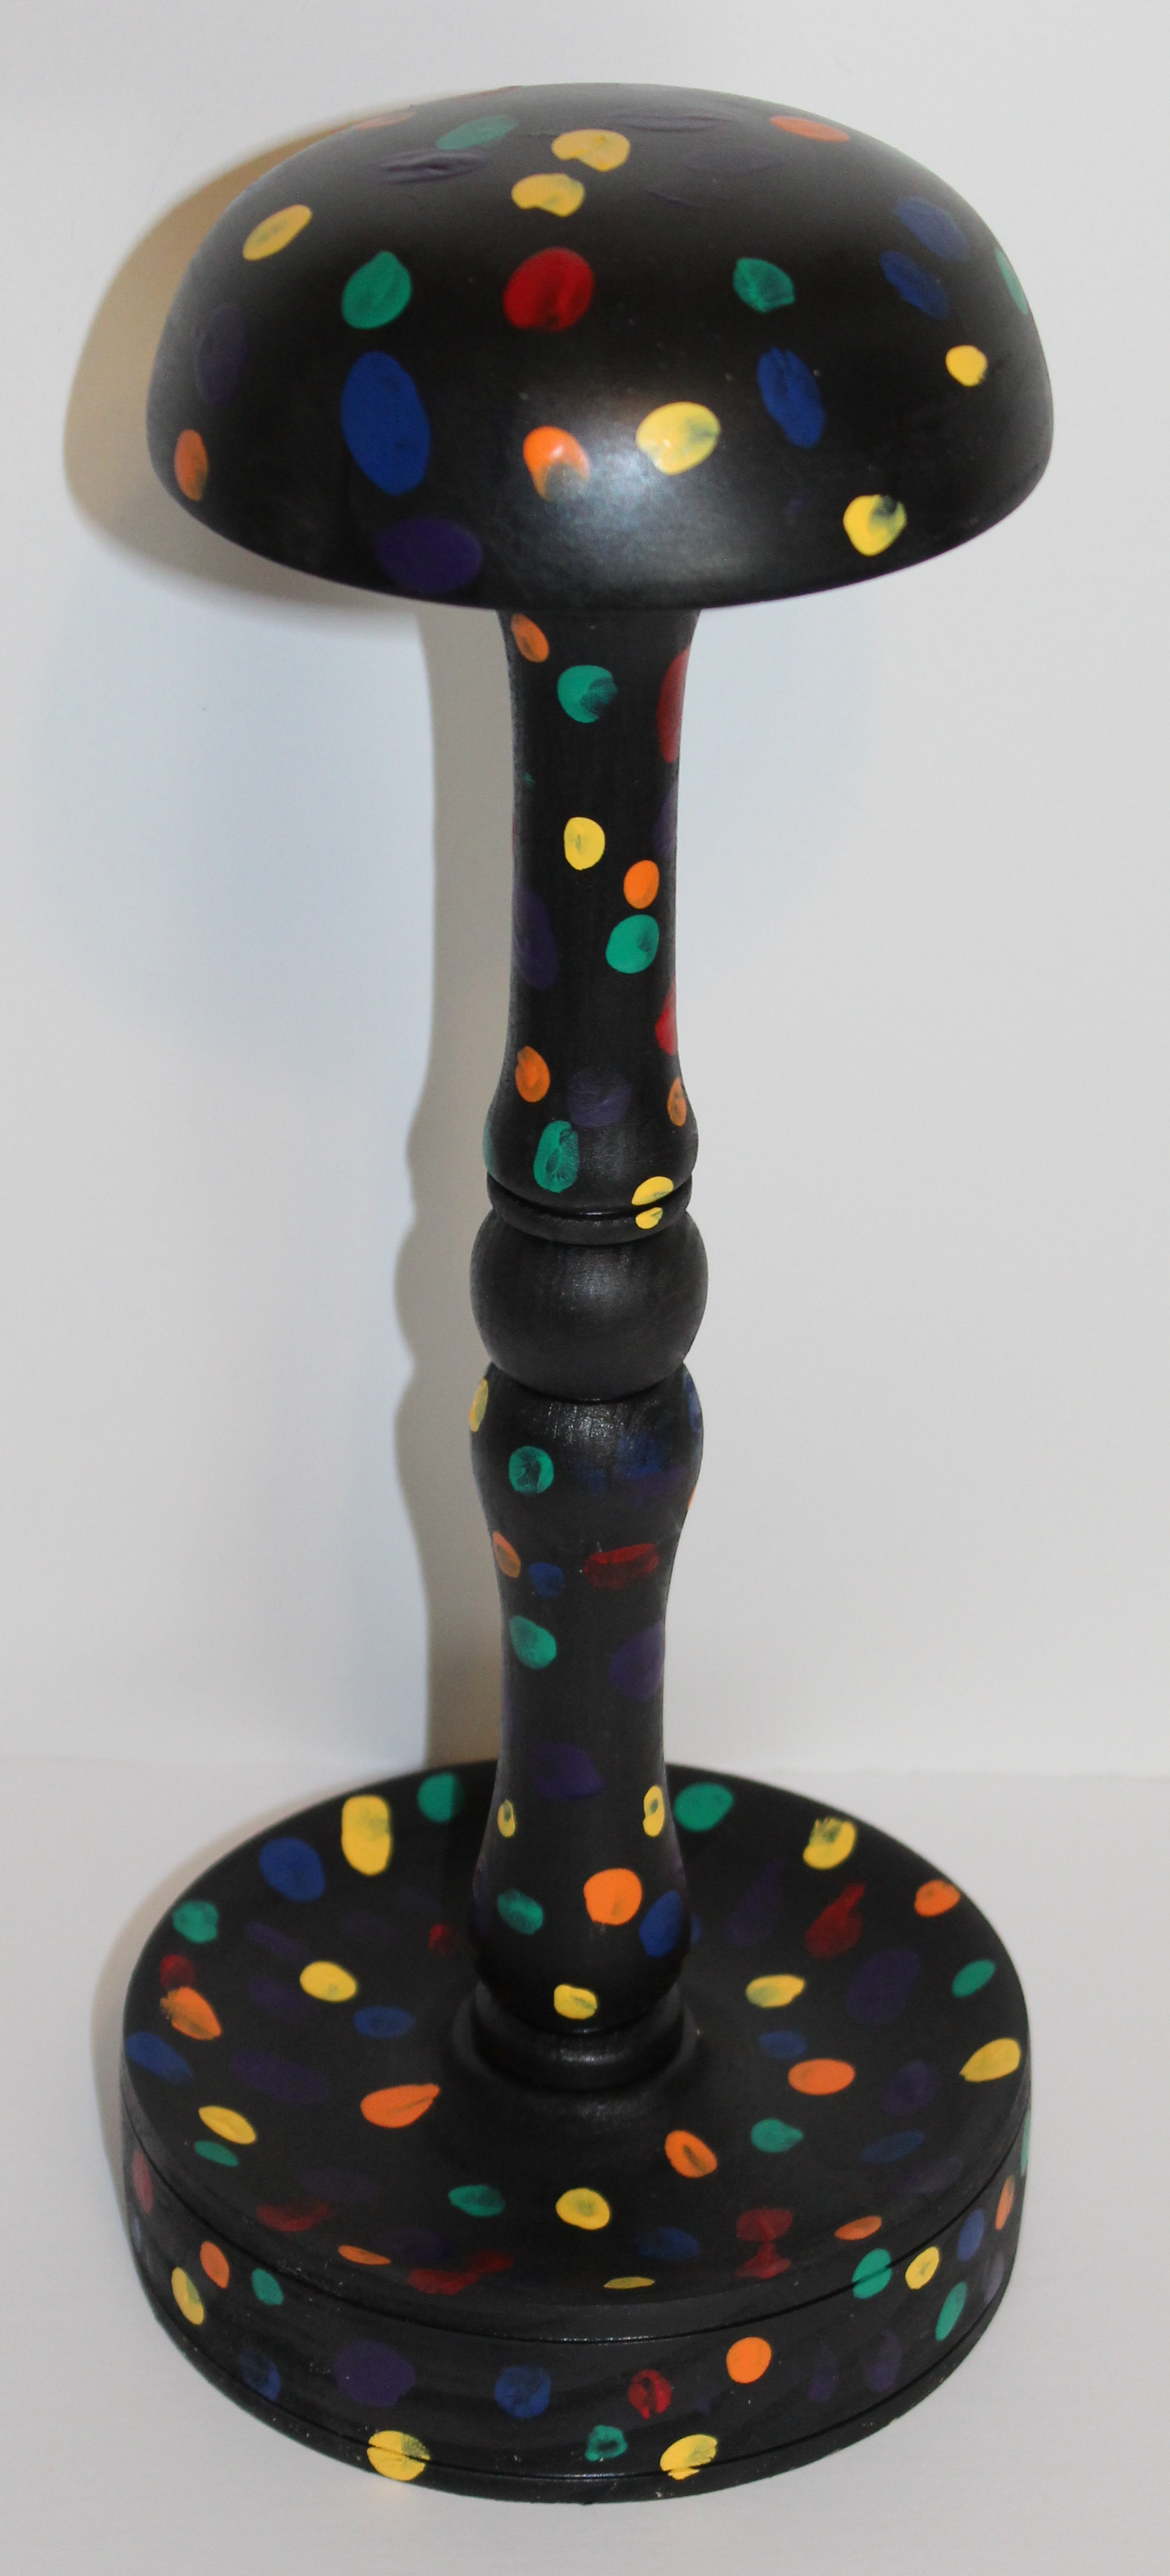
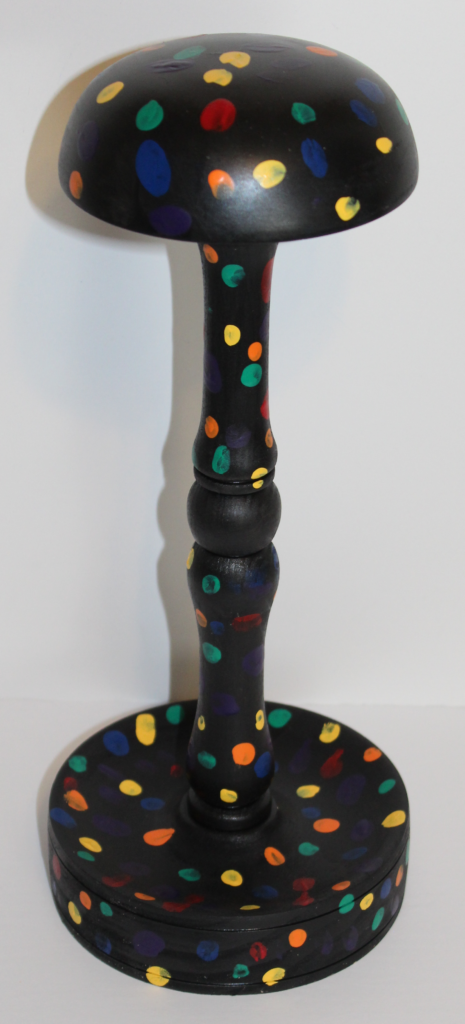
When I got done making the videos, I had three wig stands that were completely turned, but needed to be finished. For many, this means nothing more than applying a few coats of wipe on Poly, but the first two were very plain, bland, poplar. I’ve always thought that if someone going through cancer treatment needs a wig stand, the least we can do is make them something worth looking at. For the first one, I decided to use it as an “all day activity” with Papa, while I was babysitting one of my grand-daughters. She’s three, so her art skills are admittedly limited, but she actually followed instructions very well, took her time, and did an exceptional job!
The first was to paint the entire stand flat black. I worked with her to make sure there were no white spots left, then we sat it aside to dry. After nap, we got out a bunch of different colors, then I helped her leave muli-colored fingerprints all over it. When we were done, it turned out very well!
The women at Susan G. Komen assured me that this would be selected very quickly, especially since my grand daughter signed her name on the bottom as the “artist”, using typical three year old lettering. Absolutely the cutest thing ever!
At least 10 years ago, I saw a bowl that had been turned out of something called parallam. It had THE coolest patterns in the wood that I had ever seen. This included burls, crotch figures, and all of the exotics. I had never heard of it before, so I took to the internet to find out what this stuff was. It took awhile, because the stuff was relatively new. Turns out, this is a product used in construction beams. As I looked, it was pretty clear this was the next evolution in beams. First, beams were made by 2×12’s, sometimes nailed together. They were good, but they were replaced Glulam, which is really thick pieces of plywood, laminated together, that were stronger and less prone to warping. Parallam, was make like Glulam, but instead of using sheets of thin wood, it’s made with individual strands of wood, glued together under extreme pressure. According to the glossy brochure, these were especially good for projects that required heavy loads over long spans. Boring, I know, but I figured I could buy one of the beams and have a BUNCH of turning projects. I searched for dealers but there was literally no one even close to Blo/No carried them, and the few places I could find just said “call for price”.
Years went by and I forgot about this product. It wasn’t until about 4 years ago that I started a phase of making things out of high grade birch plywood that it seeped back into my consciousness. I looked again and found a place near Chicago, St. Louis, and Champaign that said they carried them and had prices listed. Two things became instantly clear: A) the stuff was priced by the foot, and B) I would have had to sell both kidney’s to buy a 10’x3″ beam.
On a whim, about a month ago, I went looking again and found a place just outside Arthur, Illinois, that claimed to sell them, along with trusses and traditional beams. I called them, left a message, and waited, but they never called back. At the same time, I was contacted via Facebook from a guy who was interested in joining our local turning club (Dan), who just happened to live outside of Arthur. Go figure! After messaging with Dan, he stopped by the business and worked a deal with them where they gave him two “cut offs” that were about 18″ long and 5″ thick. He gave them to me, in exchange for some lessons on using a bowl gouge and “dibs” on something made from them. DEAL!
It took me awhile to start, but this weekend I completed the first project. This stiff is HORRIBLE to turn! It doesn’t really cut, it just kind of splinters and disintegrates into sawdust. This must not be made with the highest quality wood, so there were gaps throughout the blanks that needed to be patched. I patched them with CA glue and sawdust, but that look didn’t match the rest of the blank, so I turned them away and just left the gaps and places where chunks of the blank had splintered off. Sanding was next to impossible, since there were “fuzzies” left next to each of the voids. Each grit had to be sanded in both forward and revers to get rid of them. Splintered parts had to be glued down to keep them from completely tearing out, dust collection was a must, and although it smelled kinda like pine, it was more like pine that had been soaked in some combination of old finish, glue, and wet dog hair.
Still, after looking at the final product, I’ll be continuing to work through the rest of the blanks. I’ve got several ideas on what could be done with this stuff, but in all honesty, even though the finished project looks really cool, I won’t be looking forward to it!
The finial/knob is a piece of walnut, died black, and the finish is Danish Oil.